
1. Introduction
This manual provides detailed instructions for the safe and proper installation, operation, and maintenance of your VideoSecu MF801b3 Heavy-Duty Tilting TV Wall Mount. Please read all instructions carefully before beginning installation to ensure correct assembly and to prevent potential injury or damage.
The VideoSecu MF801b3 is designed to securely mount televisions ranging from 40 to 90 inches, supporting weights up to 220 lbs. It features a 15-degree tilt capability and a rail design for horizontal TV adjustment.
2. Important Safety Information
WARNING: Failure to read and follow all instructions can result in personal injury, property damage, or voiding of warranty. If you do not understand these instructions or have doubts about the safety of the installation, please contact a qualified installer.
- Do not install this product on walls that are not structurally sound.
- Ensure the mounting surface can safely support the combined weight of the mount and the television.
- Always use the provided hardware. If any parts are missing or defective, contact VideoSecu for replacements.
- This product is intended for indoor use only.
- Do not exceed the maximum weight capacity of 220 lbs (100 kg).
- Do not exceed the maximum VESA compatibility of 800x400mm.
- Two people are recommended for installation to ensure safety.
3. Package Contents
Please verify that all components are present and undamaged before installation. If any parts are missing or damaged, do not proceed with installation and contact customer support.
- Wall Plate Assembly
- TV Bracket Arms (2)
- Standard Mounting Hardware Kit (screws, washers, spacers, anchors)
- Instruction Manual

Figure 3.1: Overview of the VideoSecu MF801b3 TV Wall Mount components. This image displays the main wall plate and the two vertical TV bracket arms, which are the primary structural elements of the mount.
4. Setup and Installation
Before installation, ensure you have the necessary tools (e.g., drill, stud finder, level, screwdriver) and that your TV's VESA pattern and weight are compatible with this mount.
4.1. VESA Compatibility and Weight Capacity
This mount supports VESA patterns from 200x200mm (8"x8") to 800x400mm (32"W x 16"H). The maximum weight capacity is 220 lbs (100 kg). Verify your TV's VESA pattern and weight before proceeding.

Figure 4.1: Dimensional diagram of the VideoSecu MF801b3 TV Wall Mount. This illustration provides key measurements for the wall plate and TV bracket arms, including VESA hole patterns and overall mount width, which is approximately 88.2 cm (34.7 inches).
4.2. Wall Plate Installation
- Locate Wall Studs: Use a stud finder to locate the center of two adjacent wooden studs. Mark their positions. For concrete or brick walls, use appropriate anchors (not always included, consult a professional if unsure). The mount supports stud spacing up to 860mm (33.9 inches).
- Determine Mounting Height: Hold the wall plate against the wall at the desired height. Ensure it is level using a spirit level. Mark the drilling locations through the holes on the wall plate.
- Drill Pilot Holes: Drill pilot holes at the marked locations. The size of the drill bit will depend on the type of wall and the lag bolts being used.
- Attach Wall Plate: Secure the wall plate to the wall using the provided lag bolts and washers. Ensure it is firmly tightened and level.

Figure 4.2: Rear view of the VideoSecu MF801b3 TV Wall Mount. This image highlights the robust construction of the wall plate and the various mounting holes designed to accommodate different stud spacings and VESA patterns.
4.3. Attaching TV Brackets to Television
- Prepare TV: Lay your TV face down on a soft, clean surface to prevent screen damage.
- Attach Brackets: Align the TV bracket arms with the VESA mounting holes on the back of your television. Use the appropriate screws, washers, and spacers from the hardware kit that fit your TV's specific requirements. Ensure the brackets are securely fastened and evenly spaced. The open wall plate design allows space for cable management.
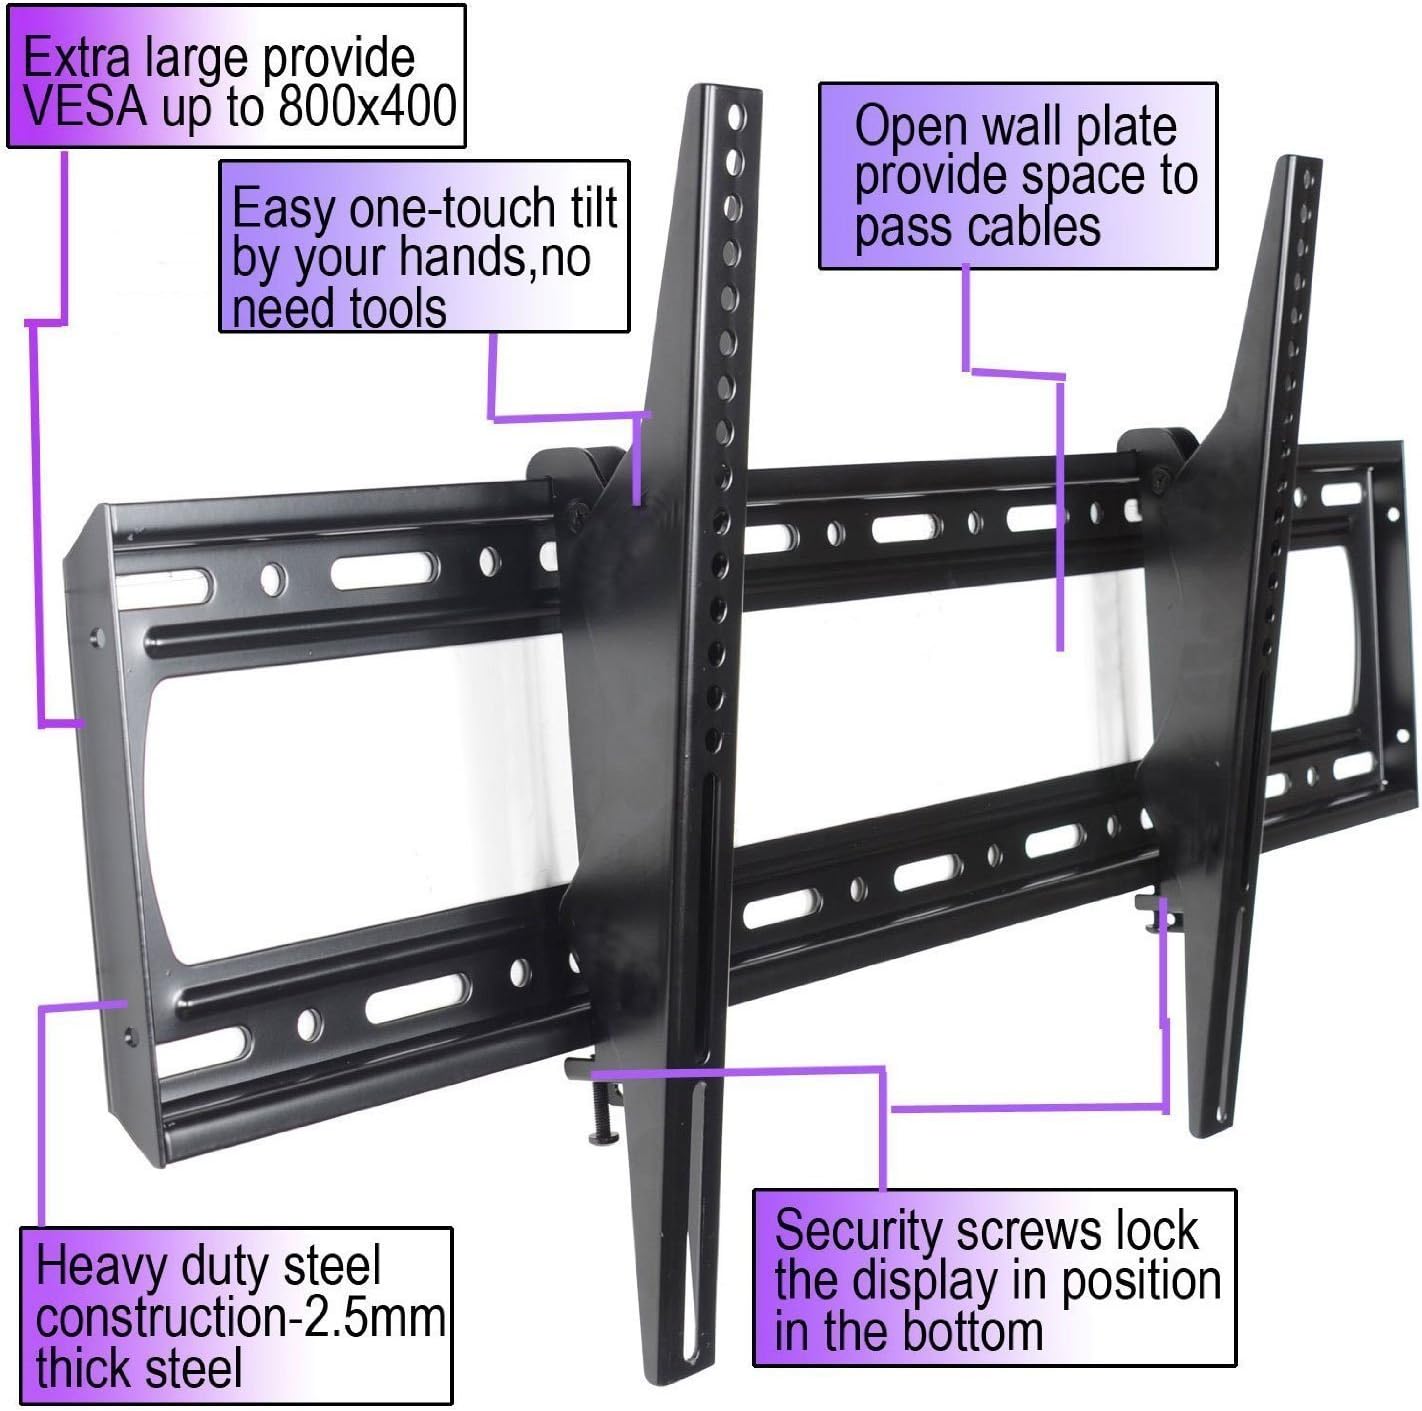
Figure 4.3: Key features of the VideoSecu MF801b3 TV Wall Mount. This image illustrates the heavy-duty steel construction, the extra-large VESA compatibility up to 800x400mm, the easy one-touch tilt mechanism, the open wall plate for cable access, and the security screws at the bottom to lock the display in position.
4.4. Mounting Television to Wall Plate
- Lift TV: With assistance, carefully lift the television and hook the TV bracket arms onto the top edge of the wall plate.
- Lower and Secure: Gently lower the TV until the brackets fully engage with the wall plate. The rail design allows for slight left and right shifting to center the TV.
- Engage Security Screws: Locate the security screws at the bottom of the TV bracket arms. Tighten these screws to lock the television securely in place on the wall plate, preventing accidental dislodgement.
5. Operating the Tilting Feature
The VideoSecu MF801b3 mount allows for a 15-degree forward or backward tilt to optimize viewing angles and reduce glare.
- To adjust the tilt, gently push or pull the bottom of the television to the desired angle. The mount is designed for easy one-touch tilt adjustment without the need for tools.
- Ensure the TV is stable after adjustment.
6. Maintenance
Regular maintenance helps ensure the longevity and safety of your TV wall mount.
- Cleaning: Wipe the mount with a soft, dry cloth. Avoid abrasive cleaners or solvents.
- Check Connections: Periodically check all screws and bolts to ensure they remain tight and secure. Re-tighten if necessary.
- Inspect for Damage: Regularly inspect the mount for any signs of wear, corrosion, or damage. If any damage is observed, discontinue use and contact customer support.
7. Troubleshooting
| Problem | Possible Cause | Solution |
|---|---|---|
| TV is not level. | Wall plate not installed level. | Remove TV, loosen wall plate bolts, adjust level, and re-tighten. Ensure to use a spirit level during installation. |
| Mount feels loose on the wall. | Lag bolts not fully tightened or improper wall anchors used. | Ensure lag bolts are securely tightened into wall studs. If using anchors, verify they are appropriate for your wall type and installed correctly. Consult a professional if unsure. |
| TV cannot be tilted. | Security screws are too tight or mechanism is obstructed. | Ensure security screws at the bottom of the TV brackets are not overtightened. Check for any obstructions preventing movement. |
8. Specifications
- Model: MF801b3
- Brand: VideoSecu
- Material: Alloy Steel (2.5mm thick)
- Color: Black
- Mounting Type: Wall Mount
- Movement Type: Tilt
- Maximum Tilt Angle: 15 Degrees (forward/backward)
- Compatible TV Sizes: 40" - 90" (some models up to 85" 90")
- Weight Capacity: 220 lbs (100 kg)
- VESA Compatibility: 200x200mm to 800x400mm (e.g., 200x200, 300x200, 300x300, 400x200, 400x300, 400x400, 500x300, 600x200, 600x400, 684x300, 700x400, 800x400)
- Stud Spacing: Up to 860mm (33.9 inches)
- Item Weight: Approximately 1 pound (Note: This seems low for a heavy-duty mount, but it's from the provided data. User should verify actual product weight.)
9. Warranty Information
For specific warranty details regarding your VideoSecu MF801b3 TV Wall Mount, please refer to the warranty card included with your product or visit the official VideoSecu website. Warranty terms and conditions may vary.
10. Customer Support
If you have any questions, require assistance with installation, or need to report missing/damaged parts, please contact VideoSecu customer support. Refer to the product packaging or the official VideoSecu website for contact information.