
1. Introduction
The MARES Mission Puck 2 Dive Computer Console is an advanced instrument designed for scuba diving, providing essential information for a safe and enjoyable underwater experience. This console integrates a Puck dive computer and a compact pressure gauge within a durable, ergonomically shaped housing. It supports various dive modes including Air, Nitrox, and Bottom Timer, making it suitable for a wide range of diving activities.
This manual provides detailed instructions for the proper setup, operation, maintenance, and troubleshooting of your Mission Puck 2 Dive Computer Console. Please read this manual thoroughly before using the device to ensure optimal performance and safety.
2. Product Overview


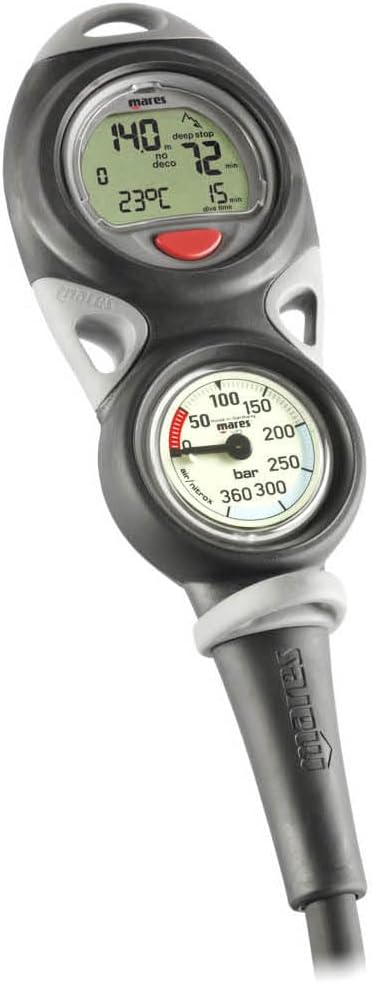
Key Features:
- Integrated Design: Combines a digital dive computer and an analog pressure gauge in one compact console.
- Intuitive Operation: Single-button control for easy navigation through menus and settings.
- High-Contrast Display: Large character display with automatic illumination for excellent readability up to 170 degrees, even in low-light conditions.
- Versatile Dive Modes: Supports Air, Nitrox, and Bottom Timer modes.
- Durable Construction: Ergonomically shaped, chrome-plated brass body for enhanced durability and corrosion resistance.
- Multiple Attachment Points: Designed with numerous anchor points for comfortable and preferred attachment during dives.
- Logbook Capacity: Stores up to 35 hours of dive profiles recorded at 20-second intervals.
3. Setup
3.1. Battery Installation
The Mission Puck 2 uses a user-replaceable battery. It is recommended to replace the battery before your first dive or if a low battery indicator appears.
- Locate the circular battery compartment cover on the rear of the console (refer to Figure 2.2).
- Using a coin (e.g., a US quarter) or a suitable tool, carefully turn the battery cover counter-clockwise until it unlocks. The cover may be stiff initially.
- Remove the old battery. Note the orientation of the battery (+/- terminals).
- Insert the new battery, ensuring correct polarity.
- Inspect the O-ring on the battery cover for any damage or debris. If damaged, replace it. Lightly lubricate the O-ring with silicone grease.
- Align the battery cover and turn it clockwise until it is securely sealed. Ensure it is tight to prevent water ingress.
- After battery replacement, the computer may reset. Set the date, time, and preferred units (metric/imperial) as described in Section 3.3.
3.2. Connecting the Pressure Hose
The console comes with a high-pressure hose that connects to your first stage regulator.
- Ensure the hose is free from kinks or damage.
- Thread the hose connector onto the high-pressure port of your first stage regulator.
- Tighten the connection firmly by hand. Do not overtighten with tools, as this can damage the O-ring or threads.
- Once connected, slowly open the tank valve and check for any air leaks at the connection point. If a leak is detected, close the valve, re-tighten, and re-check.
3.3. Initial Settings
Upon first use or after battery replacement, you may need to configure basic settings.
- Power On: The computer typically powers on automatically when pressure is detected or by pressing the single control button.
- Unit Selection: Navigate to the settings menu to select between metric (meters, Bar, Celsius) or imperial (feet, PSI, Fahrenheit) units.
- Date and Time: Set the current date and time.
- Dive Mode: Select your primary dive mode (Air, Nitrox, or Bottom Timer). For Nitrox, ensure the correct oxygen percentage (O2%) is set.
4. Operating Instructions
4.1. Basic Navigation
The Mission Puck 2 features a single control button for all operations. Short presses typically cycle through information displays or menu options, while long presses confirm selections or enter/exit menus.
- Short Press: View different data screens (e.g., current depth, dive time, no-decompression limit, temperature).
- Long Press: Enter or exit the main menu, confirm a setting, or activate specific functions.
4.2. Dive Modes
The console supports three primary dive modes:
- Air Mode: Standard mode for diving with compressed air. The computer calculates no-decompression limits and other dive parameters based on air.
- Nitrox Mode: For diving with enriched air nitrox. Before diving, you must set the correct oxygen percentage (O2%) for your gas mixture. The computer will adjust calculations accordingly.
- Bottom Timer Mode: Functions as a simple depth gauge and timer, without decompression calculations. This mode is suitable for technical diving or when using external dive planning.
To switch between dive modes, access the main menu and select the desired mode. Always verify your selected mode and gas settings before each dive.
4.3. During the Dive
The computer automatically activates when submerged. Key information displayed includes:
- Current Depth
- Dive Time
- No-Decompression Limit (NDL) or Decompression Information
- Water Temperature
- Ascent Rate Indicator
- Battery Status
The analog pressure gauge continuously displays your tank pressure. Monitor both the digital display and the analog gauge throughout your dive.
4.4. After the Dive
After surfacing, the computer will enter surface mode, displaying surface interval time and desaturation time. The logbook automatically records dive data.
- Logbook Review: Access the logbook menu to review details of your previous dives, including maximum depth, dive time, and temperature.
- Data Download: An optional interface cable (not included) may be required to download dive data to a computer for detailed analysis and logging.
5. Maintenance
5.1. Post-Dive Care
- Rinse the console thoroughly with fresh water after each dive, especially after saltwater exposure.
- Press the button multiple times while rinsing to flush out any salt or debris.
- Allow the console to air dry completely in a shaded area before storage. Avoid direct sunlight.
5.2. Battery Replacement
Refer to Section 3.1 for detailed battery replacement instructions. Always use the specified battery type and ensure the O-ring is clean and properly seated to maintain water integrity.
5.3. Storage
- Store the console in a cool, dry place, away from direct sunlight and extreme temperatures.
- Avoid storing with other sharp objects that could scratch the display or housing.
5.4. Professional Servicing
It is recommended to have your dive computer console inspected and serviced by an authorized Mares service center periodically, typically every two years or as recommended by Mares, to ensure continued accuracy and reliability.
6. Troubleshooting
| Problem | Possible Cause | Solution |
|---|---|---|
| Low Battery Symbol / Computer Not Turning On | Depleted battery. | Replace the battery as per Section 3.1. Ensure correct polarity and a properly sealed battery compartment. |
| Water Inside Gauge / Corrosion | Damaged or improperly seated O-ring on pressure gauge or hose connection. | Immediately rinse with fresh water and dry. Do not use. Seek professional service from an authorized Mares dealer for inspection and repair. |
| Inaccurate Readings (Depth/Pressure) | Sensor malfunction, air in hose, or calibration issue. | Ensure hose is properly connected and purged of air. If problem persists, contact an authorized Mares service center. |
| Display Difficult to Read | Low battery, screen damage, or condensation. | Check battery level. Ensure screen is clean and dry. If condensation or damage is present, seek professional service. |
If you encounter issues not listed here or if solutions do not resolve the problem, please contact an authorized Mares service center or your dealer for assistance. Do not attempt to repair the unit yourself beyond battery replacement.
7. Specifications
| Feature | Specification |
|---|---|
| Model Number | 414420 |
| Dimensions (L x W x H) | Approximately 13.1 x 7.4 x 4.5 inches (Item Package) |
| Weight | 0.8 Kilograms (Item Weight) / 3.3 Pounds (Package Weight) |
| Material | Brass (Console Body) |
| Color | Black |
| Dive Modes | Air, Nitrox, Bottom Timer |
| Logbook Memory | 35 hours at 20-second sampling rate |
| Display | High-contrast, large character display with automatic illumination |
| Operating Depth | Refer to product markings and official Mares documentation for specific depth limits. |
8. Warranty and Support
8.1. Warranty Information
Mares products are manufactured to high-quality standards. For specific warranty terms and conditions, please refer to the warranty card included with your product or visit the official Mares website. Keep your proof of purchase for warranty claims.
8.2. Customer Support
For technical assistance, service, or spare parts, please contact your authorized Mares dealer or visit the Mares official website for contact information and support resources. Do not attempt unauthorized repairs, as this may void your warranty and compromise the safety of the device.
