
Oster FRSBCB40-BLS
Oster 6317 2-Slice Toaster Instruction Manual
Model: FRSBCB40-BLS
Brand: Oster
Introduction
Thank you for purchasing the Oster 6317 2-Slice Toaster. This manual provides important information for the safe and efficient operation, maintenance, and care of your new appliance. Please read these instructions thoroughly before first use and retain them for future reference.
Important Safety Instructions
- Always unplug the toaster from the outlet when not in use and before cleaning.
- Do not immerse the toaster, cord, or plug in water or other liquids.
- Close supervision is necessary when any appliance is used by or near children.
- Do not operate any appliance with a damaged cord or plug, or after the appliance malfunctions or has been damaged in any manner.
- Do not place the toaster on or near a hot gas or electric burner, or in a heated oven.
- Do not use the toaster for anything other than its intended use.
- Avoid touching hot surfaces. Use handles or knobs.
- Do not insert oversized foods, metal foil packages, or utensils into the toaster as this may create a fire or electric shock hazard.
- A fire may occur if toasters are covered or touching flammable material, including curtains, draperies, walls, and the like, when in operation.
- Do not leave the toaster unattended when in use.
Product Overview and Features
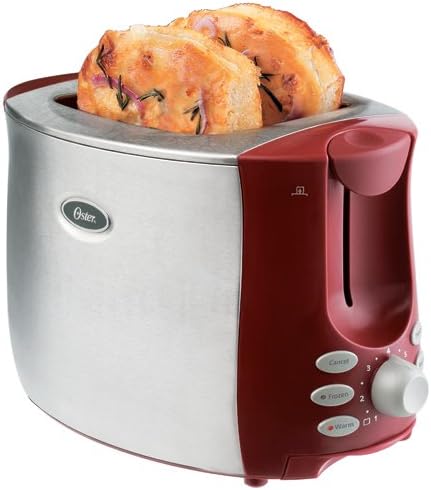
Image: The Oster 6317 2-Slice Toaster, featuring its distinctive red and brushed stainless steel design. Two slices of bread are visible in the extra-wide slots, indicating its primary function. The control panel on the front includes buttons for Cancel, Frozen, and Warm functions, along with a rotary dial for selecting toast shade settings.
The Oster 6317 is a modern and efficient 2-slice toaster designed for everyday use. Its durable red metallic and stainless steel exterior adds a touch of style to any kitchen.
Key Features:
- 2-Slice Capacity: Accommodates two slices of bread or other items simultaneously.
- Extra Wide Slots: Designed to fit a wide range of bread types and sizes, including bagels and thicker slices.
- Function Buttons: Dedicated buttons for Cancel, Bagel, Frozen, and Warm settings.
- Durable Red Metallic Exterior: Stylish and robust construction.
- Electronic Toast Technology: Ensures consistent toasting results.
- Red LED Display Lights: Illuminates selected functions for easy visibility.
- Toast Lift: Allows for easy removal of smaller items from the toaster slots.
- Removable Crumb Tray: Facilitates easy cleaning and maintenance.
- 7 Toast Shade Settings: Provides precise control over browning levels, from light to dark.
- Dual Auto-Centering Bread Guides: Automatically adjusts to hold bread centrally for even toasting.
Setup
- Unpacking: Carefully remove the toaster and all packaging materials from the box. Retain packaging for storage or in case of return.
- Placement: Place the toaster on a stable, flat, heat-resistant surface, away from flammable materials such as curtains or walls. Ensure there is adequate ventilation around the toaster.
- First Use (Burn-Off): Before toasting food for the first time, operate the toaster without bread for a few cycles at the highest setting. This will burn off any manufacturing residues and eliminate initial odors. It is normal for a slight odor or smoke to be present during this process. Ensure the area is well-ventilated.
- Power Connection: Plug the power cord into a standard 120V AC electrical outlet.
Operating Instructions
- Insert Bread: Place one slice of bread, bagel, or other item into each toasting slot. The dual auto-centering guides will automatically adjust to hold the item centrally.
- Select Toast Shade: Turn the browning control dial to your desired toast shade setting. The toaster offers 7 settings, from 1 (lightest) to 7 (darkest). Start with a medium setting (e.g., 3 or 4) and adjust according to your preference.
- Lower Lever: Press the toast lever down until it latches into place. The toaster will begin the toasting cycle. The selected function button (if any) will illuminate with a red LED light.
- Using Special Functions:
- Cancel Button: Press this button at any time to stop the toasting cycle and eject the bread.
- Bagel Button: Activates the bagel function, which toasts the cut side of the bagel while gently warming the outer side. Press this button after lowering the toast lever.
- Frozen Button: Designed for toasting frozen bread or waffles. This setting adds extra time to the toasting cycle to defrost the item before toasting. Press this button after lowering the toast lever.
- Warm Button: Gently warms previously toasted items without further browning. Press this button after lowering the toast lever.
- Toast Lift: Once the toasting cycle is complete, the toast will automatically pop up. If you are toasting smaller items, you can gently lift the toast lever further upwards to raise the items higher for easier removal.
- Unplug: After use, it is recommended to unplug the toaster from the power outlet.
Maintenance and Cleaning
Regular cleaning of your toaster will ensure optimal performance and extend its lifespan. Always ensure the toaster is unplugged and completely cool before cleaning.
Cleaning the Crumb Tray:
- Unplug the toaster and allow it to cool completely.
- Locate the removable crumb tray at the bottom of the toaster.
- Slide out the crumb tray.
- Discard accumulated crumbs. Wipe the tray clean with a damp cloth, or wash with warm, soapy water if necessary. Rinse thoroughly and dry completely before reinserting.
- Slide the crumb tray back into its position until it clicks securely.
Cleaning the Exterior:
- Wipe the exterior of the toaster with a soft, damp cloth. For stubborn stains, a mild non-abrasive cleaner can be used.
- Do not use abrasive cleaners or scouring pads, as they may scratch the surface.
- Never immerse the toaster in water or any other liquid.
Troubleshooting
If you encounter issues with your Oster 6317 Toaster, please refer to the following common problems and solutions:
| Problem | Possible Cause | Solution |
|---|---|---|
| Toaster does not turn on. | Not plugged in; power outlet not working; circuit breaker tripped. | Ensure the toaster is securely plugged into a working outlet. Check your household circuit breaker. |
| Toast is unevenly browned. | Bread not centered; crumb tray full; internal elements dirty. | Ensure bread is properly inserted. Clean the crumb tray. If issue persists, contact customer support. |
| Toast lever does not stay down. | Toaster not plugged in; internal mechanism obstruction. | Ensure the toaster is plugged in. Check for any obstructions in the slots. Do not force the lever. |
| Smoke coming from toaster. | Crumbs inside; food stuck; first use burn-off. | Immediately unplug the toaster. Clean the crumb tray. If food is stuck, carefully remove it after the toaster has cooled. Ensure proper ventilation during first use. |
If the problem persists after attempting these solutions, please contact Oster customer support.
Specifications
| Brand | Oster |
| Model Number | FRSBCB40-BLS |
| Color | Red |
| Material | Stainless Steel |
| Number of Slices | 2 |
| Special Features | Cancel Function, LED Indicator, Extra Wide Slots, Toast Lift, Removable Crumb Tray, Auto-Centering Guides |
| Number of Shade Settings | 7 |
| UPC | 034264418592 |
| Product Dimensions | 8.15 x 8.8 x 13.3 inches |
| Item Weight | 3.5 pounds |
| Date First Available | February 25, 2007 |
Warranty and Support
Manufacturer's Warranty:
This Oster 6317 2-Slice Toaster is covered by a 1-Year Manufacturer's Warranty from the date of purchase. This warranty covers defects in material and workmanship under normal household use.
The warranty does not cover damage resulting from misuse, abuse, accident, alteration, or commercial use. Please retain your original purchase receipt as proof of purchase for warranty claims.
Customer Support:
For technical assistance, warranty claims, or to inquire about replacement parts, please contact Oster Customer Service. Visit the official Oster website for the most current contact information, including phone numbers and online support options.
You can often find support resources and FAQs on the Oster Brand Store on Amazon or the official Oster website.
Ask a question about this manual
Ask about setup, troubleshooting, compatibility, parts, safety, or missing instructions. Manuals+ will review the question and use this page’s manual context to help answer it.