
1. Introduction
This instruction manual provides detailed guidance for the setup, operation, and maintenance of your TFA Dostmann Wireless Weather Station Gaia, Model 35.1083.54. This device is designed to provide accurate indoor and outdoor temperature and humidity readings, along with a weather forecast and radio-controlled time.
2. Features
- Weather Display: Provides a weather forecast and prediction, with an integrated barometer measuring absolute and relative air pressure. Includes a graphical display of the air pressure trend.
- Radio-Controlled Clock: Features a digital clock with date, alarm, and snooze functions. The unit can be wall-mounted or placed on a tabletop.
- Weather Station Functions: Measures indoor and outdoor temperature and humidity. Wireless transmission is facilitated by an outdoor sensor. Records daily high and low values with time and date stamps.
- Adjustable Functions: Offers programmable alarm conditions, such as temperature alerts and storm warnings. Includes dew point display and a backlight for improved visibility.
3. Package Contents
Please check that all items are present and in good condition:
- Main Base Station (Display Unit)
- Thermo-Hygro Outdoor Sensor
- Instruction Manual
4. Setup
4.1 Battery Installation
- Open the battery compartment on the back of the outdoor sensor.
- Insert 2 AAA batteries, observing the correct polarity (+/-).
- Close the battery compartment securely.
- Open the battery compartment on the back of the main base station.
- Insert 2 AAA batteries, observing the correct polarity (+/-).
- Close the battery compartment securely.
4.2 Sensor Placement
Place the outdoor sensor in a shaded, dry location, protected from direct sunlight and precipitation. Ensure it is within the wireless range of the main base station (typically up to 100 meters in open air).
4.3 Initial Synchronization
After inserting batteries, the main base station will automatically search for the outdoor sensor and the radio-controlled time signal (DCF77). This process may take several minutes. Ensure both units are close to each other during initial setup.

This image displays the front view of the TFA Dostmann Gaia Wireless Weather Station. The large digital screen shows the current time, date, indoor and outdoor temperature and humidity readings, a graphical representation of air pressure history, and weather forecast icons. Control buttons are visible at the bottom.
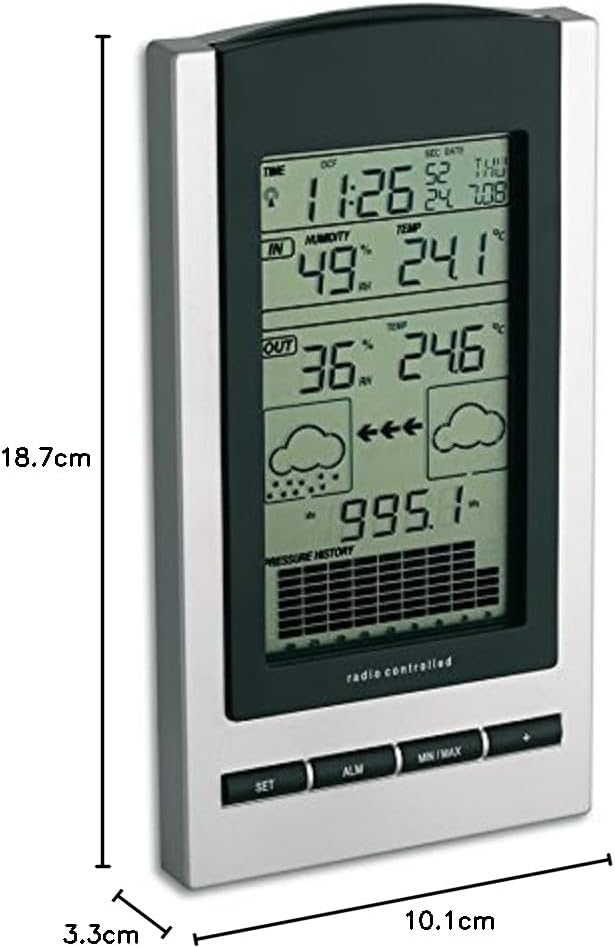
This image illustrates the dimensions of the TFA Dostmann Gaia Wireless Weather Station. The height is marked as 18.7 cm, the width as 10.1 cm, and the depth as 3.3 cm, providing a clear understanding of its physical size.
5. Operating Instructions
5.1 Display Overview
The main display shows the following information:
- Time and Date: Radio-controlled time, including seconds and day of the week.
- Indoor Temperature and Humidity: Current readings for the base station's location.
- Outdoor Temperature and Humidity: Current readings from the wireless sensor.
- Weather Forecast Icons: Graphical representation of expected weather conditions (e.g., sunny, cloudy, rainy).
- Barometric Pressure: Current absolute pressure and a graphical history of pressure trends.
- Dew Point: Calculated dew point value.
5.2 Button Functions
The buttons at the bottom of the unit control various functions:
- SET: Enters setup mode for manual adjustments (e.g., time zone, alarm).
- ALM: Activates/deactivates the alarm and enters alarm setting mode.
- MIN/MAX: Displays minimum and maximum recorded temperature and humidity values. Press again to cycle through values.
- '+' / '-': Adjusts values during setup or changes display modes.
5.3 Setting Alarm and Snooze
To set the alarm, press the ALM button until the alarm time flashes. Use the '+' and '-' buttons to adjust the hour and minute. Press SET to confirm. When the alarm sounds, press any button (except ALM) to activate snooze, or press ALM to turn off the alarm.
5.4 Backlight
Press any button to briefly activate the backlight for improved visibility in low-light conditions.
6. Maintenance
- Cleaning: Wipe the unit and sensor with a soft, damp cloth. Do not use abrasive cleaners or solvents.
- Battery Replacement: Replace batteries in both the main unit and sensor when the low battery indicator appears on the display. Always replace all batteries at the same time.
- Storage: If storing the device for an extended period, remove all batteries to prevent leakage.
7. Troubleshooting
- No Outdoor Temperature/Humidity Reading: Ensure the outdoor sensor is within range and has fresh batteries. Try re-synchronizing by removing and reinserting batteries in both units.
- Incorrect Time: Verify that the main unit is receiving the radio-controlled time signal. Ensure there are no strong interference sources nearby. If necessary, manually set the time zone.
- Inaccurate Readings: Ensure both the main unit and sensor are placed in appropriate locations (e.g., sensor not in direct sunlight, main unit not near heat sources).
- Display Not Working: Check battery levels and ensure they are inserted correctly.
8. Specifications
| Feature | Specification |
|---|---|
| Model Number | 35.1083.54 |
| Dimensions (Main Unit) | 10.1 x 3.3 x 18.7 cm |
| Weight | 251 g |
| Power Source (Main Unit) | 2 x AAA Batteries |
| Power Source (Sensor) | 2 x AAA Batteries |
| Connectivity | 433 MHz Wireless |
| Material | Plastic |
| Special Features | Air Pressure, Trend Forecast, Humidity, Radio-controlled Time |
9. Warranty and Support
For warranty information and customer support, please refer to the documentation provided with your purchase or visit the official TFA Dostmann website. Keep your proof of purchase for any warranty claims.


