1. Introduction
The ATEN CL5716M is a 16-port KVM (Keyboard, Video, Mouse) switch featuring an integrated 17-inch LCD monitor, full keyboard, and touchpad. This unit is designed to provide efficient control and management of multiple computers from a single console, saving space and improving workflow in server rooms or data centers. It supports both USB and PS/2 connections for versatile compatibility.
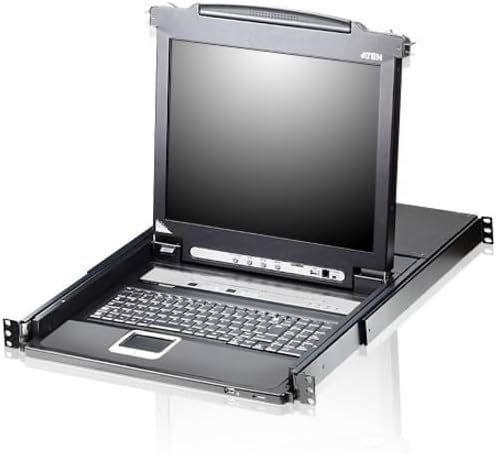
This image displays the ATEN CL5716M KVM switch unit, featuring its integrated 17-inch LCD monitor, full keyboard, and touchpad. The unit is designed for rack mounting, with the console extended for use.
2. Features
The ATEN CL5716M KVM Switch offers a range of features designed for robust and flexible system management:
- Integrated Console: Combines a 17-inch LCD monitor, keyboard, and touchpad in a single, space-saving rack-mountable unit.
- 16-Port KVM: Directly controls up to 16 computers.
- Expandable Connectivity: Daisy-chain up to 31 additional KVM switches to manage a total of up to 256 computers from a single console.
- Multi-Platform Support: Compatible with Windows, Sun, Linux, Mac, Unix, Netware, AIX (RS6000), and DOS 6.2 and later operating systems.
- Flexible Switching: Computers can be accessed via On-Screen Display (OSD) menu, hotkey combinations, or front panel push buttons.
- USB and PS/2 Support: Accommodates both USB and PS/2 data link protocols for keyboard and mouse connections.
- Upgradeable Firmware: Ensures compatibility with future hardware and software.
- Console Lock: Provides security for the integrated console.
- Extra Console Port: Allows for an additional external console connection.
3. Setup
Follow these steps to set up your ATEN CL5716M KVM Switch:
3.1 Unpacking and Inspection
- Carefully unpack the KVM switch and all accessories.
- Verify that all components are present and undamaged. Contact your dealer if any items are missing or damaged.
3.2 Rack Mounting
The CL5716M is designed for standard 19-inch rack mounting. Refer to the included rack mount kit instructions for proper installation into your server rack.
3.3 Connecting Computers
- Ensure all computers and the KVM switch are powered off.
- Connect the KVM cables (VGA, USB/PS2 keyboard, USB/PS2 mouse) from each computer to the corresponding KVM ports on the rear of the CL5716M.
- If using an external console, connect your external monitor, keyboard, and mouse to the dedicated external console ports.
3.4 Power Connection
- Connect the provided power adapter to the power jack on the KVM switch.
- Plug the power adapter into a grounded AC power outlet.
4. Operating
Once the KVM switch is set up, you can begin operating it to manage your connected computers.
4.1 Powering On
- Power on the KVM switch.
- Power on the connected computers.
- The KVM switch will automatically detect the active computers.
4.2 Switching Between Computers
You can switch between connected computers using one of three methods:
- On-Screen Display (OSD): Press the OSD hotkey (typically [Scroll Lock] + [Scroll Lock] + [F1]) to bring up the OSD menu. Use the arrow keys and Enter to navigate and select the desired computer.
- Hotkey Commands: Use predefined hotkey combinations (e.g., [Scroll Lock] + [Scroll Lock] + [Port Number]) to directly switch to a specific port. Refer to the full manual for a complete list of hotkey commands.
- Front Panel Push Buttons: Press the port selection buttons on the front panel of the KVM switch to cycle through the connected computers.
4.3 Console Lock
The console lock feature prevents unauthorized access to the KVM console. Activate or deactivate this feature through the OSD menu or a specific hotkey combination as detailed in the comprehensive manual.
5. Maintenance
Proper maintenance ensures the longevity and optimal performance of your ATEN CL5716M KVM Switch.
5.1 Cleaning
- Use a soft, dry cloth to clean the exterior of the KVM switch.
- For the LCD screen, use a specialized screen cleaning solution and a microfiber cloth.
- Avoid using harsh chemicals or abrasive materials.
5.2 Firmware Updates
Periodically check the ATEN website for available firmware updates. Firmware updates can improve performance, add new features, or resolve known issues. Follow the instructions provided with the firmware update package carefully.
5.3 Cable Management
Ensure all cables are neatly routed and secured to prevent accidental disconnections or damage. Proper cable management also improves airflow and reduces clutter in your rack.

This diagram illustrates the rigorous testing procedures for ATEN products, including a keyboard life test, shock test, and drop test, ensuring durability and reliability.
6. Troubleshooting
If you encounter issues with your ATEN CL5716M, refer to the following common troubleshooting steps:
- No Display on LCD:
- Check all video cable connections between the KVM switch and the computers.
- Ensure the KVM switch and connected computers are powered on.
- Verify the LCD brightness and contrast settings.
- Keyboard or Mouse Not Responding:
- Check USB/PS2 cable connections from the computers to the KVM switch.
- Ensure the correct port is selected on the KVM switch.
- Try connecting the keyboard and mouse directly to the computer to rule out peripheral issues.
- Switching Problems:
- Confirm that the hotkey combinations are being pressed correctly.
- If using OSD, ensure it is enabled and accessible.
- Power cycle the KVM switch and the affected computers.
- Intermittent Connectivity:
- Inspect all cables for damage or loose connections.
- Ensure the KVM switch is receiving stable power.
If these steps do not resolve the issue, please refer to the Warranty and Support section for further assistance.
7. Specifications
Detailed technical specifications for the ATEN CL5716M KVM Switch:
| Device Type | KVM Switch |
| Model Number | CL5716M |
| Ports | 16 |
| Form Factor | External; Internal; Integrated (Rack-mountable) |
| Interfaces | OSD, Hotkey, Push button |
| Data Link Protocol | USB; PS/2 |
| Dimensions (W x D x H) | 18.9 inches x 24.9 inches x 1.7 inches |
| Item Weight | 43.8 pounds |
| Wattage | 27.5 watts |
| Color | Black |
| International Protection Rating | IP54 |
| UPC | 672792100598 |
8. Warranty and Support
ATEN is committed to providing reliable products and comprehensive customer support.
- Localized Repair Centers: For RMA (Return Merchandise Authorization) service, ATEN offers localized repair centers to facilitate efficient service.
- Extended Warranty Options: Variable value-added service packages are available for extended warranty coverage. Please contact ATEN sales or your dealer for details.
- Free Technical Support: ATEN provides free technical support with a commitment to respond to customer inquiries within four hours.
For further assistance, please visit the official ATEN website or contact their customer service department.

This graphic highlights ATEN's comprehensive customer support services, including localized repair centers for RMA, options for extended warranty, and free technical support with a commitment to respond within four hours.


