1. Introduction
This manual provides comprehensive instructions for the setup, operation, and maintenance of your KitVision 7-inch Digital Photo Frame, model DPF7BKK. Please read this manual thoroughly before using the device to ensure proper functionality and longevity.

Figure 1: Front view of the KitVision 7-inch Digital Photo Frame. The frame is silver with a black bezel, displaying a vibrant image of a person holding a child on a beach.
2. Package Contents
Verify that all items listed below are present in your package:
- KitVision 7-inch Digital Photo Frame (DPF7BKK)
- AC Power Adapter
- Detachable Stand
- User Manual (this document)

Figure 2: The product packaging for the KitVision 7-inch Digital Photo Frame. The box features a blue background with wave patterns and an image of the digital photo frame displaying a beach scene.
3. Product Overview
3.1. Rear Panel and Controls

Figure 3: Rear view of the digital photo frame. Visible features include the USB port, SD/MMC/MS card slot, DC power input, control buttons (ENTER, arrows, MENU, STANDBY), and a detachable stand.
- USB Port: For connecting USB flash drives.
- SD/MMC/MS Card Slot: For inserting compatible memory cards.
- DC Input: Power connection port for the AC adapter.
- Control Buttons:
- ENTER: Confirms selections.
- < / > (Left/Right Arrows): Navigates through menus and images.
- ^ / v (Up/Down Arrows): Navigates through menus and options.
- MENU: Accesses the main menu.
- STANDBY: Powers the frame on or off.
- Detachable Stand: Allows for tabletop placement in landscape or portrait orientation.
- Wall Mount Hole: For mounting the frame on a wall.
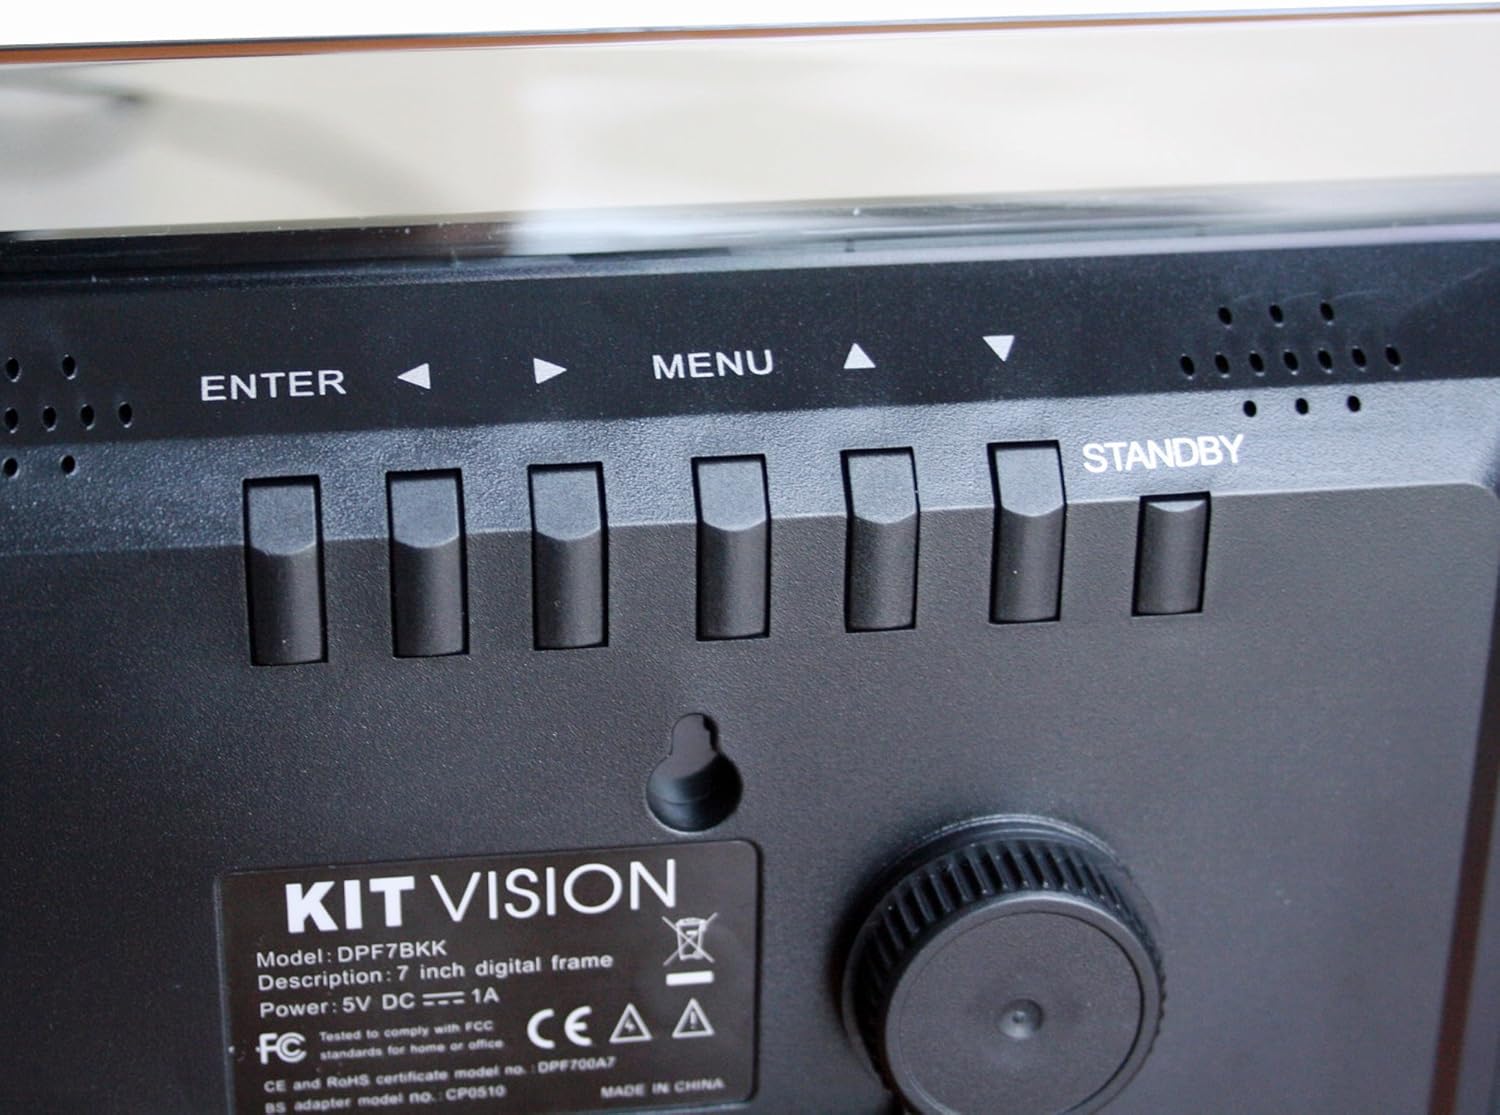
Figure 4: Close-up view of the control buttons and product label on the rear of the digital photo frame. The label clearly shows "KITVISION", "Model: DPF7BKK", and power specifications.
4. Setup
4.1. Attaching the Stand
- Locate the detachable stand in the package.
- Insert the stand's peg into the designated hole on the rear of the photo frame.
- Rotate the stand to secure it in place and adjust the angle for optimal viewing. The stand supports both landscape and portrait orientations.
4.2. Power Connection
- Connect the AC power adapter to the DC input port on the rear of the frame.
- Plug the other end of the power adapter into a standard electrical outlet.
- The frame will typically power on automatically or can be turned on using the STANDBY button.
4.3. Inserting a Memory Card or USB Drive
The frame supports SD, MMC, MS memory cards, and USB flash drives. Ensure your photos are in a compatible format (e.g., JPEG).
- Carefully insert your memory card into the SD/MMC/MS slot or your USB flash drive into the USB port.
- Ensure the card or drive is inserted correctly and fully seated. Do not force it.
- The frame should automatically detect the storage device and begin displaying photos, or prompt you to select a source.
5. Operating Instructions
5.1. Basic Navigation
- Use the < / > (Left/Right) and ^ / v (Up/Down) arrow buttons to navigate through menus and select options.
- Press the ENTER button to confirm a selection or open a sub-menu.
- Press the MENU button to return to the previous menu or access the main menu from a slideshow.
- Press and hold the STANDBY button to power the frame off or on.
5.2. Viewing Photos
Once a memory card or USB drive is inserted, the frame will typically start a slideshow automatically. If not, navigate to the "Photo" or "Slideshow" option in the main menu and press ENTER.
5.3. Slideshow Settings
To customize your slideshow:
- Press the MENU button to access the main menu.
- Navigate to "Settings" or "Slideshow Options" using the arrow buttons and press ENTER.
- Adjust settings such as:
- Display Time: Duration each photo is shown.
- Transition Effect: How photos change (e.g., fade, wipe).
- Repeat Mode: Loop all photos or play once.
- Photo Order: Sequential or random.
- Press ENTER to confirm changes and MENU to exit.
6. Maintenance
6.1. Cleaning the Frame
- Always disconnect the power adapter before cleaning.
- Use a soft, dry, lint-free cloth to gently wipe the screen and frame.
- For stubborn marks on the screen, lightly dampen the cloth with water or a screen-safe cleaning solution. Do not spray liquid directly onto the screen.
- Avoid using abrasive cleaners, solvents, or alcohol-based solutions, as these can damage the surface.
6.2. Storage
- When not in use for extended periods, store the digital photo frame in a cool, dry place, away from direct sunlight and extreme temperatures.
- It is recommended to store the frame in its original packaging to protect it from dust and physical damage.
7. Troubleshooting
| Problem | Possible Cause | Solution |
|---|---|---|
| Frame does not power on. | No power, faulty adapter, or STANDBY button not pressed. | Ensure power adapter is securely connected to both the frame and a working electrical outlet. Press the STANDBY button. Try a different outlet. |
| No images displayed. | No memory card/USB, incompatible file format, or card/USB not inserted correctly. | Insert a memory card or USB drive with compatible image files (JPEG). Ensure it is fully seated. Check if the frame is set to the correct source input in the menu. |
| Images appear distorted or low quality. | Low resolution images, damaged memory card/USB, or screen issue. | Use higher resolution images. Try a different memory card or USB drive. Clean the screen. |
| Buttons are unresponsive. | Temporary software glitch. | Disconnect the power adapter, wait 10 seconds, then reconnect it to reset the device. |
8. Specifications
| Model Number | DPF7BKK |
| Screen Size | 7 Inches |
| Resolution | WXGA |
| Product Dimensions | 9.06 x 6.5 x 1.26 inches |
| Item Weight | 0.012 ounces |
| Connectivity Technology | USB |
| Power Source | Corded Electric (5V DC === 1A) |
| Supported Memory Cards | SD, MMC, MS |
| Supported Image Formats | JPEG (common format, specific list not provided in input) |
9. Warranty and Support
For warranty information and technical support, please refer to the documentation provided at the time of purchase or contact KitVision customer service. Specific warranty terms may vary by region and retailer.


