
Introduction
This manual provides instructions for the proper use and installation of the Standard Motor Products Stp128H (HP2300) Heat Shrink Ring Terminal. This product is designed to create secure, insulated, and moisture-resistant electrical connections in various applications.
The HP2300 is a copper crimp-type ring terminal featuring a heat-shrinkable insulation sleeve. When properly installed, the heat shrink tubing provides environmental sealing and strain relief, enhancing the durability and reliability of the electrical connection.
Product Overview
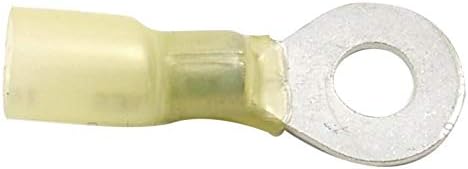
This image displays the Standard Motor Products HP2300 heat shrink ring terminal. It features a translucent yellow heat-shrinkable insulation sleeve covering a metallic ring terminal. The ring terminal is silver-colored, indicating a conductive material like copper or tin-plated copper, designed for secure electrical connections.
The Standard Motor Products HP2300 is a high-quality heat shrink terminal designed for reliable electrical connections. Its primary function is to connect a wire to a stud or screw terminal, providing both mechanical and electrical integrity, along with environmental protection.
Setup and Installation
Proper installation is crucial for the performance and longevity of the heat shrink terminal. Follow these steps carefully:
- Gather Tools: You will need a wire stripper, a crimping tool suitable for insulated terminals, and a heat gun (or a butane torch with caution).
- Prepare the Wire:
- Determine the correct wire gauge for the terminal. The HP2300 is designed for specific wire sizes (refer to product packaging or specifications for exact compatibility).
- Carefully strip approximately 3/8 to 1/2 inch (10-12 mm) of insulation from the end of the wire. Ensure the stripped wire strands are clean and untwisted. Avoid cutting or nicking the wire strands.
- Insert Wire into Terminal: Insert the stripped end of the wire fully into the barrel of the heat shrink terminal. Ensure no stray wire strands are outside the terminal barrel and that the wire insulation butts up against the terminal's insulation sleeve.
- Crimp the Terminal:
- Using a suitable crimping tool, crimp the terminal barrel onto the wire. Apply firm, even pressure to create a secure mechanical and electrical connection.
- A proper crimp should be tight and hold the wire firmly without damaging the wire strands or the terminal.
- Inspect the Crimp: Gently tug on the wire to ensure it is securely held by the crimp. The wire should not pull out of the terminal.
Operating (Heat Shrinking)
After crimping, the heat shrink insulation needs to be activated to provide environmental protection.
- Apply Heat: Using a heat gun, apply even heat to the translucent yellow insulation sleeve of the terminal. Keep the heat gun moving to prevent localized overheating.
- Observe Shrinkage: As heat is applied, the insulation sleeve will begin to shrink tightly around the wire insulation and the terminal barrel. You will observe the material becoming clear and often see a small bead of sealant extruding from the ends, indicating a good seal.
- Ensure Full Shrinkage: Continue applying heat until the sleeve has fully shrunk and conforms tightly to the wire and terminal, and the sealant is visible. Avoid excessive heat, which can damage the wire insulation or the terminal.
- Allow to Cool: Let the terminal cool down completely before handling or placing it under stress. This allows the heat shrink material and sealant to set.
Caution: When using a heat gun or torch, always wear appropriate personal protective equipment (PPE) and ensure adequate ventilation. Keep flammable materials away from the heat source.
Maintenance
Heat shrink terminals are generally maintenance-free once properly installed. However, periodic inspection can help ensure long-term reliability:
- Visual Inspection: Periodically check connections for any signs of damage, corrosion, or loosening. Ensure the heat shrink tubing remains intact and sealed.
- Environmental Factors: In harsh environments, more frequent inspections may be necessary. Look for cracks, discoloration, or signs of moisture ingress.
- Cleaning: If necessary, gently clean the exterior of the terminal with a non-abrasive cleaner suitable for electrical components. Ensure the area is dry before re-energizing.
Troubleshooting
If you encounter issues with your heat shrink terminal connections, consider the following:
- Poor Electrical Connection:
- Cause: Improper crimp, incorrect wire gauge, or damaged wire strands.
- Solution: Re-crimp the terminal if possible, or cut off the old terminal and install a new one, ensuring correct wire stripping and crimping technique. Verify wire gauge matches terminal specifications.
- Incomplete Heat Shrinkage/Poor Seal:
- Cause: Insufficient heat, uneven heat application, or incorrect heat gun temperature.
- Solution: Reapply heat evenly with a heat gun, ensuring the sleeve fully shrinks and sealant extrudes. If the seal is compromised, the terminal may need to be replaced for optimal protection.
- Damaged Insulation Sleeve:
- Cause: Excessive heat, physical abrasion, or chemical exposure.
- Solution: If the damage compromises the seal, replace the terminal. Prevent future damage by using appropriate heat levels and protecting connections from physical stress or harsh chemicals.
Specifications
Key specifications for the Standard Motor Products HP2300 Heat Shrink Terminal:
| Feature | Detail |
|---|---|
| Model Number | HP2300 |
| Brand | Standard Motor Products |
| Connector Type | Crimp |
| Material | Copper |
| Color | Assorted (Insulation sleeve is translucent yellow) |
| Unit Count | 1.0 Count |
| Item Weight | 1 pounds |
| Product Dimensions | 1 x 1 x 1 inches |
| UPC | 091769705633 |
Warranty Information
Specific warranty details for the Standard Motor Products Stp128H (HP2300) Heat Shrink Terminal are not provided within this manual. For information regarding product warranty, please refer to the official Standard Motor Products website or contact their customer service directly. Keep your purchase receipt as proof of purchase.
Support
For technical assistance, product inquiries, or further support, please visit the official Standard Motor Products website or contact their customer support department. Contact information can typically be found on the manufacturer's official website.
Official Website: www.smpcorp.com