
ProForm PFM66950
ProForm PFM66950 Rocker Arm Stud Girdle Instruction Manual
For Small Block Chevy Engines with 3/8-24 Thread Studs
Introduction
This manual provides detailed instructions for the proper installation, operation, and maintenance of your ProForm PFM66950 Rocker Arm Stud Girdle. This product is designed to enhance valve train stability and reduce rocker arm stud flex in high-performance Small Block Chevy engines. Please read all instructions carefully before proceeding with installation.
Safety Information
- Always wear appropriate personal protective equipment, including safety glasses and gloves, when working on automotive components.
- Ensure the engine is cool and disconnected from the battery before beginning any work.
- Use proper lifting and support equipment when working under a vehicle.
- Refer to your vehicle's service manual for specific torque specifications and procedures not covered in this document.
- Keep all tools and parts organized to prevent accidents.
Package Contents
Verify that all components are present before beginning installation:
- ProForm PFM66950 Rocker Arm Stud Girdle Kit (includes two purple anodized aluminum girdles and associated hardware for 3/8-24 inch thread studs).
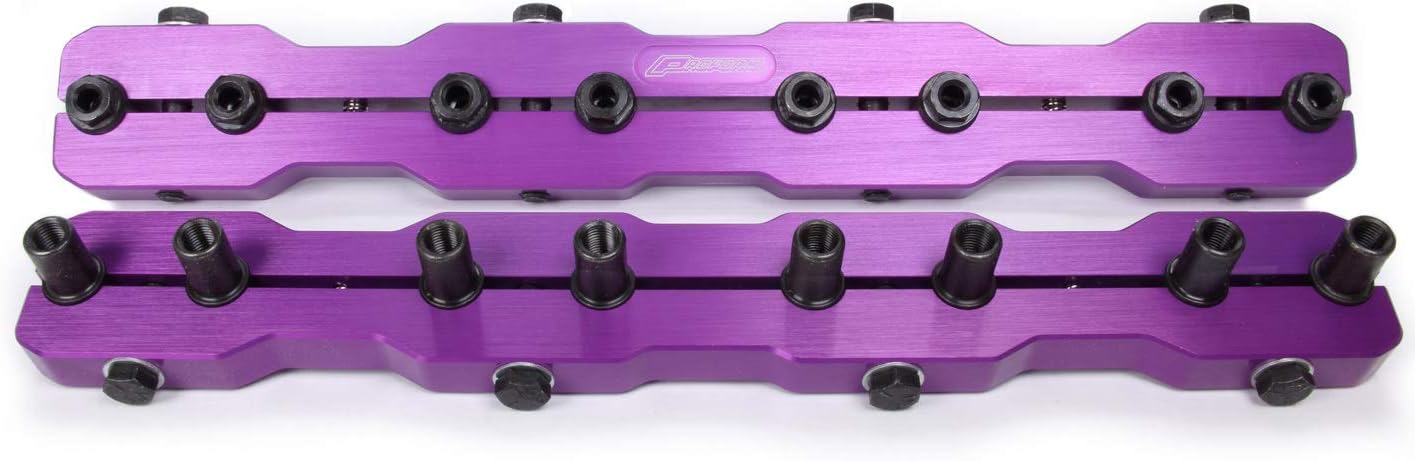
Image 1: The ProForm PFM66950 Rocker Arm Stud Girdle Kit. This image displays two purple anodized aluminum girdles, each designed to fit over rocker arm studs. The top girdle shows the black hex nuts that secure it, while the bottom girdle shows the threaded studs that pass through the rocker arms. The girdles are long, rectangular components with cutouts to accommodate the rocker arms and their associated hardware.
Specifications
- Model: PFM66950
- Application: Small Block Chevy engines
- Stud Thread Size: 3/8-24 inches
- Material: Aluminum
- Finish: Purple Anodized
- Item Weight: Approximately 7.8 pounds
- Product Dimensions: Approximately 18.25 x 6 x 5.5 inches
Setup and Installation
Proper installation is crucial for the performance and longevity of your rocker arm stud girdle. It is recommended that this procedure be performed by an experienced mechanic.
- Preparation:
- Ensure the engine is completely cool.
- Remove valve covers to access the rocker arms and studs.
- Rotate the engine manually to bring each cylinder to Top Dead Center (TDC) on the compression stroke before adjusting or removing rocker arm nuts for that cylinder. This relieves valve spring pressure.
- Rocker Arm Compatibility Check:
- Before installation, carefully check the slot width of your existing rocker arms. The girdle is designed to fit specific rocker arm configurations. If the slots are too narrow, the girdle may not seat correctly, leading to improper function or damage.
- Remove Existing Hardware:
- Loosen and remove the existing rocker arm nuts (e.g., poly-locks or standard nuts) from the 3/8-24 inch rocker arm studs. Keep track of any shims or washers.
- Carefully lift the rocker arms off the studs, ensuring pushrods remain seated.
- Install Girdle:
- Place the ProForm Rocker Arm Stud Girdle over the rocker arm studs. Ensure it sits flat and evenly across all studs. The girdle should align with the rocker arms.
- Reinstall the rocker arms onto their respective studs, ensuring they are properly aligned with the pushrods and valve stems.
- Secure Girdle and Adjust Valve Lash:
- Install the new poly-locks or specialized nuts provided with the girdle onto the rocker arm studs, securing the girdle in place.
- Adjust valve lash according to your engine builder's specifications or manufacturer's recommendations. This typically involves tightening the poly-lock until zero lash is achieved, then adding a specified number of turns (e.g., 1/2 to 1 full turn) for hydraulic lifters, or setting a specific clearance for mechanical lifters.
- Ensure all poly-locks are properly tightened and locked to prevent loosening during engine operation.
- Final Checks:
- Double-check all fasteners for proper torque and security.
- Ensure there is adequate clearance between the girdle and any other engine components, including the valve covers. Some aftermarket valve covers may be required for proper clearance.
- Reinstall valve covers.
Operating Considerations
Once installed, the ProForm Rocker Arm Stud Girdle operates passively to maintain valve train stability. No specific operational adjustments are required after initial setup. Monitor engine performance and listen for any unusual noises after installation, especially during the first few engine cycles.
Maintenance
The ProForm Rocker Arm Stud Girdle requires minimal maintenance. Periodically inspect the following:
- Fastener Security: During routine engine maintenance (e.g., valve lash checks), verify that all poly-locks or nuts securing the girdle are tight and properly locked.
- Girdle Condition: Inspect the aluminum girdles for any signs of wear, cracks, or damage. Replace if any damage is observed.
- Clearance: Ensure continued adequate clearance between the girdle and valve covers or other engine components.
Troubleshooting
- Girdle Does Not Fit: Ensure the rocker arm stud thread size is 3/8-24 inches. Verify that the slot width of your rocker arms is compatible with the girdle. Some aftermarket rocker arms may have different dimensions.
- Valve Cover Interference: If valve covers do not fit after girdle installation, check for proper seating of the girdle and rocker arms. It may be necessary to use taller aftermarket valve covers to provide adequate clearance.
- Unusual Engine Noise: Re-check valve lash settings and ensure all poly-locks are securely tightened. Verify that the girdle is not contacting any other engine components.
Warranty and Support
For information regarding product warranty or technical support, please refer to the official ProForm website or contact their customer service department directly. Keep your purchase receipt as proof of purchase.
Ask a question about this manual
Ask about setup, troubleshooting, compatibility, parts, safety, or missing instructions. Manuals+ will review the question and use this page’s manual context to help answer it.