
Product Overview
The Duravit Vero 070225-1HOLE Ceramic Vanity Top is designed with a striking rectangular geometry and precise edges, making it suitable for modern and minimalist bathroom spaces. This ceramic vanity top is durable, elegant, and timeless, reflecting Duravit's signature quality. Please note that the sink(s) and cabinet are sold separately.

Figure 1: Front view of the Duravit Vero 070225-1HOLE Ceramic Vanity Top.
Safety Information
- Always wear appropriate personal protective equipment (PPE) during installation, including safety glasses and gloves.
- Ensure all water supply lines are turned off before beginning any plumbing work.
- Handle ceramic products with care to prevent chipping or breakage.
- If you are unsure about any installation steps, consult a qualified professional plumber or installer.
- Keep small parts and tools out of reach of children.
Package Contents
Verify that all components are present and undamaged before beginning installation.
- Duravit Vero Ceramic Vanity Top (Model 070225-1HOLE)
- Installation hardware (if included by manufacturer)
- Instruction manual (this document)
Note: Faucet, drain assembly, and vanity cabinet are sold separately and are not included with this vanity top.
Setup and Installation
Tools and Materials Required (Not Included):
- Adjustable wrench
- Screwdriver set
- Level
- Measuring tape
- Caulk gun and silicone sealant (mildew-resistant)
- Plumber's putty
- Drill (if wall mounting brackets are required)
- Safety glasses and gloves
Pre-Installation Checklist:
- Unpack the vanity top and inspect for any damage. Report any damage immediately to the retailer.
- Ensure the installation area is clean, dry, and level.
- Confirm that all necessary plumbing (water supply lines, drain pipe) is correctly positioned and accessible.
- Gather all required tools and materials.
Installation Steps:
- Prepare the Vanity Cabinet/Mounting Area:
If installing on a vanity cabinet, ensure the cabinet is level and securely positioned. If wall-mounting, install appropriate wall brackets according to the manufacturer's instructions for your specific mounting system (not included with vanity top).

Figure 2: Example of a Duravit Vero vanity top installed in a bathroom setting.
- Install Faucet and Drain Assembly:
Install the faucet and drain assembly (sold separately) onto the vanity top according to their respective manufacturer's instructions. Use plumber's putty or silicone sealant as required to ensure watertight seals.

Figure 3: Detail of the faucet hole on the vanity top.
- Position the Vanity Top:
Carefully place the ceramic vanity top onto the vanity cabinet or mounting brackets. Ensure it is centered and level. Check for any gaps between the vanity top and the wall or cabinet.
- Secure the Vanity Top:
Apply a bead of silicone sealant along the top edge of the cabinet or mounting brackets where the vanity top will rest. Press the vanity top firmly into place. If using clips or fasteners (not included, depends on cabinet/mounting system), secure the vanity top from underneath.
- Seal Edges:
Apply a thin, continuous bead of mildew-resistant silicone sealant along the back edge of the vanity top where it meets the wall, and along any side edges that meet a wall. Smooth the sealant for a clean finish. Allow the sealant to cure completely as per the manufacturer's instructions before using the sink.
- Connect Plumbing:
Connect the faucet supply lines to the hot and cold water shut-off valves. Connect the drain assembly to the P-trap. Ensure all connections are tight and leak-free. Turn on the water supply and check for leaks.
Operating Instructions (Daily Use)
The Duravit Vero ceramic vanity top is designed for daily use in a bathroom environment. To ensure its longevity and maintain its appearance:
- Avoid dropping heavy or sharp objects into the sink, as this can cause chipping or cracking.
- Do not expose the ceramic surface to extreme temperature changes, which can lead to thermal shock and damage.
- Ensure proper drainage to prevent standing water, which can lead to mineral deposits.
Maintenance and Care
Regular cleaning and proper care will help maintain the pristine condition of your Duravit Vero ceramic vanity top.
General Cleaning:
- Clean the ceramic surface regularly with a soft cloth or sponge and a mild, non-abrasive cleaner.
- Rinse thoroughly with clean water after cleaning to remove all cleaner residue.
- Dry the surface with a soft cloth to prevent water spots and streaks.
Avoiding Damage:
- Do not use abrasive cleaners, scouring pads, or harsh chemicals (e.g., strong acids, alkalis, drain cleaners) as these can damage the glazed surface.
- Avoid leaving items that can stain (e.g., hair dyes, nail polish, strong pigments) on the surface for extended periods. Clean spills immediately.
- For stubborn stains, a diluted solution of vinegar or lemon juice can be used, followed by thorough rinsing. Test on an inconspicuous area first.
Troubleshooting
This section addresses common issues you might encounter with your ceramic vanity top.
| Problem | Possible Cause | Solution |
|---|---|---|
| Water spots/mineral deposits | Hard water residue left after drying. | Wipe the surface dry after each use. For existing spots, use a diluted vinegar solution and rinse thoroughly. |
| Slow drainage | Clog in the drain assembly or P-trap. | Remove and clean the drain stopper. If necessary, disassemble and clean the P-trap. Avoid harsh chemical drain cleaners. |
| Leaks around faucet or drain | Loose connections or worn seals. | Tighten connections on the faucet or drain assembly. Inspect and replace any worn washers or seals. Reapply plumber's putty or silicone sealant if needed. |
| Surface scratches or chips | Impact from hard objects or abrasive cleaning. | Ceramic is very durable but not indestructible. Minor scratches may be polished with specialized ceramic repair kits. Chips usually require professional repair or replacement. Prevent by avoiding impacts and abrasive cleaners. |
Specifications
Detailed specifications for the Duravit Vero 070225-1HOLE Ceramic Vanity Top.
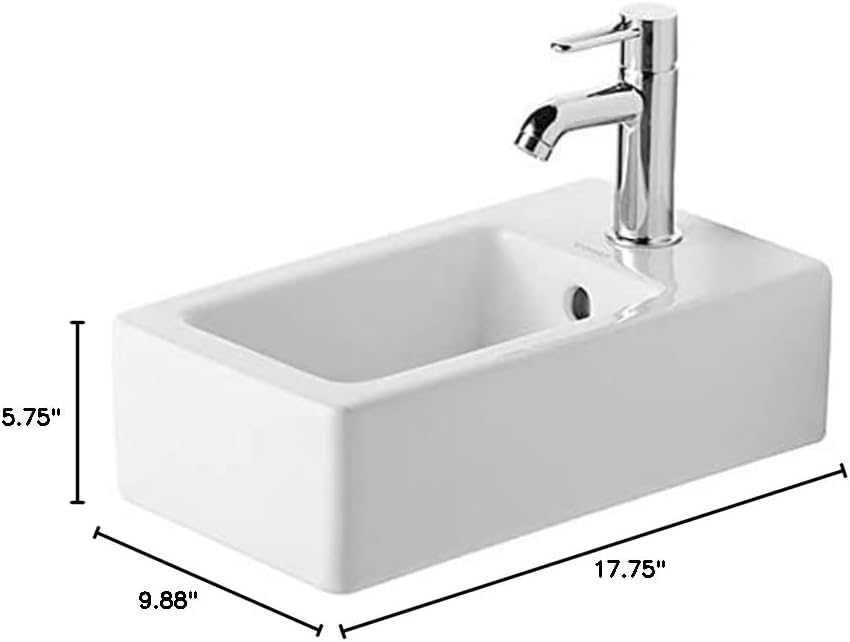
Figure 4: Dimensional drawing of the vanity top.
| Feature | Detail |
|---|---|
| Model Number | 0702250000 |
| Brand | Duravit |
| Style | Vero |
| Material | Ceramic |
| Color/Finish | White / Glazed Underside |
| Shape | Rectangular |
| Vanity Top Width | 9.88 inches (25.1 cm) |
| Vanity Top Depth | 17.75 inches (45.1 cm) |
| Vanity Top Height | 5.75 inches (14.6 cm) |
| Faucet Centers | 0 inches (Single Faucet Hole) |
| Installation Type | Wall-Mount (requires separate mounting system) |
| Drain Type | Pop-Up (drain assembly sold separately) |
| Item Weight | 24.6 pounds (11.16 kg) |
| Product Care Instructions | Mild Cleaning |
Warranty Information
Duravit products are manufactured to high-quality standards. For specific warranty details regarding your Vero ceramic vanity top, please refer to the warranty documentation included with your purchase or visit the official Duravit website. Warranty terms and conditions may vary by region and product.
It is recommended to retain your proof of purchase for warranty claims.
Customer Support
If you have any questions, require technical assistance, or need to report an issue, please contact Duravit customer support:
- Website: www.duravit.us (or your regional Duravit website)
- Contact Information: Refer to the "Contact Us" section on the official Duravit website for phone numbers and email addresses specific to your location.
When contacting support, please have your product model number (0702250000) and date of purchase readily available.


