
Flymo FLEASICUT420
Flymo Easicut 420 Electric Hedge Trimmer User Manual
Model: FLEASICUT420
Introduction
This manual provides essential information for the safe and efficient operation, maintenance, and troubleshooting of your Flymo Easicut 420 Electric Hedge Trimmer. Please read this manual thoroughly before using the product and keep it for future reference. The Flymo Easicut 420 is designed for trimming hedges and shrubs in domestic gardens. It features a 420W motor, a 42cm cutting blade, an ergonomic handle, and a twisted cable with an anti-snag belt clip for user convenience and safety.
Safety Information
Always observe basic safety precautions to reduce the risk of fire, electric shock, and personal injury. Failure to follow these instructions may result in serious injury.
- Read the Manual: Familiarize yourself with all controls and proper use of the hedge trimmer.
- Personal Protective Equipment (PPE): Always wear safety glasses or goggles, sturdy footwear, and gloves when operating the hedge trimmer. Consider ear protection.
- Work Area: Keep the work area clean and well-lit. Do not operate in explosive atmospheres, such as in the presence of flammable liquids, gases, or dust. Keep children and bystanders away.
- Electrical Safety: Do not expose the hedge trimmer to rain or wet conditions. Avoid body contact with earthed or grounded surfaces. Do not abuse the cord; never use it for carrying, pulling, or unplugging the power tool. Keep cord away from heat, oil, sharp edges, or moving parts.
- Before Use: Inspect the hedge trimmer for any damage before each use. Do not use if the switch does not turn it on and off. Disconnect the plug from the power source before making any adjustments, changing accessories, or storing power tools.
- Operation: Do not overreach. Keep proper footing and balance at all times. Do not operate the hedge trimmer with one hand. Always hold the tool firmly with both hands.
- Maintenance: Maintain hedge trimmers with care. Keep cutting edges sharp and clean for better and safer performance. Follow instructions for lubricating and changing accessories.
- Storage: Store idle hedge trimmers out of the reach of children and do not allow persons unfamiliar with the hedge trimmer or these instructions to operate the power tool.
Components and Features
The Flymo Easicut 420 is designed for ease of use and effective hedge trimming. Key components include:
- Cutting Blade: A 42 cm double-sided blade for efficient cutting.
- Blade Guard: A transparent guard covering the blade for safety during operation and storage.
- Ergonomic Handle: Designed for comfortable and secure grip, reducing user fatigue.
- Power Switch: Integrated into the handle for easy on/off control.
- Cable with Anti-Snag Clip: Twisted cable design to prevent tangling, with a clip to secure it to your belt, reducing strain and accidental disconnection.
- Motor Housing: Protects the 420W electric motor.
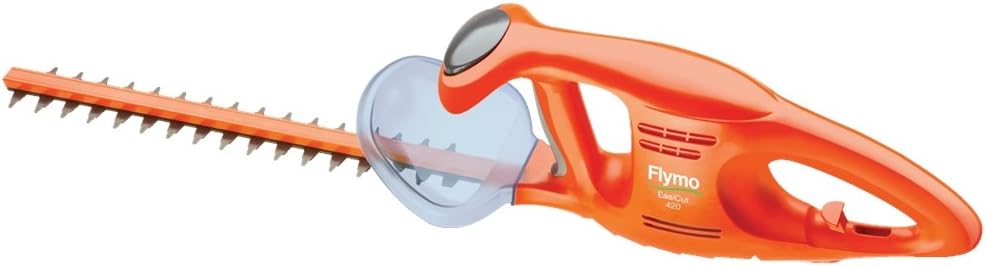
Image: The Flymo Easicut 420 Electric Hedge Trimmer, showing its orange body, transparent blade guard, and 42cm cutting blade. The ergonomic handle and power switch are visible on the main body.
Setup
Before first use, ensure the hedge trimmer is properly prepared.
- Unpack: Carefully remove the hedge trimmer and all accessories from the packaging. Retain packaging for future storage or transport.
- Inspect for Damage: Check the hedge trimmer for any signs of damage during transit. Do not use if any parts are broken or missing.
- Blade Guard Removal: The blade guard is for protection during shipping and storage. Remove it before operation.
- Power Connection: Ensure your power supply matches the voltage specified on the hedge trimmer's rating label. Use an appropriate extension cord if necessary, ensuring it is rated for outdoor use and sufficient current.
- Secure Cable: Attach the anti-snag belt clip to your belt and secure the power cable through it. This helps prevent accidental disconnection and keeps the cable away from the cutting blade.
Operating Instructions
Follow these steps for safe and effective hedge trimming.
- Preparation: Clear the area of any debris, stones, or objects that could interfere with the blade. Ensure no one is within the operating range.
- Starting the Trimmer: Plug the hedge trimmer into a suitable power outlet. Hold the hedge trimmer firmly with both hands. Press and hold the power switch to start the motor.
- Trimming Technique:
- For horizontal cutting, sweep the trimmer in an arc, keeping the blade slightly tilted downwards.
- For vertical cutting, move the trimmer upwards or downwards along the hedge, maintaining a steady pace.
- Avoid cutting branches thicker than the recommended maximum cutting capacity (refer to specifications).
- Stopping the Trimmer: Release the power switch to stop the motor. Always unplug the hedge trimmer from the power source when not in use, before cleaning, or before performing any maintenance.
- Overload Protection: If the hedge trimmer becomes overloaded or jams, release the power switch immediately and unplug the unit. Clear any obstruction before restarting.
Maintenance
Regular maintenance ensures optimal performance and extends the life of your hedge trimmer.
- Cleaning: After each use, unplug the hedge trimmer and clean the blades and housing. Use a stiff brush to remove debris from the blades. Wipe the housing with a damp cloth. Do not use solvents or abrasive cleaners.
- Blade Lubrication: Apply a light machine oil or blade lubricant to the cutting blades after each use to prevent rust and ensure smooth operation.
- Blade Sharpening: If the blades become dull, they can be sharpened by a qualified service technician. Do not attempt to sharpen the blades yourself unless you have the proper tools and expertise.
- Cord Inspection: Regularly inspect the power cord for any signs of damage, cuts, or fraying. If damaged, have it replaced by a qualified electrician.
- Storage: Store the hedge trimmer in a dry, secure place, out of reach of children. Always re-attach the blade guard before storage.
Troubleshooting
Refer to the table below for common issues and their solutions.
| Problem | Possible Cause | Solution |
|---|---|---|
| Hedge trimmer does not start. | No power supply; faulty power cord; power switch not fully engaged. | Check power outlet and cord connection. Inspect cord for damage. Ensure both hands are on the handles and the switch is fully depressed. |
| Blades are not cutting effectively. | Dull blades; debris caught in blades; cutting material too thick. | Clean blades and lubricate. Have blades sharpened by a professional. Do not attempt to cut branches exceeding the maximum capacity. |
| Excessive vibration or noise. | Loose components; damaged blade; motor issue. | Stop use immediately. Unplug and inspect for loose parts or blade damage. If problem persists, contact customer support. |
| Hedge trimmer stops during operation. | Overload protection activated; power interruption; cable snagged. | Unplug, clear any obstruction, and allow motor to cool. Check power connection and ensure cable is not snagged. |
Specifications
| Feature | Detail |
|---|---|
| Model | FLEASICUT420 |
| Power | 420 Watts |
| Blade Length | 42 Centimeters |
| Cutting Width | 42 Centimeters |
| Weight | 2.7 Kilograms (approx. 5.95 lbs) |
| Material | Stainless Steel (Blade) |
| Color | Red |
| Power Source | Corded Electric |
| Manufacturer | Husqvarna (for Flymo) |
Warranty and Support
Flymo products are manufactured to high quality standards and are guaranteed for a specific period against manufacturing defects. Please retain your proof of purchase for warranty claims.
For warranty service, technical support, or to order replacement parts, please contact Flymo customer service. Contact details can typically be found on the official Flymo website or on your product packaging.
Note: Information regarding spare parts availability is currently unavailable. Please contact customer support for further assistance.
Related documentsFLEASICUT420


Ask a question about this manual
Ask about setup, troubleshooting, compatibility, parts, safety, or missing instructions. Manuals+ will review the question and use this page’s manual context to help answer it.