
1. Introduction
This manual provides comprehensive instructions for the safe and proper installation, operation, and maintenance of your VideoSecu Tilting Low Profile TV Wall Mount. Please read all instructions carefully before beginning installation to ensure a secure and correct setup.
The VideoSecu MP501B wall mount is designed to securely hold LCD, LED, and Plasma televisions ranging from 37 to 75 inches, with a maximum weight capacity of 165 lbs (75 kg). It features a low-profile design, sitting approximately 2.2 inches from the wall, and offers a 15-degree forward tilt for optimal viewing angles.
2. Safety Information
WARNING: Failure to read and follow all instructions may result in personal injury, property damage, or voiding of warranty. If you have any questions, please contact VideoSecu customer support or a qualified installer.
- Weight Capacity: Do not exceed the maximum weight capacity of 165 lbs (75 kg).
- TV Size: This mount is suitable for most 37-75 inch TVs. However, it may not be compatible with some older 60-75 inch TVs manufactured before 2013 due to differing VESA patterns. Verify your TV's VESA pattern before installation.
- Wall Structure: Ensure the mounting surface can safely support the combined weight of the mount and your television. This mount is designed for installation on wood studs (16" or 24" on center) or solid concrete/brick walls. Do not install on drywall alone.
- Tools: Use appropriate tools for installation. Always wear safety glasses.
- Assembly: Do not assemble or install if any parts are missing or damaged.
- Children: Keep children away during installation. Small parts may be a choking hazard.
3. Package Contents
Verify that all components are present and undamaged before proceeding with installation. If any parts are missing or defective, please contact VideoSecu customer service.
- Wall Plate Assembly
- TV Bracket Arms (2)
- Standard Hardware Pack (various screws, washers, spacers, anchors)
- Bubble Level
- HDMI Cable

Image: Included accessories, typically a bubble level and an HDMI cable.
4. Setup and Installation
Follow these steps carefully for a secure installation. Professional installation is recommended if you are unsure about any part of the process.
4.1 Identify Wall Type and Locate Studs
This mount is designed for wood stud walls (16" or 24" on center) or solid concrete/brick walls. Use a stud finder to locate the edges of your wood studs. Mark the center of the studs. For concrete walls, ensure the wall is solid and capable of supporting the weight.
4.2 Attach Wall Plate to Wall
- Position the wall plate on the wall at your desired height. Use the included bubble level to ensure it is perfectly horizontal.
- Mark the drilling locations through the holes on the wall plate.
- For wood studs: Drill pilot holes (e.g., 7/32" or 5.5mm) into the center of the marked studs.
- For concrete walls: Drill pilot holes (e.g., 3/8" or 10mm) to the appropriate depth. Insert concrete anchors into the holes.
- Secure the wall plate to the wall using the appropriate lag bolts and washers. Tighten firmly but do not overtighten.

Image: Wall plate with mounting points and features. Note the 32-inch wide wall plate for stud support.
4.3 Attach TV Brackets to Television
- Carefully place your TV face down on a soft, clean surface to prevent screen damage.
- Identify the VESA mounting holes on the back of your TV.
- Select the correct diameter and length screws from the hardware pack that fit your TV's VESA holes. Use washers and spacers as needed to ensure a snug fit without overtightening.
- Attach the two TV bracket arms to the back of your television. Ensure the arms are oriented correctly (hooks facing upwards) and are level with each other.
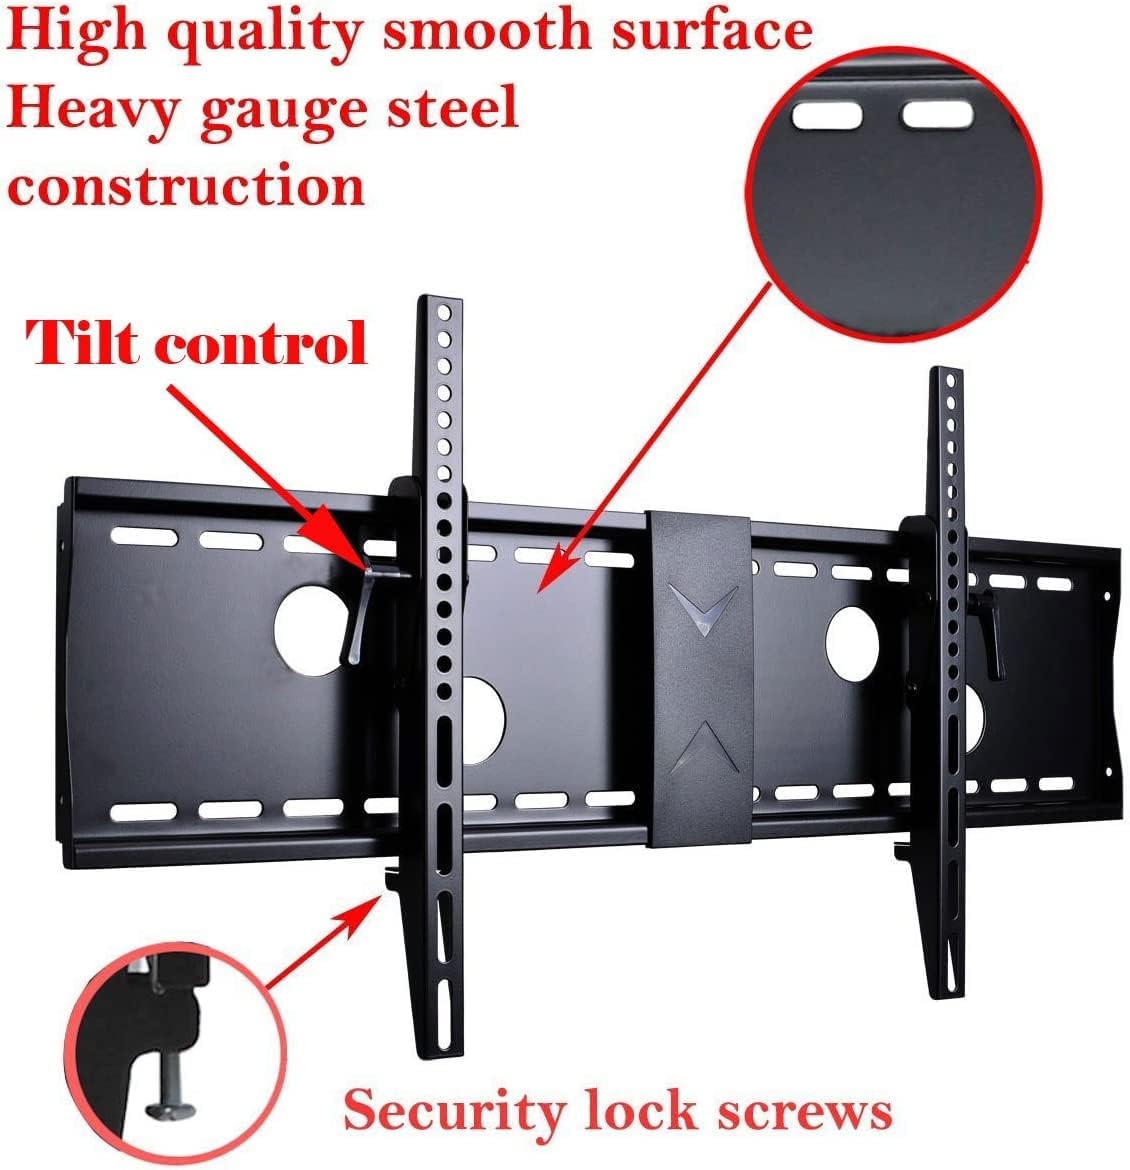
Image: TV bracket arms with tilt control and security lock screws.
4.4 Mount TV to Wall Plate
- With assistance, carefully lift the television with the attached brackets.
- Hook the TV bracket arms onto the top edge of the wall plate.
- Gently lower the TV until the brackets are fully seated on the wall plate.
- Locate the security lock screws at the bottom of the TV bracket arms. Tighten these screws to secure the TV to the wall plate, preventing accidental dislodging.

Image: Close-up of the security lock screw for securing the TV to the wall plate.
5. Operating the Mount (Tilt Adjustment)
The VideoSecu MP501B mount allows for a forward tilt adjustment of 0 to 15 degrees to achieve your preferred viewing angle.
- To adjust the tilt, loosen the tilt control knobs located on the side of each TV bracket arm.
- Carefully tilt the television to the desired angle.
- Once the desired tilt is achieved, firmly tighten the tilt control knobs to lock the TV in position.

Image: Side view illustrating the mount's tilt capability.
6. Maintenance
- Cleaning: Dust the mount periodically with a soft, dry cloth. Avoid using abrasive cleaners or solvents.
- Inspection: Periodically check all screws and bolts to ensure they remain tight and secure. Over time, vibrations or movement can cause fasteners to loosen.
- Damage: If any part of the mount appears damaged or worn, discontinue use and contact VideoSecu customer support for replacement parts or advice.
7. Troubleshooting
- TV is not level: Ensure the wall plate was installed level using the bubble level. If the wall plate is level, check if the TV bracket arms are attached evenly to the TV. Adjust as necessary.
- Difficulty tilting the TV: Loosen the tilt control knobs slightly more. Ensure no cables are obstructing the tilt mechanism.
- Mount feels loose on the wall: Immediately remove the TV from the mount. Re-check all wall mounting bolts for tightness. Ensure the wall structure is adequate. If issues persist, consult a professional installer.
- TV not securely attached to wall plate: Ensure the security lock screws at the bottom of the TV bracket arms are fully tightened.
8. Specifications
| Brand | VideoSecu |
| Model Number | MP501B |
| Mounting Type | Wall Mount |
| Movement Type | Tilt |
| Compatible Devices | Television (LCD, LED, Plasma) |
| TV Size Compatibility | 37 - 75 inches (most models) |
| Maximum Weight Capacity | 165 lbs (75 kg) |
| Maximum Tilt Angle | 15 Degrees (forward) |
| Profile from Wall | 2.2 inches (flat position) |
| VESA Compatibility | 200x100, 200x200, 300x200, 300x300, 400x300, 400x400, 600x400, 700x400mm |
| Wall Plate Width | Up to 28 inches (710mm) for stud separation |
| Item Weight | 10 pounds (approx.) |
| Color | Black |
| UPC | 753182744230 |
9. Warranty and Support
For warranty information and customer support, please refer to the documentation included with your product packaging or visit the official VideoSecu website. If you have any questions regarding installation or operation, please contact VideoSecu customer service directly.