
1. Introduction
Thank you for choosing the Nordlux Vejers Outdoor Wall Light with Motion Sensor. This manual provides essential information for the safe installation, operation, and maintenance of your new lighting fixture. Please read these instructions carefully before installation and retain them for future reference.
This outdoor wall light is designed for exterior use only and features an integrated motion sensor for enhanced functionality and energy efficiency. It accommodates one E27 bulb with a maximum wattage of 60W.
2. Safety Information
- Electrical Safety: Installation must be performed by a qualified electrician in accordance with local wiring regulations. Always switch off the main power supply before commencing any installation or maintenance work.
- Outdoor Use: This fixture is rated IP54, indicating protection against dust ingress and splashing water. It is suitable for outdoor environments.
- Bulb Compatibility: Use only E27 bulbs with a maximum wattage of 60W. The fixture is compatible with bulbs of energy classes A++ to D. Do not exceed the maximum wattage.
- Handling: Handle the glass components with care to prevent breakage.
- Cleaning: Disconnect power before cleaning. Use a soft, dry cloth. Do not use abrasive cleaners or solvents.
3. Package Contents
Please check that all components are present and undamaged:
- Nordlux Vejers Outdoor Wall Light fixture (Model 25101003)
- Mounting hardware (screws, wall plugs)
- Instruction Manual
Note: The E27 bulb is not included and must be purchased separately.
4. Specifications
| Model Number | 25101003 |
| Brand | Nordlux |
| Dimensions (L x W x H) | 9.5 x 9.5 x 23.01 cm |
| Weight | 1.39 kg (3.07 lbs) |
| Material | Metal, Glass |
| Color | Body: Black, Lamp Head: Transparent |
| Power Source | Electric Cable |
| Voltage | 230 Volts |
| Bulb Base | E27 |
| Max Wattage | 60 Watts |
| Number of Bulbs | 1 (Bulb not included) |
| Special Feature | Motion Detector |
| IP Rating | IP54 (Waterproof) |
| Mounting Type | Wall Mount, Surface Installation |
| Usage | Outdoor Use Only |
5. Setup and Installation
Important: Ensure the main power supply is switched off at the fuse box before starting installation.
- Choose Location: Select a suitable outdoor wall location for surface mounting. Ensure the surface is stable and can support the fixture's weight.
- Prepare Wiring: Route the electrical cable to the chosen installation point.
- Mounting the Base:
- Carefully detach the mounting bracket or base from the main fixture if it's separate.
- Hold the mounting bracket against the wall at the desired height and mark the drilling points.
- Drill holes using an appropriate drill bit for your wall type. Insert wall plugs if necessary.
- Secure the mounting bracket to the wall using the provided screws.
- Electrical Connection:
- Connect the live (L), neutral (N), and earth (E) wires from your mains supply to the corresponding terminals on the fixture. Ensure connections are secure and correctly insulated.
- Refer to the wiring diagram provided with the product packaging for specific terminal identification.
- Attach Fixture Body: Secure the main body of the light fixture to the mounted bracket, ensuring all wires are safely tucked away and not pinched.
- Install Bulb: Unscrew the glass cover if necessary. Carefully screw one E27 bulb (max 60W) into the lamp holder. Do not overtighten. Reattach the glass cover securely.
- Restore Power: Once installation is complete and all connections are secure, switch the main power supply back on.
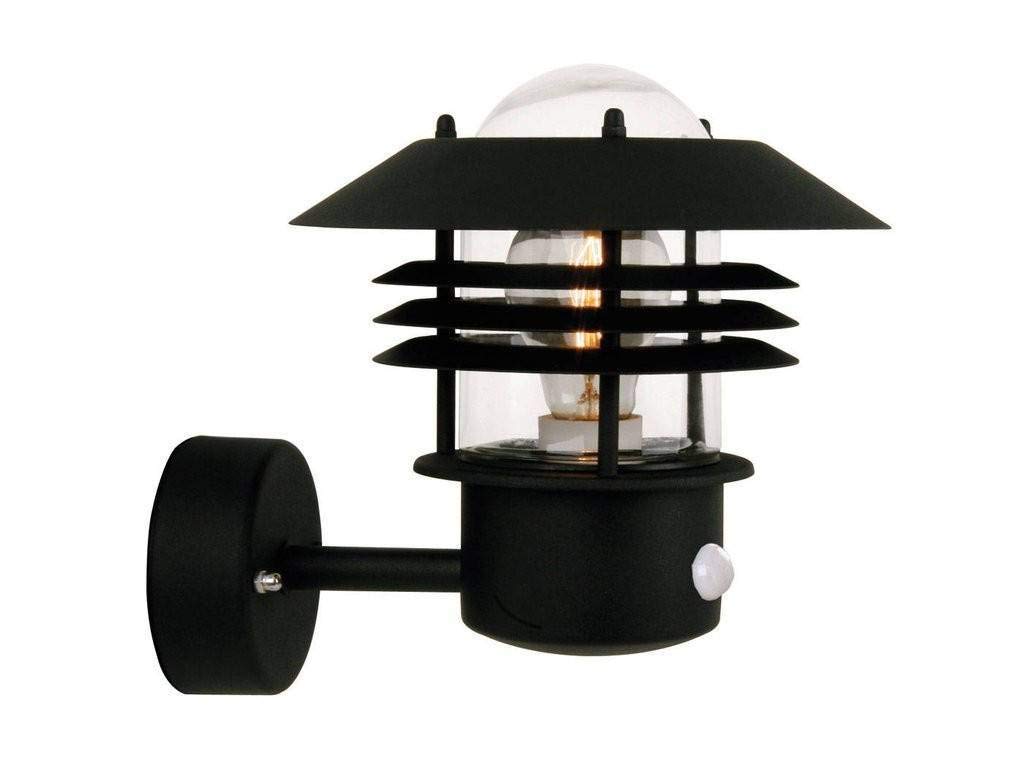
Image: The Nordlux Vejers outdoor wall light mounted on a wooden surface, illuminated. The motion sensor is visible at the bottom of the fixture.
6. Operating Instructions
The Nordlux Vejers wall light features an integrated motion sensor for automatic operation.
- Automatic Activation: The light will automatically turn on when motion is detected within its sensing range and ambient light conditions are below a set threshold.
- Motion Sensor Adjustment: The motion sensor typically has adjustable settings for sensitivity (detection range) and time duration (how long the light stays on after detection). These adjustments are usually made via small dials or switches located on the sensor itself, often behind a protective cover. Refer to the specific markings on your sensor for details on adjusting these settings to your preference.
- Light Duration: After motion ceases, the light will remain on for the pre-set duration before turning off automatically.
7. Maintenance
- Cleaning: To clean the fixture, ensure the power is off. Wipe the metal and glass surfaces with a soft, damp cloth. Do not use harsh chemicals, abrasive cleaners, or solvents, as these can damage the finish or components.
- Bulb Replacement:
- Ensure the power supply to the fixture is switched off.
- Carefully unscrew the glass cover.
- Unscrew the old E27 bulb counter-clockwise.
- Screw in a new E27 bulb (max 60W) clockwise until secure.
- Reattach the glass cover, ensuring it is sealed properly to maintain the IP54 rating.
- Restore power.
- Inspection: Periodically inspect the fixture for any signs of wear, damage, or loose connections. If any issues are found, disconnect power and consult a qualified electrician.
8. Troubleshooting
| Problem | Possible Cause | Solution |
|---|---|---|
| Light does not turn on. | No power supply. Faulty bulb. Incorrect wiring. Motion sensor settings. | Check circuit breaker/fuse. Replace bulb. Verify wiring connections (consult electrician). Adjust motion sensor sensitivity/light threshold. |
| Light stays on constantly. | Continuous motion detected. Motion sensor faulty. Incorrect wiring. | Ensure no objects are causing constant detection. Check sensor for damage. If faulty, replace. Verify wiring connections (consult electrician). |
| Motion sensor not detecting. | Sensor obstructed. Sensitivity too low. Ambient light too high. Sensor faulty. | Clear obstructions from sensor's field of view. Increase sensor sensitivity. Adjust light threshold setting. Check sensor for damage. If faulty, replace. |
If you are unable to resolve an issue, please contact a qualified electrician or Nordlux customer support.
9. Warranty and Support
Nordlux products are manufactured to high-quality standards and come with a standard warranty. For specific warranty terms and conditions, please refer to the warranty information provided with your purchase or visit the official Nordlux website.
For technical support, spare parts, or further assistance, please contact Nordlux customer service through their official website or your local retailer. When contacting support, please have your model number (25101003) and proof of purchase readily available.
Nordlux Official Website: www.nordlux.com


