
Rapidair 90500
Rapidair 90500 Air Compressor Accessories Master Kit User Manual
Model: 90500 | Brand: Rapidair
Product Overview
The Rapidair 90500 Master Kit provides a comprehensive solution for setting up a compressed air system in your workshop or garage. This kit features durable 1/2 inch nylon tubing and push-to-connect fittings, designed for easy installation without the need for glue, soldering, or crimping. It allows for flexible routing on wall surfaces or within walls, helping to reduce clutter and optimize your workspace.
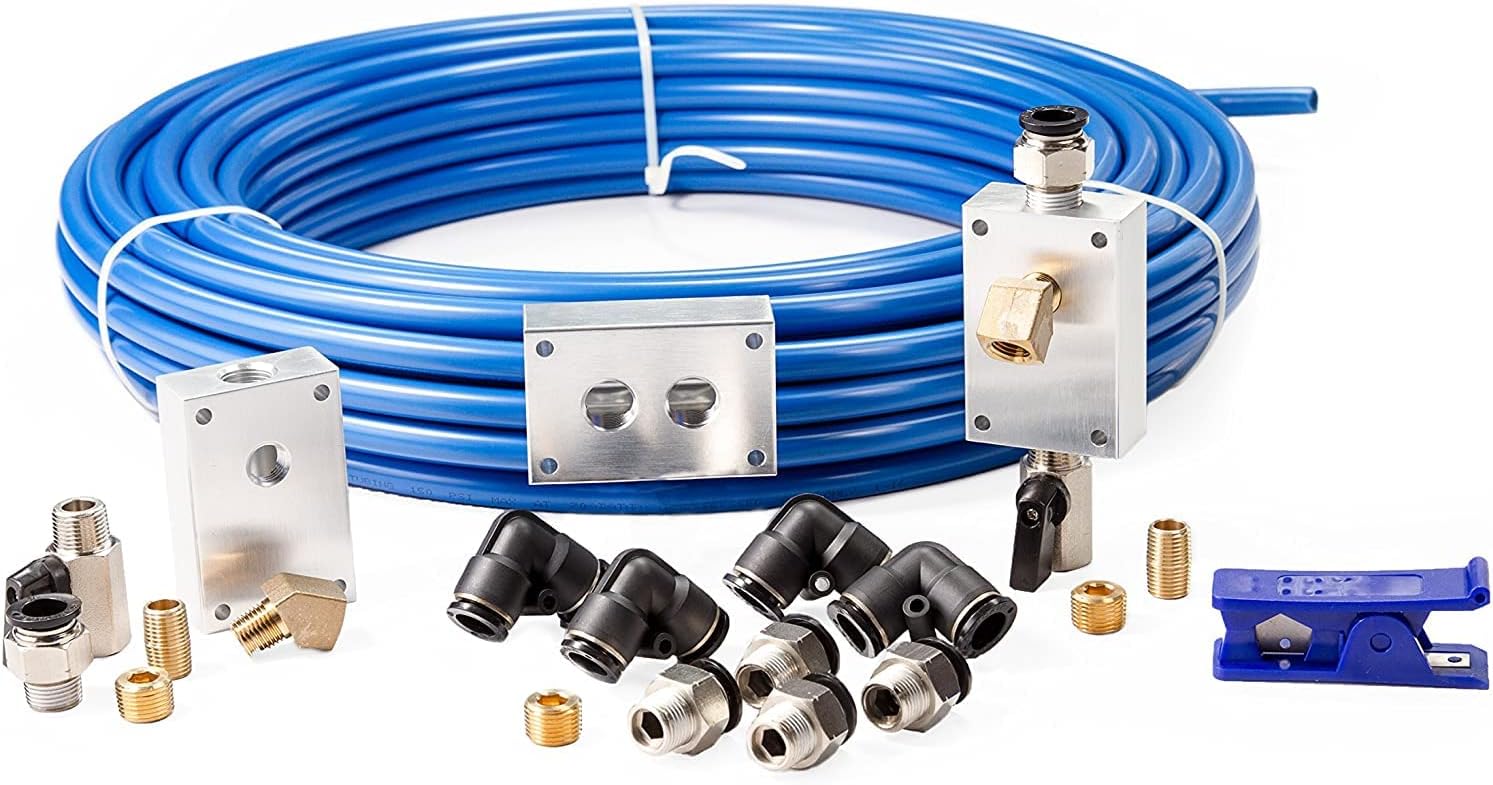
Image: The Rapidair 90500 Master Kit, showcasing the coiled blue nylon tubing, aluminum manifold blocks, various push-to-connect fittings, brass nipples, and a blue tubing cutter.
Key Features:
- 100 feet of 1/2 inch nylon tubing for extensive coverage.
- Two (2) air outlet kits for convenient access points.
- One (1) compressor manifold kit for central air distribution.
- Maximum working pressure of 150 PSI.
- Easy-to-use Push-to-Connect fittings for quick and secure connections.
- Tubing dimensions: 1/2 inch outside diameter x 3/8 inch inside diameter.
- Recommended for use up to 50 feet from the air compressor, suitable for buildings up to 1200 sq. ft. and air compressors up to 5 horsepower.
Included Components
The Rapidair 90500 Master Kit comes with the following components:
- 100 ft. of 1/2 in. Tubing
- 2 Aluminum Outlet Blocks
- 1 Aluminum Manifold Block
- Tubing Cutter
- 6 x 3/8'' NPT Straight Fittings
- 4 x Union Elbow Fittings
- 2 x Hand Valves
- 2 x 1/4'' NPT Brass Nipples
- 2 x 1/4'' NPT Brass 45-degree Elbows
- 3 x 3/8'' NPT Brass Plugs
- Quick couplers (pictured, but sold separately as per product description)
Setup and Installation
Proper setup is crucial for the optimal performance and longevity of your Rapidair compressed air system. Follow these steps carefully.
1. Planning Your Layout:
Before beginning installation, plan the layout of your compressed air system. Consider the location of your air compressor, the desired air outlet locations, and the most efficient routing for the tubing. The system is designed for flexibility, allowing for expansion or modification later.
2. Tubing Preparation:
- Unroll the 1/2 inch nylon tubing and allow it to relax. For easier handling, especially in cooler temperatures, you may unroll it and let it sit in a warm area or sunlight for a few hours to reduce coil memory.
- Use the included tubing cutter to make clean, square cuts. A clean cut is essential for a secure, leak-free connection with the push-to-connect fittings. Avoid using knives or other tools that may deform the tubing end.
3. Connecting Fittings:
- To connect the tubing to a push-to-connect fitting, simply push the tubing firmly into the fitting until it bottoms out. You should feel a "double thump" or two distinct clicks as the tubing passes through the O-ring and then seats against the internal stop.
- To disconnect, push the collar of the fitting inwards towards the body of the fitting, and then pull the tubing out.
- For threaded connections on manifold blocks, outlet blocks, or brass fittings, apply appropriate thread sealant (e.g., PTFE tape or pipe dope) to ensure a leak-free seal.
4. Mounting Components:
- Mount the compressor manifold block near your air compressor.
- Install the aluminum outlet blocks at your desired air access points. These can be mounted on wall surfaces or recessed within walls.
- Secure the tubing along its path using appropriate clips or hangers (not included) to prevent sagging and protect it from damage. Space supports every 4-6 feet.
5. System Integration:
Connect the main air supply line from your compressor to the manifold block. Then, run tubing from the manifold block to each air outlet location. Ensure all connections are secure before pressurizing the system.
Operating Instructions
Once your Rapidair system is installed, operating it is straightforward.
1. Initial Pressurization:
After completing installation, slowly pressurize the system by turning on your air compressor. Listen and check for any leaks. Address any leaks immediately before full operation.
2. Using Air Outlets:
Attach your air tools or hoses to the quick couplers (if installed) on the air outlet blocks. The hand valves can be used to control air flow at each outlet.
3. Pressure Management:
The system is designed for a maximum working pressure of 150 PSI. Ensure your air compressor's output pressure does not exceed this limit. If your compressor operates at a higher pressure, use a pressure regulator at the compressor or manifold to reduce the pressure to 150 PSI or below.
Maintenance
Regular maintenance ensures the longevity and efficiency of your Rapidair compressed air system.
1. Leak Checks:
Periodically check all connections for air leaks. Leaks can lead to reduced compressor efficiency and increased energy consumption. A simple method is to spray a soapy water solution on connections; bubbles indicate a leak.
2. Tubing Inspection:
Inspect the nylon tubing for any signs of damage, kinks, or wear. While durable, physical damage can compromise the system's integrity. Replace any damaged sections promptly.
3. Fitting Integrity:
Ensure push-to-connect fittings are securely seated. If a fitting appears loose or is leaking, disconnect and re-insert the tubing, ensuring a clean, square cut. If issues persist, the fitting may need replacement.
4. Condensate Management:
While the system is designed to minimize water issues, it is good practice to regularly drain any condensate from your air compressor's tank. Installing an air dryer or filter/separator upstream of the Rapidair system can further improve air quality and prevent moisture-related issues.
Troubleshooting
This section addresses common issues you might encounter with your Rapidair compressed air system.
| Problem | Possible Cause | Solution |
|---|---|---|
| Air Leak at Fitting | Tubing not fully inserted, improper cut, damaged O-ring in fitting, insufficient thread sealant. | Ensure tubing is fully seated. Re-cut tubing end cleanly. Inspect fitting for damage; replace if necessary. Reapply thread sealant to threaded connections. |
| Low Air Pressure at Outlet | Compressor not reaching desired pressure, significant air leaks, tubing restriction, hand valve partially closed. | Check compressor operation. Identify and fix all leaks. Inspect tubing for kinks or blockages. Ensure hand valves are fully open. |
| Water in Air Lines | High humidity, compressor condensate not drained, lack of air dryer/filter. | Regularly drain compressor tank. Consider installing an air dryer or filter/separator. |
| Tubing Kinks or Collapses | Improper installation (sharp bends), excessive heat, external damage. | Ensure tubing runs are smooth with gradual bends. Avoid placing tubing near heat sources. Replace damaged sections. |
Specifications
| Attribute | Detail |
|---|---|
| Model Number | 90500 |
| Brand | Rapidair |
| Tubing Length | 100 Feet |
| Tubing Material | Nylon |
| Tubing Outer Diameter | 1/2 inch |
| Tubing Inner Diameter | 3/8 inch |
| Maximum Working Pressure | 150 PSI |
| Recommended Compressor HP | Up to 5 Horsepower |
| Product Dimensions | 45.72 x 45.72 x 10.16 cm (17.5" x 17.3" x 4.2") |
| Item Weight | 3.86 kg |
Warranty and Support
The Rapidair 90500 Air Compressor Accessories Master Kit comes with a 1-year limited warranty from the manufacturer.
For warranty claims, technical assistance, or product support, please contact Rapidair customer service. Refer to the product packaging or the official Rapidair website for the most current contact information.
It is recommended to retain your proof of purchase for warranty purposes.
Related documents90500


Ask a question about this manual
Ask about setup, troubleshooting, compatibility, parts, safety, or missing instructions. Manuals+ will review the question and use this page’s manual context to help answer it.