1. Introduction
Thank you for choosing the Roadstar CD-853 USMP car stereo. This manual provides detailed instructions for the proper installation, operation, and maintenance of your new car audio system. Please read this manual thoroughly before using the product to ensure correct usage and to prevent damage.
The Roadstar CD-853 USMP is designed to provide high-quality audio entertainment in your vehicle, featuring CD, MP3, CD-R, and CD-RW playback capabilities, along with an FM/AM radio tuner.
2. Safety Information
- Professional Installation Recommended: For optimal performance and safety, it is highly recommended to have this unit installed by a qualified professional.
- Power Supply: This unit is designed for a 12V DC negative ground electrical system. Ensure correct wiring to prevent short circuits or damage.
- Avoid Water and Moisture: Do not expose the unit to water or excessive moisture. This can cause electric shock or fire.
- Temperature: Avoid extreme temperatures. Ensure proper ventilation around the unit.
- Driving Safety: Do not operate the unit in a way that distracts you from driving. Always prioritize road safety.
- Volume Control: Keep the volume at a level where you can still hear outside traffic sounds. Prolonged exposure to high volume levels can cause hearing damage.
3. Product Overview
Front Panel Layout
The following image illustrates the main controls and features on the front panel of your Roadstar CD-853 USMP car stereo.
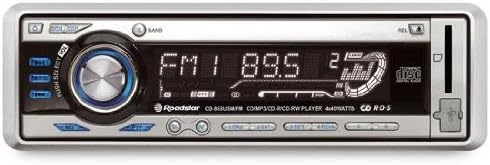
Figure 1: Front panel of the Roadstar CD-853 USMP car stereo. This image displays the front panel of the Roadstar CD-853 USMP car stereo, highlighting the main controls and display. Key features visible include the central volume/select knob, radio band selection, CD slot, and display showing radio frequency and playback information.
- Power Button: Located on the top left, used to turn the unit on or off.
- EQ/DSP Button: Adjusts equalizer and digital sound processing settings.
- PUSH SELECT / VOL Knob: Central rotary knob for volume control. Pressing it typically accesses menu options or selection.
- BAND Button: Selects between different radio bands (FM1, FM2, FM3, AM1, AM2).
- Display: Shows current status, radio frequency, track information, and menu options.
- CD Slot: For inserting audio CDs, MP3 CDs, CD-R, and CD-RW discs.
- REL Button: Release button, typically for detaching the front panel.
- Eject Button: Located near the CD slot, used to eject discs.
- USB/AUX Input: (If present, typically indicated by an icon) For connecting external audio devices or USB storage.
4. Setup
4.1 Installation
Due to the complexity of vehicle electrical systems, professional installation is strongly recommended. Incorrect installation can lead to damage to the unit, your vehicle, or personal injury. Refer to your vehicle's service manual for specific wiring diagrams and dashboard disassembly instructions.
4.2 Wiring Connections
Ensure all wiring connections are secure and correctly matched. Common wiring colors include:
- Yellow: Constant 12V (Battery)
- Red: Switched 12V (Ignition/Accessory)
- Black: Ground
- Blue: Power Antenna / Amplifier Remote Turn-On
- Speaker Wires: Typically pairs of solid and striped wires (e.g., White/White-Black for Left Front, Grey/Grey-Black for Right Front, Green/Green-Black for Left Rear, Purple/Purple-Black for Right Rear).
Always consult the wiring diagram provided with your unit and your vehicle's specific wiring information.
4.3 Initial Power-On
After installation, turn on your vehicle's ignition. Press the Power button on the unit. The display should illuminate, indicating successful power-up. If the unit does not power on, recheck all wiring connections and your vehicle's fuse box.
5. Operating Instructions
5.1 Basic Operation
- Power On/Off: Press the Power button (top left) to turn the unit on. Press and hold the Power button for a few seconds to turn it off.
- Volume Control: Rotate the central PUSH SELECT / VOL knob clockwise to increase volume and counter-clockwise to decrease volume.
- Source Selection: Press the MODE or SRC button (if present, typically below the volume knob) to cycle through available audio sources (e.g., Radio, CD, USB, AUX).
5.2 Radio Operation
- Select Band: Press the BAND button to switch between FM1, FM2, FM3, AM1, and AM2 bands.
- Manual Tuning: Use the TUNE buttons (typically left/right arrows) to manually adjust the frequency.
- Automatic Seek Tuning: Press and hold the TUNE buttons to automatically seek the next strong station.
- Preset Stations: To store a station, tune to the desired frequency, then press and hold one of the numbered preset buttons (1-6) until you hear a beep. To recall a preset, simply press the corresponding numbered button.
5.3 CD/MP3 Playback
- Inserting a Disc: Gently insert a CD (audio CD, MP3 CD, CD-R, or CD-RW) into the CD Slot with the label side facing up. The unit will automatically pull the disc in and begin playback.
- Ejecting a Disc: Press the Eject button (located near the CD slot) to remove the disc.
- Play/Pause: Press the PLAY/PAUSE button (if present, often integrated with the volume knob press) to pause or resume playback.
- Track Skip: Use the SKIP buttons (typically forward/backward arrows) to skip to the next or previous track.
- Fast Forward/Reverse: Press and hold the SKIP buttons to fast forward or reverse within a track.
- Folder Navigation (MP3): For MP3 CDs, use the FOLDER UP/DOWN buttons (if present) to navigate between folders.
5.4 Sound Settings
- Equalizer (EQ): Press the EQ/DSP button to cycle through preset equalizer modes (e.g., Pop, Rock, Classic) or to access manual bass/treble adjustments.
- Bass/Treble: When in EQ adjustment mode, rotate the PUSH SELECT / VOL knob to adjust bass or treble levels. Press the knob to confirm selection or move to the next setting.
6. Maintenance
- Cleaning the Unit: Use a soft, dry cloth to clean the front panel. For stubborn dirt, dampen the cloth lightly with water. Never use harsh chemicals, abrasive cleaners, or solvents.
- Disc Handling: Handle discs by their edges. Keep them clean and free from scratches. Store discs in their cases when not in use. Do not use cracked, warped, or irregularly shaped discs, as they can damage the player mechanism.
- Detachable Front Panel: If your unit has a detachable front panel, remove it when leaving your vehicle to deter theft. Store it in a protective case.
7. Troubleshooting
If you encounter problems with your unit, refer to the following table for common issues and solutions.
| Problem | Possible Cause | Solution |
|---|---|---|
| No power | Incorrect wiring; Blown fuse; Vehicle ignition off. | Check power and ground connections. Replace fuse if necessary. Turn vehicle ignition to ACC or ON position. |
| No sound | Volume too low; Mute function active; Incorrect speaker wiring. | Increase volume. Deactivate mute. Check speaker connections. |
| Disc error / Disc not playing | Disc is dirty, scratched, or inserted incorrectly; Disc format not supported. | Clean the disc. Insert disc correctly. Use supported disc formats (CD, MP3, CD-R, CD-RW). |
| Poor radio reception | Antenna not connected; Weak signal area; Antenna damaged. | Ensure antenna is securely connected. Try tuning to a stronger station. Check antenna for damage. |
| Buttons not responding | Unit frozen; Detachable panel not properly seated. | Reset the unit (refer to manual for reset button location, often a small pinhole). Re-attach the front panel securely. |
If the problem persists after trying these solutions, please contact customer support or a qualified service technician.
8. Specifications
- Model: Roadstar CD-853 USMP
- Power Output: 160 Watts (4 x 40 Watts)
- Supported Media: CD, MP3, CD-R, CD-RW
- Tuner: FM/AM Radio
- Power Supply: 12V DC (Negative Ground)
- ASIN: B000YSFRMY
9. Warranty & Support
Roadstar products are manufactured to high-quality standards. This product is covered by a limited warranty from the date of purchase. Please refer to the warranty card included with your product for specific terms and conditions.
For technical support, service inquiries, or further assistance, please visit the official Roadstar website or contact your authorized Roadstar dealer. Keep your proof of purchase for warranty claims.


