
Introduction
This manual provides detailed instructions for the safe and proper installation, operation, and maintenance of your VideoSecu ML405B2 TV Ceiling Mount. This mount is designed to securely hold most 19 to 32-inch TVs, and some LED displays up to 42 inches, provided they meet the specified VESA patterns and weight limits. It offers versatile viewing options with adjustable tilt, swivel, and rotation, making it suitable for various ceiling types, including vaulted designs.
Safety Information
WARNING: Failure to read and follow these instructions may result in serious personal injury, property damage, or voiding of your warranty. If you do not understand these instructions or have doubts about the safety of the installation, consult a qualified professional.
- Do not exceed the maximum weight capacity of 66 lbs (30 kg).
- Ensure your TV's VESA mounting patterns (75x75mm or 100x100mm) are compatible with this mount.
- Verify that the mounting surface (ceiling) can safely support the combined weight of the mount and your TV.
- Always use the provided hardware and follow all installation steps carefully.
- Avoid overtightening screws, which can cause damage.
- Keep children and pets away during installation.
- Periodically check all connections and fasteners to ensure they remain secure.
Package Contents
Please verify that all components are present and undamaged before beginning installation. If any parts are missing or defective, contact VideoSecu customer support.
- Ceiling Plate Assembly
- Adjustable Pole
- TV Mounting Plate (VESA compatible)
- Hardware Kit (screws, washers, spacers, anchors)
- Instruction Manual
Specifications
- Mounting Type: Ceiling Mount
- Material: Alloy Steel
- Color: Black
- Compatible Devices: Monitor, Television
- Screen Size Compatibility: Most 19-32 inches, some LED up to 42 inches
- VESA Compatibility: 75x75mm, 100x100mm
- Maximum Load Capacity: 66 lbs (30 kg)
- Tilt Adjustment: 20 degrees forward, 5 degrees backward
- Swivel Adjustment: 360 degrees
- Rotation Adjustment: 90 degrees
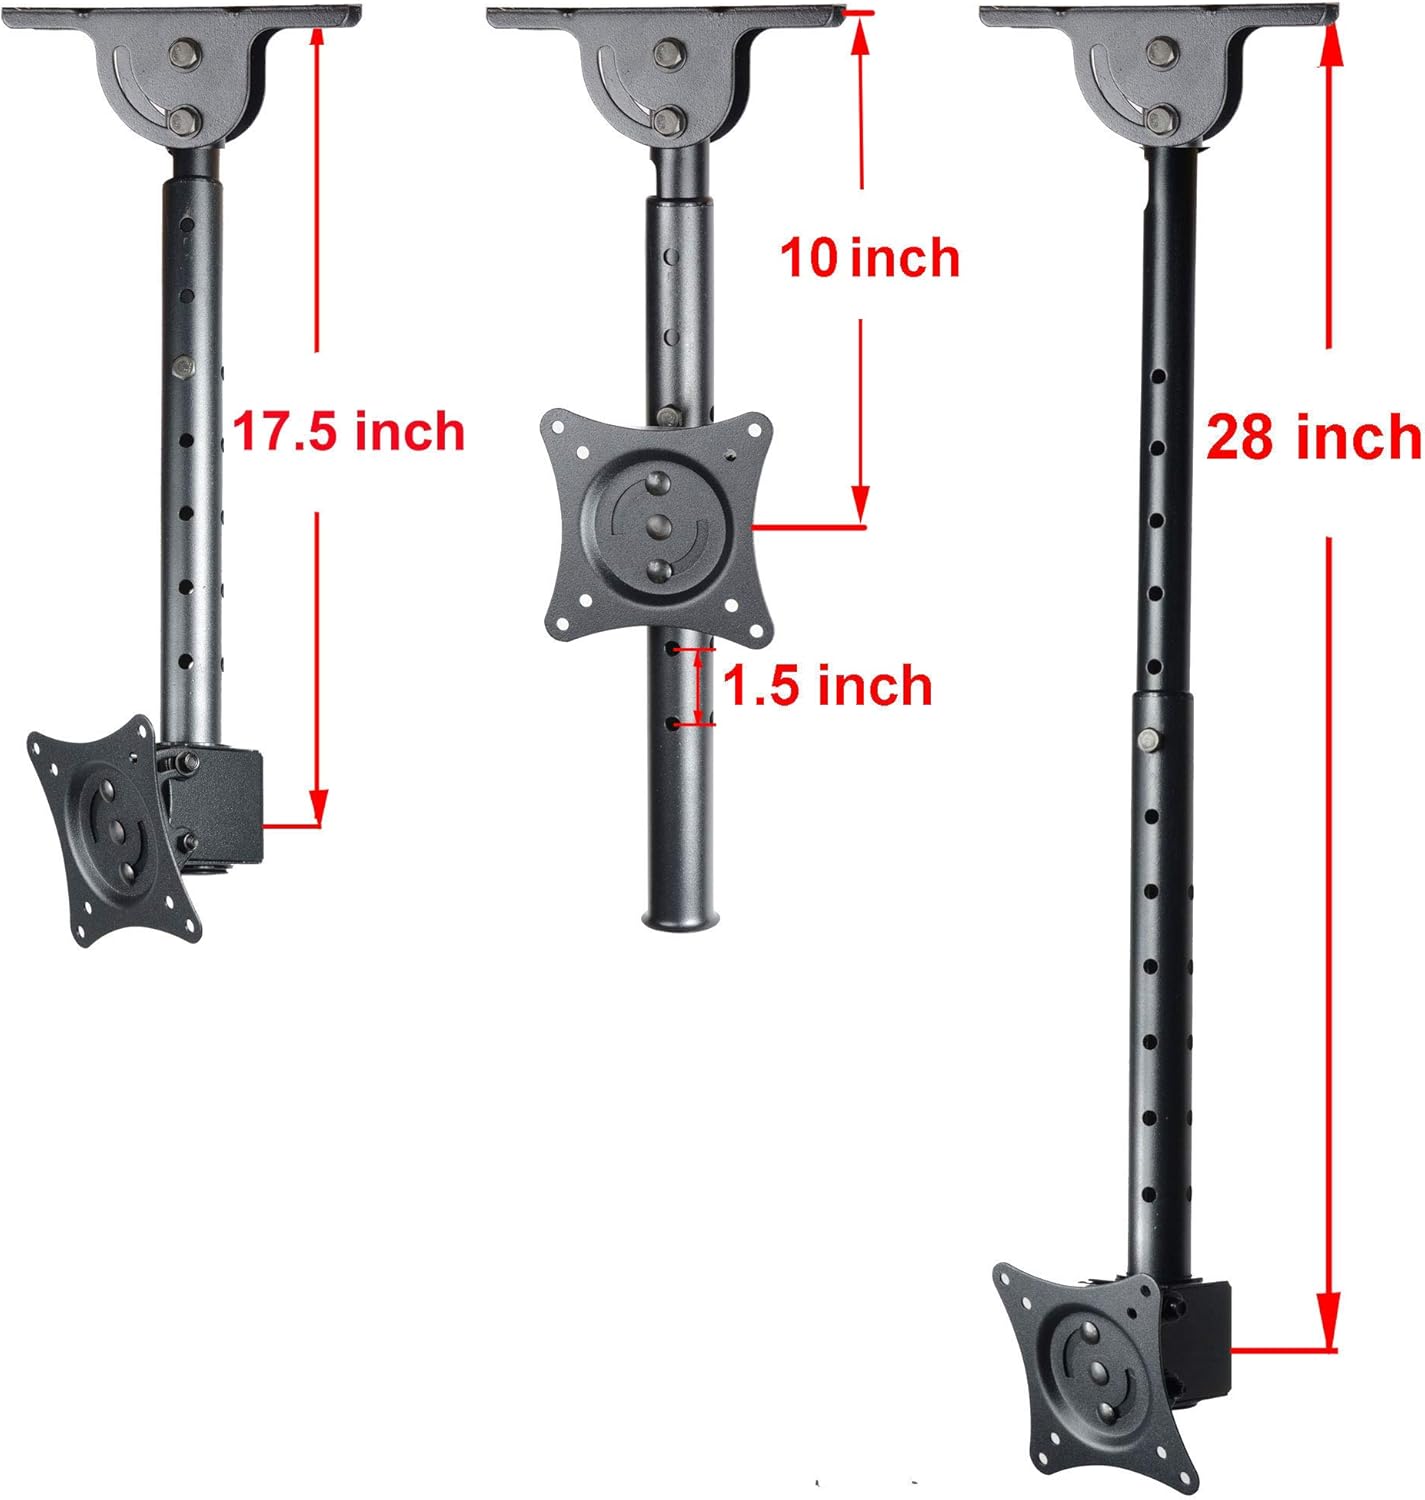
- Adjustable Pole Length: TV plate center to ceiling adjustable from 10 inches to 28 inches (in 1.5 inch increments)
- Manufacturer: VideoSecu
- Model Number: ML405B
Setup and Installation
Before installation, ensure you have the necessary tools (e.g., drill, stud finder, level, screwdriver) and that your ceiling structure can support the mount and TV weight.
Step 1: Prepare the Ceiling Plate
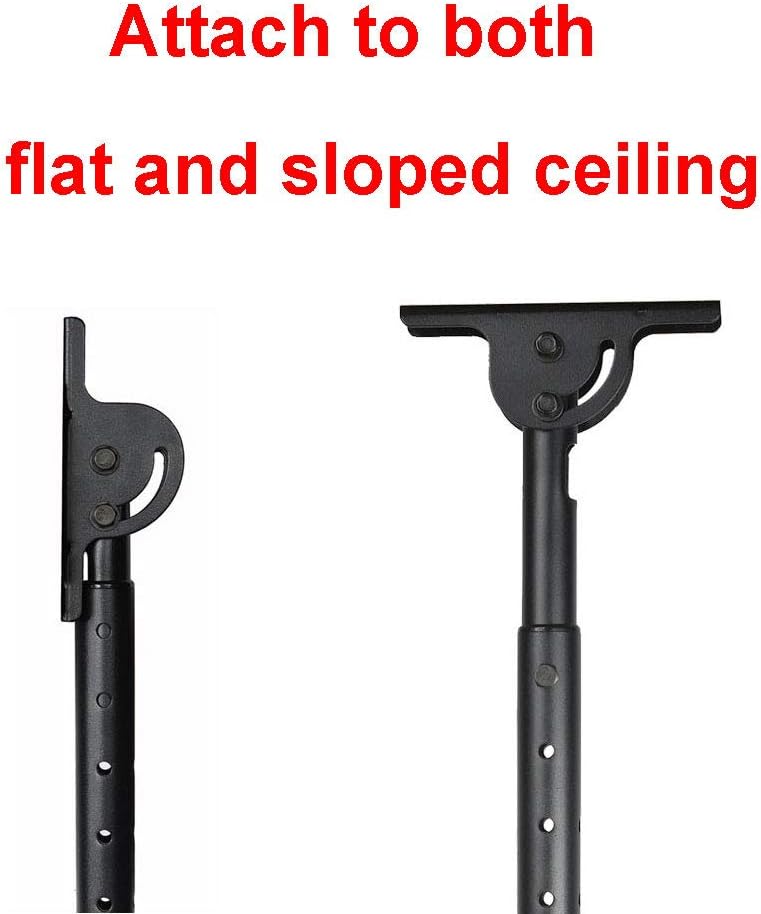
The ceiling plate is designed to attach to both flat and sloped ceilings. Position the plate at your desired location, ensuring it is aligned with a ceiling joist or appropriate structural support. Mark the drilling points.

Step 2: Mount the Ceiling Plate
Drill pilot holes at the marked locations. Secure the ceiling plate to the ceiling using the appropriate screws and anchors from the hardware kit. For wood joists, ensure screws penetrate deeply. For concrete, use concrete anchors. Ensure the plate is firmly attached and level.
Step 3: Assemble the Adjustable Pole
Attach the adjustable pole to the ceiling plate. The pole's height can be adjusted from 10 inches to 28 inches from the ceiling to the center of the TV plate, in 1.5-inch increments. Select the desired height and secure the pole using the provided pins or bolts.

Step 4: Attach the TV Mounting Plate to Your TV
Align the TV mounting plate with the VESA holes on the back of your television. Use the appropriate screws, washers, and spacers from the hardware kit to secure the plate to your TV. Ensure the screws are tightened firmly but do not overtighten.

Step 5: Hang the TV on the Pole
Carefully lift your TV (with the mounting plate attached) and hook it onto the end of the adjustable pole. Secure the TV to the pole using the locking mechanism or screws as indicated in the detailed diagram. Double-check all connections for security.

Operating and Adjustments
Once installed, your VideoSecu ML405B2 mount allows for various adjustments to achieve optimal viewing angles.
Tilt Adjustment
The TV plate can be tilted 20 degrees forward or 5 degrees backward. Loosen the tilt adjustment bolts, set the desired angle, and then securely tighten the bolts to lock the position.
Swivel Adjustment
The mount allows for a full 360-degree swivel. Gently rotate the TV to the left or right to achieve your preferred viewing direction.
Rotation Adjustment
The TV can be rotated up to 90 degrees. This feature is useful for leveling the screen or changing its orientation. Loosen the rotation mechanism, adjust, and then re-tighten.


Cable Management
The mount features an integrated cable management design. Route your TV cables through the pole to maintain a clean and organized appearance.
Maintenance
- Cleaning: Wipe the mount with a soft, dry cloth. Do not use abrasive cleaners or solvents.
- Periodic Checks: Every few months, inspect all mounting points and fasteners to ensure they are still tight and secure. Re-tighten any loose bolts.
- Damage Inspection: If any part of the mount appears damaged or worn, discontinue use and contact customer support for replacement parts or advice.
Troubleshooting
- TV is wobbling: Ensure all bolts, especially those connecting the pole to the ceiling plate and the TV plate to the pole, are securely tightened. Verify the ceiling structure is adequate.
- Difficulty adjusting tilt/swivel: Check if the adjustment bolts are sufficiently loosened before attempting to move the TV. Re-tighten after adjustment.
- TV is not level: Use the rotation adjustment feature to fine-tune the horizontal alignment of your TV.
- Missing parts: Refer to the 'Package Contents' section. If parts are missing, contact VideoSecu customer support immediately.
Warranty and Support
For warranty information, technical support, or to inquire about replacement parts, please refer to the official VideoSecu website or contact their customer service department directly. Keep your purchase receipt as proof of purchase.