
1. Introduction
This manual provides instructions for the assembly, care, and display of the Tamiya 1/6 Motorcycle Series No.32 Honda Monkey 40th Anniversary model kit. This highly detailed scale model accurately replicates the iconic Honda Monkey motorcycle, celebrating its 40th anniversary edition. Please read all instructions carefully before beginning assembly.

Figure 1: Assembled Tamiya Honda Monkey 40th Anniversary model kit. This image shows the completed model, featuring a black frame, red wheels, and a checkered seat, highlighting the detailed engine and chrome parts.
2. Safety Information
WARNING: CHOKING HAZARD - Small parts. Not for children under 3 years.
This model kit contains small parts, sharp tools, and chemical substances (adhesives, paints) that require careful handling. Adult supervision is recommended for builders under 15 years of age.
- Always work in a well-ventilated area when using paints, glues, and thinners.
- Keep all chemicals away from open flames, heat sources, and direct sunlight.
- Avoid contact of paints and glues with skin and eyes. In case of contact, rinse immediately with plenty of water and seek medical attention if irritation persists.
- Use appropriate safety tools, such as hobby knives and nippers, with caution to prevent injury.
- Dispose of waste materials responsibly according to local regulations.
- Keep all kit components and tools out of reach of small children and pets.
3. Package Contents
The Tamiya 16032 Honda Monkey 40th Anniversary model kit includes the following components:
- Plastic parts for the motorcycle frame, engine, wheels, and other components.
- 50cc engine with vinyl tubing parts for realistic detailing.
- High-quality markings (decals) for the 40th Anniversary bike and two normal version bikes.
- Metal plated parts, including muffler protector and handlebars, for a realistic finish.
- Special emblems for the fuel tank and side cover.
- Movable suspension with metal damper springs.
- Foldable handlebars.
- Custom muffler and damper option parts.
- Vinyl sticker replicating the checkered seat pattern.
- Checkered seat cover with flexible vinyl sticker.
- 40th Anniversary emblems on side covers.
- Eye-catching metal plated body highlights.
- Instruction manual (this document).
Please verify all parts are present and undamaged before beginning assembly. Contact customer support if any parts are missing or defective.
4. Assembly & Setup
4.1 Required Tools and Materials
Successful assembly requires specific tools and materials, which are not included in the kit. Refer to the images below for recommended items.
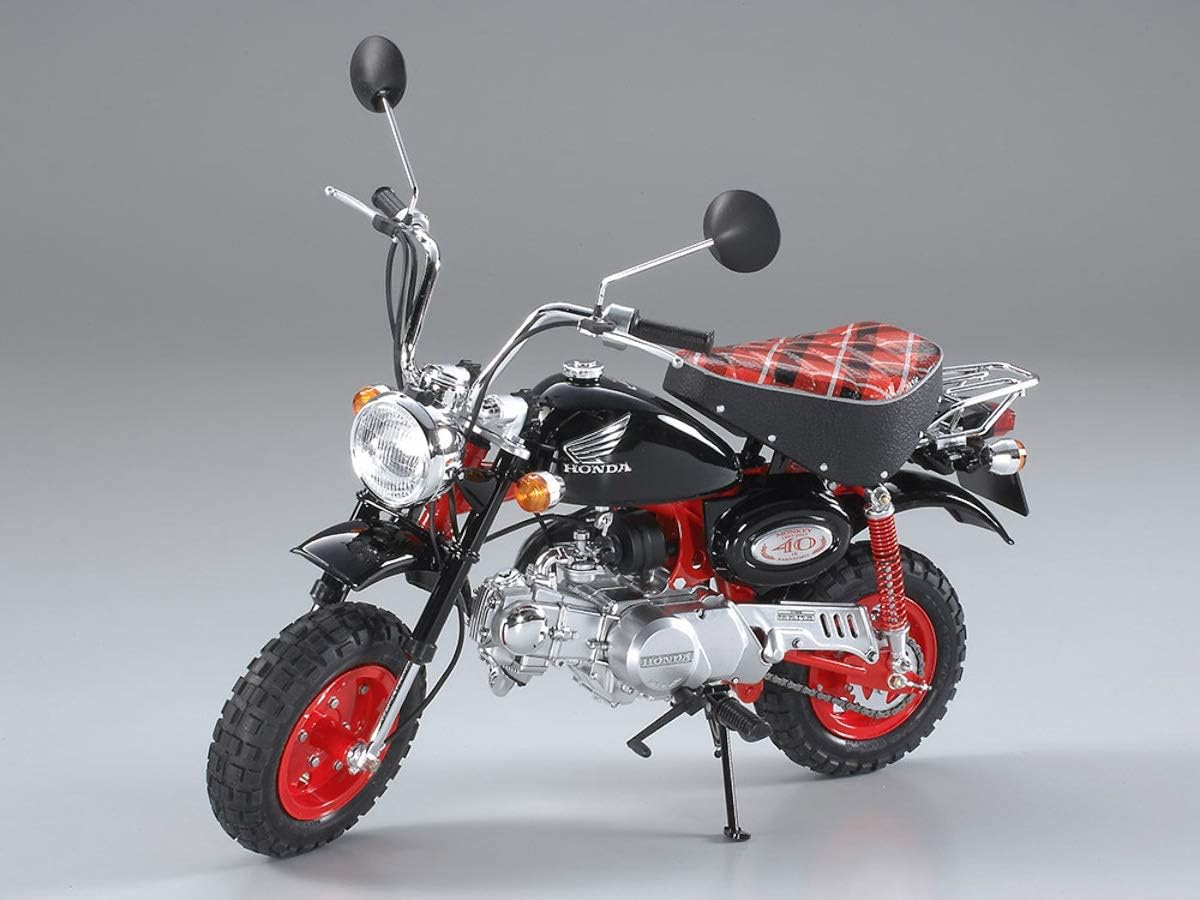
Figure 2: Recommended Paints. This image displays various Tamiya XF (flat acrylic), X (gloss acrylic), and TS (spray) paints, along with their corresponding color codes and descriptions, essential for painting the model.
Recommended Paints:
- XF-1 Flat Black, XF-16 Flat Aluminum, XF-19 Sky Grey
- X-1 Black, X-2 White, X-4 Blue, X-5 Green, X-10 Gun Metal, X-11 Chrome Silver, X-13 Metallic Blue, X-18 Semi Gloss Black, X-20A Thinner
- TS-8 Italian Red, TS-14 Black, TS-17 Gloss Aluminum, TS-26 Pure White, TS-29 Semi Gloss Black, TS-34 Camel Yellow

Figure 3: Recommended Tools and Adhesives. This image shows essential tools like angled tweezers, a cutter knife, decal scissors, side cutters, paint brushes, masking tape, plastic cement, and decal adhesive, crucial for precise model assembly.
Recommended Tools:
- Angled Tweezers (Art. Nr. 300074003)
- Cutter Knife (Art. Nr. 300074013)
- Decal Scissors (Art. Nr. 300074031)
- Side Cutters (Art. Nr. 300074035)
- Brush Set "Basic" (Art. Nr. 30007066)
- Masking Tape 10mm with Applicator (Art. Nr. 300087031)
Recommended Adhesives:
- Plastic Cement 40ml Tamiya (Art. Nr. 300087003)
- Plastic Cement 40ml Extra Thin (Art. Nr. 300087038)
- Mark Fit (Strong) Decal Softener (Art. Nr. 300087135)
- Decal Adhesive Soft / Haftmittel 10ml (Art. Nr. 300087193)
4.2 General Assembly Steps
Follow the detailed step-by-step instructions provided in the kit's dedicated assembly manual. The general process involves:
- Part Preparation: Carefully remove parts from the sprues using side cutters. Clean any excess plastic (flash) with a hobby knife or sandpaper.
- Painting: Paint individual parts according to the color guide before assembly for best results. Allow paint to dry completely.
- Sub-Assembly: Assemble smaller sections (e.g., engine, wheels, frame) as indicated in the instructions. Use plastic cement sparingly.
- Main Assembly: Join the sub-assemblies to form the complete motorcycle. Ensure proper alignment of all components.
- Decal Application: Apply decals using water and decal setting solution for a smooth, painted-on look.
- Final Details: Attach small details, chrome parts, and vinyl tubing.

Figure 4: Engine and Exhaust Detail. This image provides a closer look at the intricate engine assembly and exhaust system of the Tamiya Honda Monkey model, demonstrating the level of detail achievable with careful assembly and painting.
5. Display & Handling
The Tamiya Honda Monkey 40th Anniversary model is a static display model. It is not designed for play.
- Handle the model with care, avoiding excessive force on delicate parts.
- Display the model on a stable, flat surface away from direct sunlight, extreme temperatures, and high humidity to prevent damage or discoloration.
- Keep the model away from dust and airborne particles.
6. Maintenance
Regular maintenance will help preserve the appearance of your model.
- Dusting: Gently dust the model with a soft, dry brush or a microfiber cloth. Avoid using abrasive materials or harsh chemicals.
- Cleaning: For stubborn dust or fingerprints, lightly dampen a soft cloth with water (and a tiny amount of mild soap if necessary), then gently wipe the affected areas. Immediately dry with a clean, soft cloth. Do not immerse the model in water.
- Storage: If storing the model, place it in a protective display case or a sealed container to prevent dust accumulation and accidental damage.
7. Troubleshooting Common Issues
Here are solutions to common issues encountered during model assembly or display:
- Parts Not Fitting:
- Ensure all flash (excess plastic) is removed from the parts.
- Check the instruction manual to confirm correct part orientation and placement.
- Lightly sand or trim parts if necessary, but do so carefully to avoid removing too much material.
- Paint Issues (e.g., uneven coat, brush marks):
- Ensure paint is properly thinned and applied in thin, even coats.
- Allow each coat to dry completely before applying the next.
- Use high-quality brushes or an airbrush for smoother finishes.
- Decals Not Adhering or Bubbling:
- Ensure the surface is clean and smooth. A gloss coat before decals can help.
- Use decal setting solutions (like Tamiya Mark Fit) to help decals conform to irregular surfaces and eliminate bubbles.
- Gently press out air bubbles with a soft cloth or cotton swab.
- Loose Parts After Assembly:
- Reapply a small amount of plastic cement to the joint. Hold the parts together until the bond sets.
- For parts that experience stress, consider reinforcing with a small pin or stronger adhesive if appropriate.
8. Specifications
| Feature | Detail |
|---|---|
| Brand | TAMIYA |
| Model Number | 16032 |
| Product Name | Honda Monkey 40th Anniversary |
| Scale | 1:6 |
| Material Type | Plastic |
| Item Dimensions (L x W x H) | 8.82 x 3.94 x 6.89 inches (assembled model) |
| Item Weight | 504 Grams |
| Age Range (Recommended) | 15 years and up |
| Included Components | 50cc engine with vinyl tubing, high-quality decals, metal plated parts, movable suspension, foldable handlebars, custom muffler/damper options, checkered seat vinyl sticker, 40th Anniversary emblems. |
| UPC | 798525405133 |
9. Warranty & Support
Tamiya products are manufactured to high standards. If you encounter any issues with missing or defective parts, please contact Tamiya customer support directly.
For support, please visit the official Tamiya website or contact their customer service department. Keep your purchase receipt as proof of purchase.
Note: Specific warranty terms may vary by region. Please refer to the official Tamiya website for the most up-to-date warranty information.


