
1. Introduction
The Dayton Audio APA150 is a versatile 150W power amplifier designed for various audio applications. It delivers 75 watts per channel in its full-range stereo configuration or 150 watts into 8 ohms when in bridge-mono mode. Featuring a built-in, switchable low-pass filter, the APA150 can also function effectively as a subwoofer amplifier. This manual provides essential information for the proper setup, operation, and maintenance of your APA150 amplifier.

Image: Dayton Audio APA150 integrated into a home audio system.
2. Safety Instructions
Please read and follow all safety instructions before operating this device to prevent injury or damage. Keep this manual for future reference.
- Do not expose this unit to rain or moisture.
- Do not remove the cover. No user-serviceable parts inside. Refer servicing to qualified personnel.
- Ensure proper ventilation to prevent overheating. Do not block ventilation openings.
- Connect to a grounded AC outlet. Do not defeat the safety purpose of the polarized or grounding-type plug.
- Use only attachments/accessories specified by the manufacturer.
- Unplug this unit during lightning storms or when unused for long periods.
3. Package Contents
- Dayton Audio APA150 Power Amplifier
- AC Power Cord
- User Manual
4. Product Features
- Class A/B topology for low distortion and ultimate reliability.
- Virtually noise-free fan operation for near-field applications.
- High current, discrete output transistors that run cool and quiet.
- Adjustable 50 - 150 Hz low pass crossover for room control.
- Ultra-linear frequency response from 10 Hz to 40 kHz for high-resolution playback or acoustic measuring.
- Sleek modern design.
5. Controls and Connections
5.1 Front Panel

Image: Front panel of the APA150.
- LEVEL Knob: Adjusts the overall output volume of the amplifier.
- POWER Button: Toggles the amplifier on and off.
- POWER LED: Indicates the power status of the amplifier.
5.2 Rear Panel
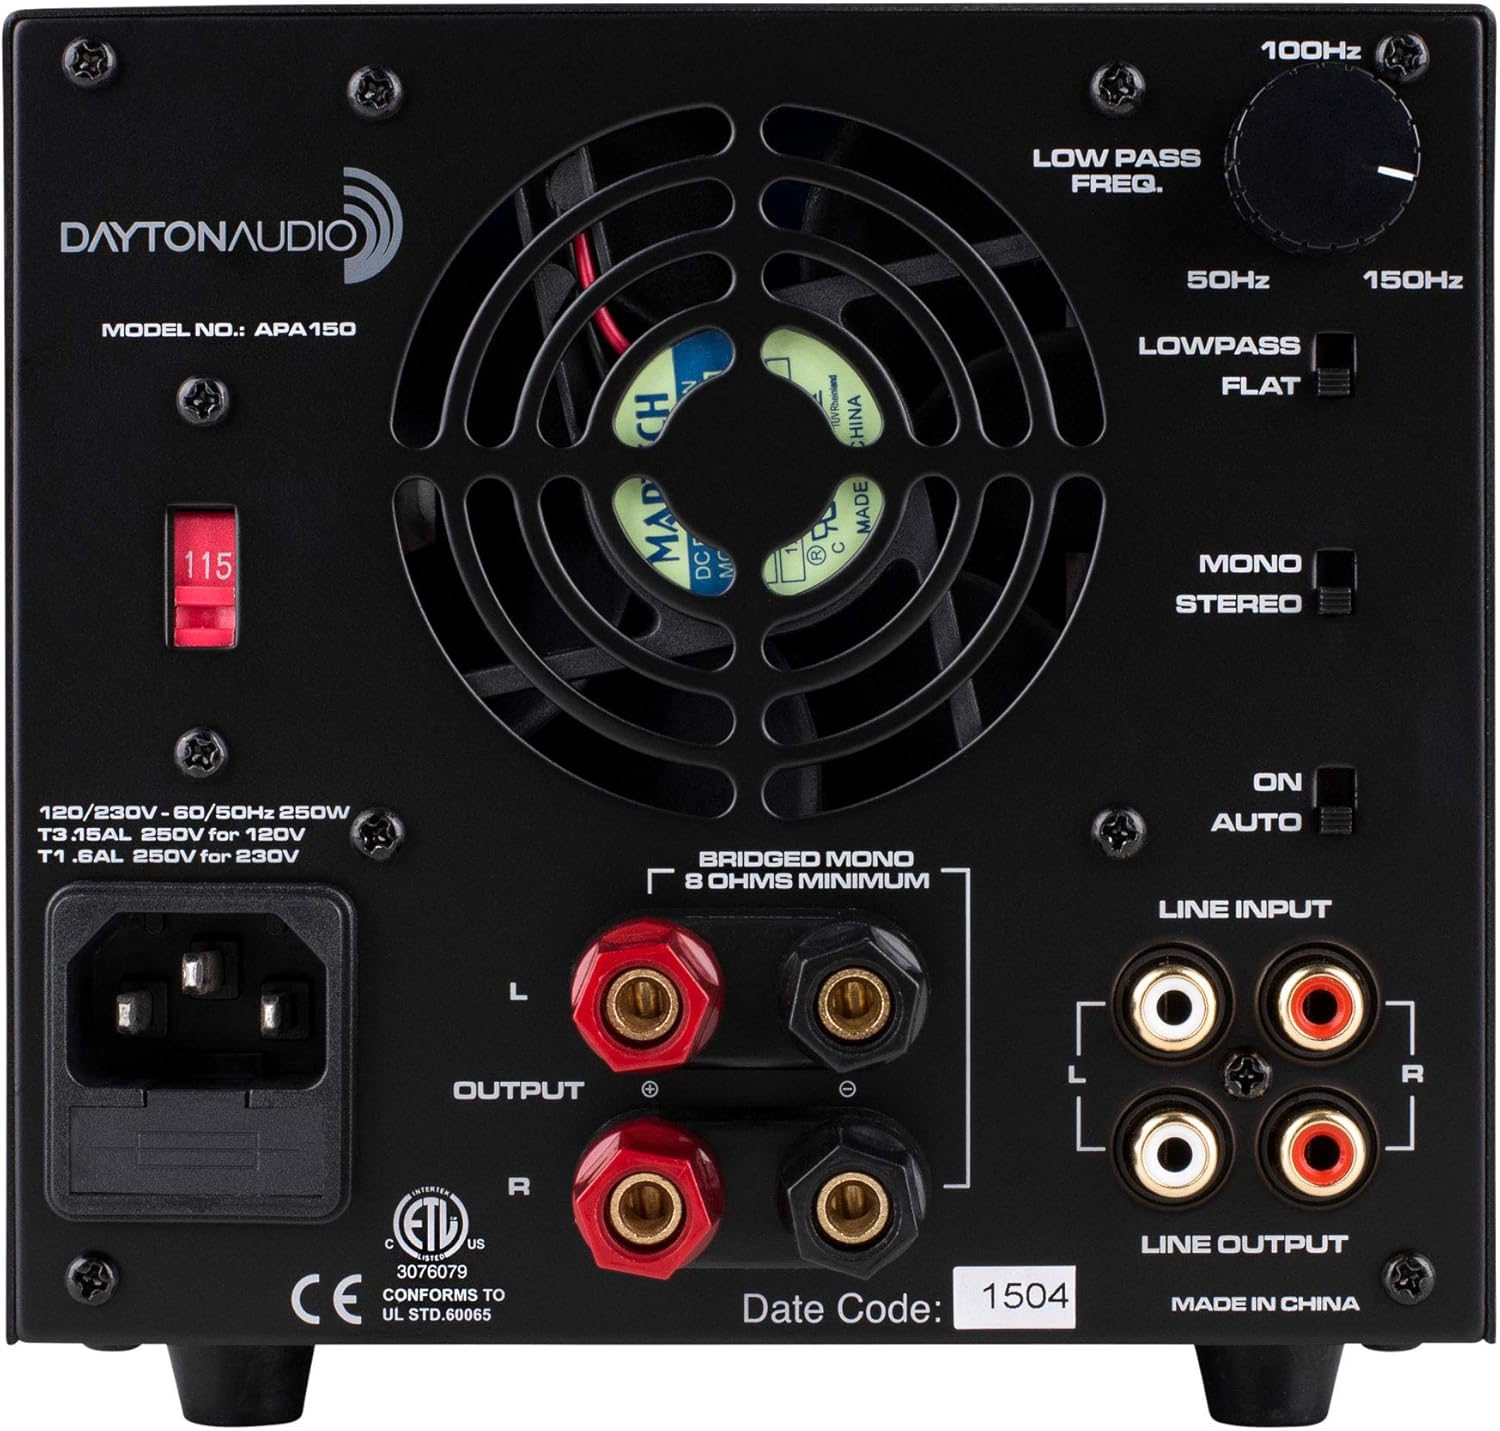
Image: Rear panel of the APA150.
- AC Power Input: Connects to the included AC power cord.
- Voltage Selector (115V/230V): Selects the appropriate operating voltage for your region. Ensure this is set correctly before powering on.
- Speaker Outputs (L/R): Binding posts for connecting passive speakers. Supports both bare wire and banana plugs.
- Line Input (L/R RCA): Connects to your audio source (e.g., preamplifier, receiver).
- Line Output (L/R RCA): Provides a full-range audio signal for connecting to another amplifier or powered subwoofer.
- Low Pass Freq Knob (50-150Hz): Adjusts the crossover frequency when the Low Pass filter is active.
- Low Pass/Flat Switch: Engages the low-pass filter (Low Pass) or bypasses it for full-range output (Flat).
- Mono/Stereo Switch: Selects between stereo operation (two channels) or bridged mono operation (single channel, higher power).
- On/Auto Switch: Sets the amplifier to always on (On) or to automatically power on/off with an audio signal (Auto).
- 12V Trigger In: Allows external devices to control the amplifier's power state.
6. Setup
6.1 Initial Checks
- Unpack the amplifier and all accessories.
- Place the amplifier on a stable, level surface with adequate ventilation.
- Verify the Voltage Selector switch on the rear panel is set to the correct voltage for your region (115V or 230V). Incorrect voltage selection can damage the unit.
6.2 Connecting Speakers (Stereo Mode)
- Ensure the amplifier is powered off and unplugged.
- Set the Mono/Stereo switch to 'Stereo'.
- Connect your left passive speaker to the 'L' speaker outputs (red to red, black to black).
- Connect your right passive speaker to the 'R' speaker outputs (red to red, black to black).
- Connect your audio source to the Line Input (L/R RCA) terminals.
6.3 Connecting Speakers (Bridged Mono Mode)
In bridged mono mode, the APA150 delivers higher power to a single speaker, typically a subwoofer. Ensure the speaker is rated for the increased power output.
- Ensure the amplifier is powered off and unplugged.
- Set the Mono/Stereo switch to 'Mono'.
- Connect your single passive speaker to the 'R' speaker outputs. The red terminal is positive (+), and the black terminal is negative (-).
- Connect your audio source to the 'R' Line Input (RCA) terminal.
6.4 Connecting a Subwoofer (Line Output)
The Line Output provides a full-range signal that can be used to connect to a powered subwoofer or another amplifier.
- Connect RCA cables from the APA150's Line Output (L/R RCA) to the line input of your powered subwoofer or secondary amplifier.
6.5 Power Connection
- Once all audio connections are made, connect the supplied AC power cord to the AC Power Input on the rear panel and then to a suitable wall outlet.
7. Operating Instructions
7.1 Powering On/Off
- To manually power on the amplifier, press the POWER button on the front panel. The POWER LED will illuminate.
- To power off, press the POWER button again.
- Alternatively, set the On/Auto switch on the rear panel to 'Auto'. The amplifier will automatically power on when an audio signal is detected and enter standby mode when no signal is present for a period.
7.2 Adjusting Volume
- Rotate the LEVEL knob on the front panel clockwise to increase volume and counter-clockwise to decrease volume.
7.3 Using the Low Pass Filter
The low-pass filter is useful when using the APA150 to drive a subwoofer or when integrating with full-range speakers.
- Set the Low Pass/Flat switch to 'Low Pass' to engage the filter.
- Adjust the Low Pass Freq knob to set the desired crossover frequency between 50 Hz and 150 Hz.
- Set the switch to 'Flat' for full-range audio output, bypassing the low-pass filter.
8. Maintenance
- Keep the amplifier clean by wiping it with a soft, dry cloth. Do not use liquid cleaners or aerosols.
- Ensure adequate airflow around the unit to prevent overheating. Do not block the ventilation slots.
- Periodically check all cable connections for security.
9. Troubleshooting
| Problem | Possible Cause | Solution |
|---|---|---|
| No power | Power cord not connected; Voltage selector incorrect; Power switch off. | Check power cord connection; Verify voltage selector setting; Press power button. |
| No sound | Input source not connected; Volume too low; Speaker wires loose/incorrect. | Check audio input connections; Increase volume; Verify speaker wire connections. |
| Distorted sound | Input signal too high; Speaker impedance mismatch; Faulty cables. | Reduce input signal level; Check speaker impedance (8 ohms minimum for bridged mono); Replace cables. |
| Overheating | Inadequate ventilation; Excessive volume for extended periods. | Ensure proper airflow around the unit; Reduce volume; Allow unit to cool. |
10. Specifications
| Feature | Specification |
|---|---|
| Output Power (Stereo) | 75 Watts per channel (8 ohms) |
| Output Power (Bridged Mono) | 150 Watts (8 ohms) |
| Frequency Response | 10 Hz to 40 kHz |
| Voltage | 120 Volts (selectable 115V/230V) |
| Item Dimensions (L x W x H) | 11.5 x 6 x 5.5 inches |
| Item Weight | 11.68 pounds |
| Number of Channels | 2 |
| Low Pass Crossover | Adjustable 50 - 150 Hz |
11. Warranty and Support
The Dayton Audio APA150 comes with a 5-year warranty, ensuring reliability and customer satisfaction.
For technical support, troubleshooting assistance, or warranty claims, please contact Dayton Audio customer service through their official website or authorized retailers.


