
1. Introduction
This manual provides essential information for the safe and efficient operation, installation, and maintenance of your Dayton 6A858 Time Delay Relay. Please read this manual thoroughly before installation and use, and retain it for future reference.
2. Safety Information
WARNING: Electrical shock hazard. Disconnect power before installing or servicing this device. All wiring should be performed by a qualified electrician and comply with local and national electrical codes.
- Ensure the power supply matches the relay's voltage requirements.
- Do not operate the relay in wet or damp conditions.
- Avoid exceeding the specified current and wattage ratings.
3. Product Overview
The Dayton 6A858 is a compact time delay relay designed for various industrial and commercial applications requiring precise timing control. It operates automatically and features a Through Hole connector type for secure mounting and electrical connection.
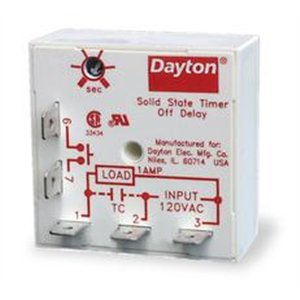
Figure 1: Dayton 6A858 Time Delay Relay. This image shows the compact form factor of the relay with its connection pins visible.
4. Setup and Installation
- Power Disconnection: Before beginning installation, ensure all power to the circuit is disconnected at the main breaker or fuse box.
- Mounting: The relay is designed for Through Hole mounting. Carefully insert the relay's pins into the corresponding holes on the circuit board or terminal block.
- Wiring: Connect the appropriate wires to the relay's terminals according to your application's wiring diagram. Ensure all connections are secure and properly insulated. Refer to the specifications for current and wattage ratings.
- Verification: Double-check all connections for correctness and security before restoring power.
5. Operating Instructions
The Dayton 6A858 Time Delay Relay operates in an automatic mode. Once properly installed and powered, it will execute its programmed time delay function. Specific timing parameters are typically set externally by the control circuit it is integrated into. Consult your system's overall wiring diagram and control logic for details on how the time delay is initiated and its duration.
- Power On: Apply power to the circuit. The relay will enter its standby state or begin its timing sequence as defined by the application.
- Timing Sequence: The relay will automatically engage or disengage its contacts after the preset time delay has elapsed.
- Monitoring: Observe the system's behavior to confirm the relay is functioning as expected.
6. Maintenance
The Dayton 6A858 Time Delay Relay is designed for long-term, maintenance-free operation. However, periodic checks can help ensure continued reliability:
- Visual Inspection: Periodically inspect the relay and its connections for any signs of damage, corrosion, or loose wiring.
- Cleaning: If necessary, gently clean the exterior of the relay with a dry, soft cloth. Do not use solvents or abrasive cleaners.
- Environmental Conditions: Ensure the operating environment remains within the specified temperature and humidity ranges to prevent premature failure.
7. Troubleshooting
| Problem | Possible Cause | Solution |
|---|---|---|
| Relay does not activate/deactivate | No power, incorrect wiring, faulty control signal. | Check power supply. Verify wiring against diagram. Test control signal. |
| Incorrect timing | External timing circuit misconfigured, relay fault. | Review external timing settings. If issue persists, relay may be faulty. |
| Overheating | Exceeding current/wattage ratings, poor ventilation. | Ensure load is within specifications. Improve ventilation around the relay. |
If troubleshooting steps do not resolve the issue, contact qualified service personnel.
8. Specifications
| Feature | Detail |
|---|---|
| Model | 6A858 |
| Brand | Dayton |
| Item Weight | 1.6 ounces |
| Package Dimensions | 2 x 1 x 0.5 inches |
| Wattage | 12 watts |
| Current Rating | 6 Amps |
| Connector Type | Through Hole |
| Operation Mode | Automatic |
| ASIN | B000TK17IA |
| Date First Available | April 28, 2011 |
9. Warranty and Support
Dayton products are manufactured to high-quality standards. For specific warranty information and technical support, please refer to the documentation provided with your purchase or visit the official Dayton website. Keep your purchase receipt for warranty claims.
For further assistance, contact Dayton customer service.