Introduction
This instruction manual provides detailed guidance for the safe and effective use of the Sealey AK505 Pipe Flaring Kit. This kit is designed for producing single or double flares on copper, brass, or thin-walled aluminum pipes. It is important to read and understand all instructions before operating the tool.
Safety Information
- Always wear appropriate personal protective equipment, including safety glasses, when operating this tool.
- Ensure the workpiece is securely clamped before flaring.
- Do not use this kit on steel pipes, as it is not designed for such materials.
- Keep hands clear of moving parts during operation.
- Store the kit in its case in a dry, safe place away from children.
Kit Contents
The Sealey AK505 Pipe Flaring Kit includes the following components, neatly organized within a durable storage case:
- Two-piece screw-type 45° flare press
- Seven double flare dies in sizes: 3/16", 1/4", 5/16", 3/8", 7/16", 1/2", 5/8"
- Flaring bar/clamp
- Storage case

Image: The complete Sealey AK505 Pipe Flaring Kit displayed in its open red storage case, showing the flaring tool, clamp, and various dies.

Image: All components of the Sealey AK505 Pipe Flaring Kit, including the flaring press, pipe clamp, and seven dies, arranged outside the storage case.
Setup
- Prepare the Pipe: Cut the pipe to the desired length, ensuring the cut is square and free of burrs. Use a reaming tool to remove any internal burrs, as these can cause leaks.
- Select the Correct Die: Choose the appropriate double flare die that matches the outer diameter of your pipe.
- Insert Pipe into Clamp: Loosen the wing nuts on the flaring bar/clamp. Insert the pipe into the correct size hole in the clamp, ensuring it extends slightly beyond the surface of the clamp. The amount of extension depends on whether you are making a single or double flare. For a double flare, the pipe should extend just enough to allow the die to sit flush on the clamp surface.
- Secure the Pipe: Tighten the wing nuts firmly to secure the pipe in the clamp. Ensure the pipe does not slip during the flaring process.

Image: A close-up view of the flaring bar/clamp, highlighting the wing nuts used to secure the pipe during the flaring process.
Operating Instructions: Single Flare
A single flare creates a conical shape at the end of the pipe. This method is generally suitable for low-pressure applications.
- Pipe Extension: For a single flare, the pipe should extend above the clamp surface by approximately 1/8 inch (3mm).
- Position Flaring Press: Place the flaring press over the pipe and clamp assembly. Ensure the cone of the press is centered directly above the pipe opening.
- Flare the Pipe: Slowly turn the handle of the flaring press clockwise. The cone will descend and gradually form the flare. Continue turning until the flare is fully formed and the cone makes firm contact with the clamp surface. Do not overtighten.
- Remove Flaring Press: Turn the handle counter-clockwise to retract the cone. Remove the flaring press.
- Inspect Flare: Loosen the wing nuts and carefully remove the flared pipe. Inspect the flare for uniformity, cracks, or imperfections. A smooth, even flare is crucial for a proper seal.

Image: A detailed view of the screw-type 45° flare press, showing its conical tip and handle, ready for operation.
Operating Instructions: Double Flare
A double flare provides a stronger, more reliable seal, often used in automotive brake lines and other high-pressure applications.
- Insert Die: Place the selected double flare die into the end of the pipe, ensuring it sits flush on the clamp surface. The pipe should extend just enough for the die to rest on the clamp.
- First Stage (Forming the Bubble): Position the flaring press over the die and pipe assembly. Slowly turn the handle clockwise until the cone of the press pushes the die into the pipe, forming a small, inverted bubble inside the pipe. Stop when the die is fully seated and the cone makes firm contact with the die.
- Remove Die: Turn the handle counter-clockwise to retract the cone. Remove the flaring press, then carefully remove the double flare die from the pipe. The pipe should now have an inverted bubble.
- Second Stage (Flattening the Bubble): Reposition the flaring press directly over the inverted bubble in the pipe (without the die). Slowly turn the handle clockwise. The cone will now flatten the bubble against the clamp surface, creating the double flare. Continue until the cone makes firm contact with the clamp. Do not overtighten.
- Final Inspection: Retract the cone, remove the flaring press, and then carefully remove the pipe from the clamp. Inspect the double flare for a smooth, even, and concentric finish.
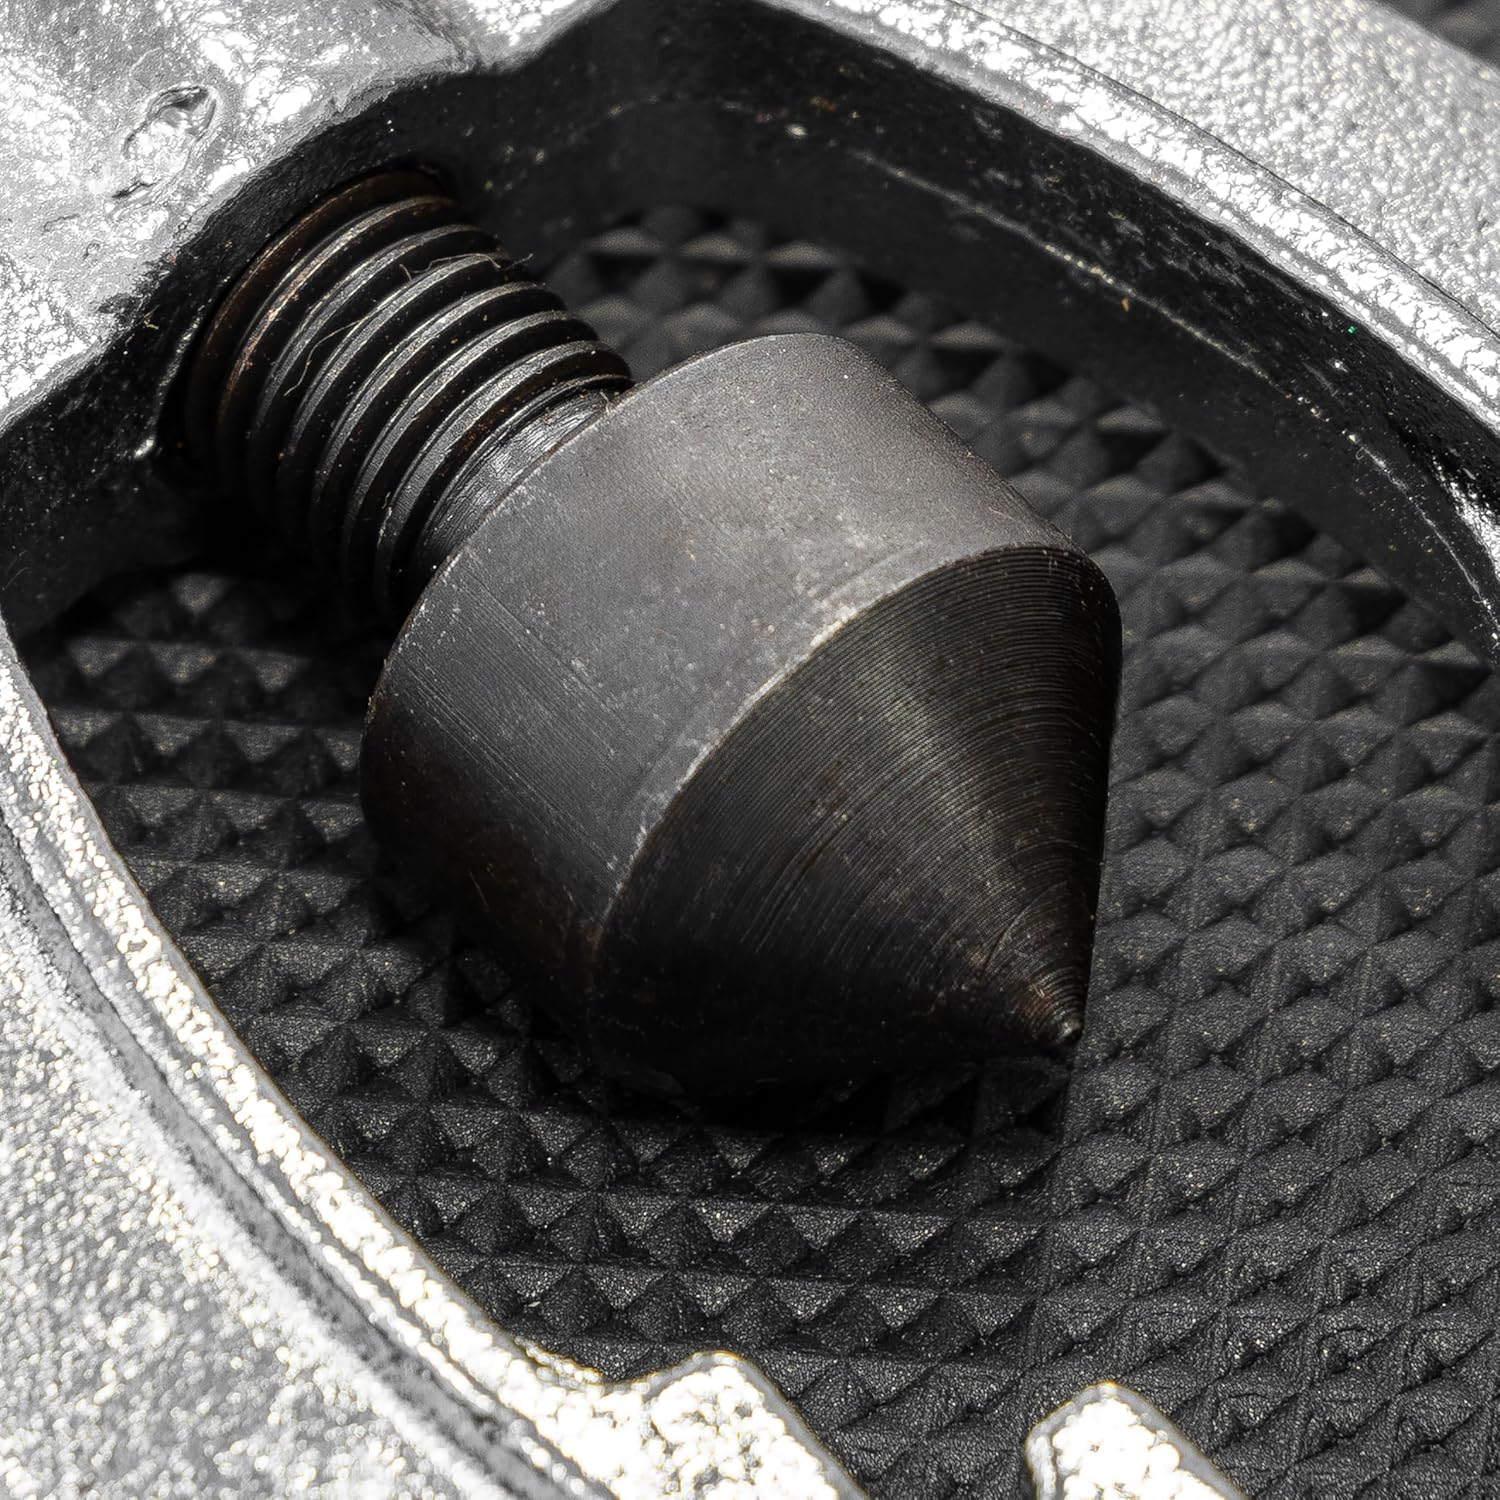
Image: A close-up of the conical tip of the flaring press, which is responsible for shaping the pipe end into a flare.
Maintenance
- Cleaning: After each use, wipe down all components of the kit with a clean, dry cloth to remove any metal shavings or debris.
- Lubrication: Periodically apply a light coat of machine oil to the screw threads of the flaring press to ensure smooth operation and prevent corrosion.
- Storage: Always store the kit in its original tough storage case to protect the components from damage and loss. Keep the case in a dry environment.
- Inspection: Regularly inspect the dies and the flaring press for any signs of wear, damage, or deformation. Replace any damaged components to ensure proper flaring results.
Troubleshooting
| Problem | Possible Cause | Solution |
|---|---|---|
| Uneven or cracked flare |
|
|
| Pipe slips during flaring |
|
|
| Leaking connection after flaring |
|
|
Specifications
| Model No. | AK505 |
| Dies Included | 3/16", 1/4", 5/16", 3/8", 7/16", 1/2", 5/8" |
| Flare Type | Single or Double 45° Flares |
| Compatible Pipe Materials | Copper, Brass, Thin-walled Aluminum |
| Not Suitable For | Steel Pipe |
| Item Weight | 2.15 pounds (approx. 0.97 kg) |
| Product Dimensions | 11.81 x 82.28 x 55.91 inches (approx. 30 x 209 x 142 cm) |
| Manufacturer | Sealey |
Warranty Information
For specific warranty details regarding your Sealey AK505 Pipe Flaring Kit, please refer to the warranty card included with your purchase or visit the official Sealey website. Warranty terms and conditions may vary by region and retailer.
Customer Support
Should you require assistance, have questions about the operation of your flaring kit, or need to order replacement parts, please contact Sealey customer support. Contact information can typically be found on the Sealey website or in the packaging materials.


