
1. Introduction
Thank you for choosing the Mac Audio MPX 2000 2-Channel Amplifier. This amplifier is designed to deliver powerful and clear audio performance for your car audio system. This manual provides essential information for the correct installation, operation, and maintenance of your amplifier. Please read it thoroughly before installation and use to ensure optimal performance and safety.
2. Safety Instructions
To prevent injury or damage to the amplifier, please observe the following safety precautions:
- Professional Installation: Installation should ideally be performed by a qualified technician. Incorrect wiring can cause damage to the amplifier or vehicle.
- Power Disconnection: Always disconnect the vehicle's battery negative terminal before starting any installation work.
- Proper Wiring: Ensure all power, ground, and speaker wires are of adequate gauge and properly insulated to prevent short circuits.
- Fuse Protection: Install an appropriate fuse on the main power cable close to the battery.
- Ventilation: Mount the amplifier in a location that allows for sufficient airflow to prevent overheating. Avoid mounting in enclosed spaces without ventilation.
- Moisture and Heat: Keep the amplifier away from moisture, water, and direct sunlight or excessive heat sources.
- Volume Control: Avoid prolonged listening at extremely high volume levels to prevent hearing damage.
- Secure Mounting: Securely mount the amplifier to prevent it from becoming a projectile in case of sudden stops or accidents.
3. Product Features
The Mac Audio MPX 2000 amplifier is equipped with several features designed for enhanced audio performance and reliability:
- 2-Channel Design: Provides two channels for stereo sound or can be bridged for mono operation.
- High Power Output: Capable of delivering up to 2 x 250 watts maximum output.
- 2 Ohm Stable: Designed for stable operation with speaker loads down to 2 ohms.
- Variable Full-Feature Filter: Includes adjustable high-pass and low-pass filters for precise sound tuning.
- Bass Boost: Integrated bass boost function for enhanced low-frequency response.
- Protection Circuitry: Features effective protection against short circuits, DC offset, and excessive temperature.
- Bridge/Tri-Mode Operation: Allows for flexible configuration options.
- Channel Mode Switch: For selecting stereo or mono operation.
- Low-Level Outputs: For connecting additional amplifiers.

Figure 1: Top view of the Mac Audio MPX 2000 amplifier, showcasing its sleek design and branding.
4. Setup and Installation
Proper installation is crucial for the performance and longevity of your amplifier. Follow these general steps:
4.1 Mounting Location
- Choose a dry, well-ventilated area, away from direct heat and moisture.
- Ensure the mounting surface is sturdy and can support the amplifier's weight.
- Allow at least 5-10 cm (2-4 inches) of clear space around the amplifier for proper heat dissipation.
- Common locations include the trunk, under seats, or behind rear seats.
4.2 Wiring Connections
Refer to the connection panel on your amplifier for specific terminal locations.
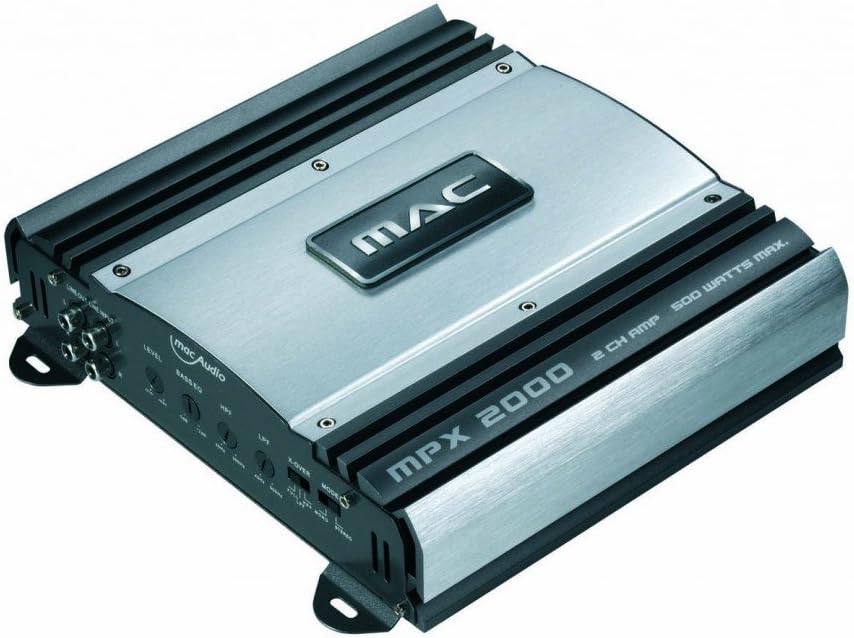
Figure 2: Angled view of the Mac Audio MPX 2000, highlighting the input and output terminals for wiring.
- Power (BATT+): Connect a heavy-gauge power cable (e.g., 8 AWG or 4 AWG depending on total system power) from the amplifier's BATT+ terminal directly to the positive terminal of the vehicle's battery. Install an inline fuse holder within 30 cm (12 inches) of the battery.
- Ground (GND): Connect a heavy-gauge ground cable of the same size as the power cable from the amplifier's GND terminal to a clean, unpainted metal surface on the vehicle's chassis. Ensure a good electrical connection.
- Remote (REM): Connect a thinner wire (e.g., 18 AWG) from the amplifier's REM terminal to the remote turn-on output of your car stereo. This wire tells the amplifier to turn on and off with the stereo.
- RCA Inputs (INPUT): Connect RCA cables from the pre-amp outputs of your car stereo to the RCA input jacks on the amplifier.
- Speaker Outputs (SPEAKER): Connect your speakers to the amplifier's speaker output terminals. Ensure correct polarity (+ to + and - to -). For 2-channel stereo operation, connect one speaker per channel. For bridged mono operation (e.g., for a subwoofer), refer to the amplifier's specific bridging instructions, typically using the + terminal of one channel and the - terminal of the other.
5. Operating Instructions
Once installed, adjust the amplifier settings for optimal sound quality.
5.1 Gain Adjustment (LEVEL)
- The gain control (often labeled "LEVEL") matches the amplifier's input sensitivity to the output voltage of your car stereo.
- Start with the gain control set to minimum.
- Turn your car stereo volume up to about 75-80% of its maximum.
- Slowly increase the amplifier's gain control until you hear distortion, then back it off slightly until the sound is clear.
- Do not use the gain control as a volume knob. It is for matching signal levels.
5.2 Filter Settings (LPF/HPF)
The MPX 2000 features variable high-pass (HPF) and low-pass (LPF) filters:
- Low-Pass Filter (LPF): Allows frequencies below the set point to pass through. Typically used for subwoofers. Adjust the LPF frequency to blend with your main speakers (e.g., 80-120 Hz).
- High-Pass Filter (HPF): Allows frequencies above the set point to pass through. Typically used for full-range speakers to prevent them from playing low bass, which can cause distortion and damage. Adjust the HPF frequency to protect your speakers (e.g., 60-100 Hz).
- Full Range: If no filtering is desired, set the filter switch to "FULL" or "FLAT".
5.3 Bass Boost
- The bass boost control increases the output at a specific low frequency.
- Use sparingly and adjust carefully to avoid distortion and speaker damage.
- Start with the bass boost off and only increase if more low-end impact is desired, ensuring the sound remains clean.
5.4 Channel Mode Switch
- This switch allows you to select between 2-channel (stereo) or bridged (mono) operation.
- Ensure this switch matches your speaker wiring configuration.
6. Maintenance
The Mac Audio MPX 2000 amplifier requires minimal maintenance:
- Cleaning: Periodically wipe the amplifier's exterior with a soft, dry cloth. Do not use harsh chemicals or abrasive cleaners.
- Ventilation: Ensure that the ventilation openings are not blocked by dust or debris. Clean gently with a soft brush or compressed air if necessary.
- Connections: Occasionally check all wiring connections to ensure they are secure and free from corrosion.
7. Troubleshooting
If you experience problems with your amplifier, consult this section before seeking professional service.
7.1 No Power / Amplifier Not Turning On
- Check the inline fuse on the power cable near the battery. Replace if blown.
- Verify that the power (BATT+), ground (GND), and remote (REM) wires are securely connected and have proper voltage.
- Ensure the remote wire is receiving 12V from the head unit when the stereo is on.
- Check the amplifier's internal fuses (if accessible and present).
7.2 No Sound Output
- Confirm the amplifier is powered on (indicator light should be lit).
- Check RCA input cables for secure connection and damage.
- Verify speaker wires are correctly connected to the amplifier and speakers, with correct polarity.
- Ensure the head unit's volume is up and not muted.
- Check the amplifier's gain (LEVEL) setting.
7.3 Distorted Sound
- Reduce the amplifier's gain (LEVEL) setting.
- Check speaker impedance. Ensure it is within the amplifier's supported range (e.g., 2 ohms stable).
- Adjust filter settings (LPF/HPF) to prevent speakers from playing frequencies they cannot handle.
- Reduce bass boost if it's causing distortion.
- Check for damaged speaker wires or speakers.
7.4 Amplifier Overheating (Protection Mode)
- Ensure adequate ventilation around the amplifier. Clear any obstructions.
- Check speaker impedance. Running below the minimum supported impedance (e.g., below 2 ohms) can cause overheating.
- Reduce the gain setting.
- Allow the amplifier to cool down. If it frequently overheats, re-evaluate the installation and speaker load.
8. Specifications
The following are the technical specifications for the Mac Audio MPX 2000 2-Channel Amplifier:
| Feature | Specification |
|---|---|
| Brand | MAC AUDIO |
| Model Number | MPX2000 |
| Number of Channels | 2 |
| Output Power | 180 Watts (RMS, typical) / 2 x 250 Watts (Max) |
| Item Weight | 1.9 Kilograms |
| Product Dimensions (L x W x H) | 5.9 x 23.9 x 22.6 cm |
| Mounting Type | Surface Mount |
| Compliance | CE |
| GTIN | 04023037041200 |
9. Warranty and Support
Specific warranty terms and conditions for the Mac Audio MPX 2000 amplifier are provided by the manufacturer or your retailer at the time of purchase. Please retain your proof of purchase for warranty claims.
For technical support or service inquiries, please contact your authorized Mac Audio dealer or visit the official Mac Audio website for contact information.


