
1. Introduction
Thank you for purchasing the jWin JXCD462 AM/FM Portable CD Boombox with Cassette Playback. This manual provides detailed instructions for the proper setup, operation, and maintenance of your new audio system. Please read this manual thoroughly before use and retain it for future reference.
2. Key Features
- Integrated AM/FM Stereo Radio for diverse listening options.
- Top-loading CD Player with 20-track programmable memory.
- CD functions including Repeat Track One/All and Skip & Search.
- 2-Digit LED Display for track and radio frequency indication.
- Cassette Player with Auto Stop Mechanism for tape protection.
- Automatic Level Control (ALC) for consistent recording levels.
- 1-Touch Recording from CD or Radio to cassette tape.
- Portable design with a convenient carrying handle.
3. Package Contents
Please check that all items are present:
- jWin JXCD462 Boombox Unit
- AC Power Cord
- User Manual (this document)
4. Controls and Indicators
Familiarize yourself with the controls and indicators on your boombox:
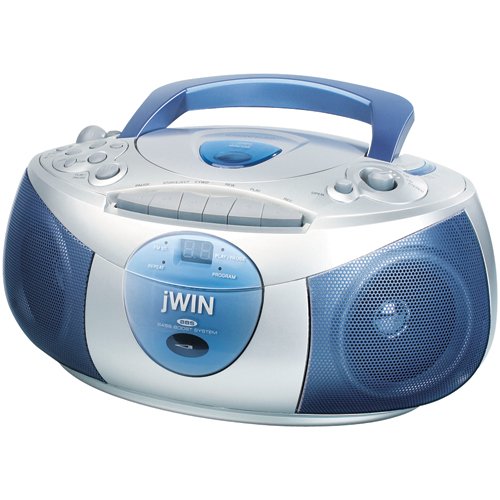
Figure 1: Front view of the jWin JXCD462 AM/FM Portable CD Boombox. This image displays the unit's overall design, including the top-loading CD compartment, the cassette deck on the front, the two circular speakers with blue grilles, the central LED display, and various control buttons and knobs. A blue carrying handle is visible at the top.
- CD Compartment: Located on top, for inserting audio CDs.
- Cassette Deck: Front-loading compartment for cassette tapes.
- LED Display: Shows CD track number or radio frequency.
- Function Selector: Switch between CD, Radio, Tape, and Off modes.
- Volume Control: Rotary knob to adjust audio output level.
- Tuning Knob: For selecting AM or FM radio stations.
- CD Control Buttons: Play/Pause, Stop, Skip/Search (forward/backward), Program, Repeat.
- Cassette Control Buttons: Play, Stop/Eject, Rewind, Fast Forward, Record.
- AM/FM Band Selector: Switch between AM and FM radio bands.
- Telescopic Antenna: Extend for improved FM radio reception.
- AC Power Input: Located at the rear for connecting the AC power cord.
- Battery Compartment: Located at the bottom for battery operation.
5. Setup
5.1 Powering the Unit
Your boombox can be powered by either AC power or batteries.
AC Power Operation:
- Ensure the unit is switched OFF using the Function Selector.
- Connect the supplied AC power cord to the AC power input jack on the rear of the unit.
- Plug the other end of the AC power cord into a standard AC wall outlet (120V/60Hz).
Note: When operating on AC power, batteries (if installed) are automatically disconnected.
Battery Power Operation:
- Ensure the unit is switched OFF.
- Open the battery compartment cover located on the bottom of the unit.
- Insert 8 x 'C' size batteries (not included), observing the correct polarity (+/-) as indicated inside the compartment.
- Close the battery compartment cover securely.
Note: Remove batteries if the unit will not be used for an extended period to prevent leakage.
6. Operating Instructions
6.1 Operating the CD Player
- Lift the CD compartment door located on the top of the unit.
- Place an audio CD onto the center spindle with the label side facing up.
- Close the CD compartment door firmly.
- Set the Function Selector to the 'CD' position. The LED display will show '--' then the total number of tracks.
- Press the PLAY/PAUSE button to begin playback. The track number will appear on the LED display.
- To pause playback, press PLAY/PAUSE again. Press it once more to resume.
- To stop playback, press the STOP button.
- To skip to the next track, press the SKIP/SEARCH FORWARD button (▶▶I).
- To go back to the beginning of the current track or previous tracks, press the SKIP/SEARCH BACKWARD button (I◀◀).
- To search rapidly within a track, press and hold the SKIP/SEARCH buttons during playback.
Programming CD Tracks:
- In STOP mode, press the PROGRAM button. '01' will flash on the LED display.
- Use the SKIP/SEARCH buttons to select the desired first track.
- Press PROGRAM again to confirm. '02' will flash.
- Repeat steps 2 and 3 to program up to 20 tracks.
- After programming the last track, press PLAY/PAUSE to start playback of the programmed sequence.
Repeat Function:
- During CD playback, press the REPEAT button once to repeat the current track (indicated by 'REP' on display).
- Press REPEAT a second time to repeat all tracks on the CD (indicated by 'ALL' on display).
- Press REPEAT a third time to cancel the repeat function.
6.2 Operating the AM/FM Radio
- Extend the telescopic antenna for optimal FM reception. For AM reception, the unit has a built-in antenna, so adjust the unit's position for best signal.
- Set the Function Selector to the 'RADIO' position.
- Select the desired band (AM or FM) using the AM/FM Band Selector switch.
- Rotate the TUNING knob to search for your desired radio station.
- Adjust the VOLUME knob to your preferred listening level.
6.3 Operating the Cassette Player/Recorder
Cassette Playback:
- Set the Function Selector to the 'TAPE' position.
- Press the STOP/EJECT button to open the cassette deck door.
- Insert a recorded cassette tape with the exposed tape facing downwards.
- Close the cassette deck door.
- Press the PLAY button to start playback.
- Use the REWIND and FAST FORWARD buttons to navigate the tape.
- Press the STOP/EJECT button to stop playback.
Cassette Recording (1-Touch Recording):
- Insert a blank cassette tape into the cassette deck.
- Select the source you wish to record from (CD or RADIO) using the Function Selector.
- Start playback of the CD or tune to the desired radio station.
- Press the RECORD button on the cassette deck. The PLAY button will also engage automatically.
- Recording will begin. The Automatic Level Control (ALC) will adjust the recording volume automatically.
- To stop recording, press the STOP/EJECT button.
7. Maintenance
Proper care will ensure long-lasting performance from your boombox.
- Cleaning the Unit: Wipe the exterior with a soft, dry cloth. Do not use abrasive cleaners or solvents.
- Cleaning the CD Lens: If CD playback becomes erratic, the lens may be dirty. Use a commercially available CD lens cleaner disc.
- Cleaning Cassette Heads: Over time, tape heads, pinch rollers, and capstans can accumulate oxide. Use a cotton swab lightly moistened with isopropyl alcohol to gently clean these components after every 10-20 hours of use.
- Battery Care: Remove batteries if the unit is not used for extended periods to prevent corrosion.
- Storage: Store the unit in a cool, dry place away from direct sunlight and extreme temperatures.
8. Troubleshooting
If you experience issues with your boombox, please consult the following table before seeking service.
| Problem | Possible Cause | Solution |
|---|---|---|
| No power | AC cord not connected; Batteries depleted or incorrectly inserted. | Ensure AC cord is securely plugged in; Replace batteries or check polarity. |
| No sound | Volume too low; Incorrect function selected. | Increase volume; Select correct function (CD, Radio, Tape). |
| CD not playing / Skipping | CD inserted incorrectly; CD dirty or scratched; CD compartment not closed. | Re-insert CD label side up; Clean CD with a soft cloth; Close CD compartment firmly. |
| Poor radio reception / Static | Antenna not extended; Unit position. | Extend FM telescopic antenna; Adjust unit's position for AM reception. |
| Cassette tape not playing / Poor sound | Tape incorrectly inserted; Tape heads dirty. | Re-insert tape correctly; Clean tape heads, pinch roller, and capstan. |
9. Specifications
- Brand: jWIN
- Model: JXCD462
- Speaker Type: Stereo
- Colour: Blue, Silver
- Product Dimensions (L x W x H): 17.27 x 33.78 x 22.61 cm
- Item Weight: 2.49 kg
- CD Player: Top-loading, 20-track programmable, Repeat (one/all), Skip & Search
- Display: 2-Digit LED
- Radio: Integrated AM/FM Stereo Tuner
- Cassette Player: Front-loading, Auto Stop Mechanism, Automatic Level Control (ALC), 1-Touch Recording (from CD/Radio)
- Power Source: AC 120V/60Hz or 8 x 'C' size batteries (not included)
10. Warranty Information
This product is covered by a limited warranty. Please refer to the warranty card included with your purchase or contact your retailer for specific terms and conditions. Keep your purchase receipt as proof of purchase.
11. Customer Support
For technical assistance or customer service inquiries, please contact the retailer where you purchased this product or refer to the contact information provided on the product packaging or jWin's official website. Please have your model number (JXCD462) and purchase details ready when contacting support.


