1. Introduction
This manual provides comprehensive instructions for the installation, operation, and maintenance of your Power Acoustik PTID-4003 in-dash monitor with integrated DVD player and AM/FM tuner. Please read this manual thoroughly before using the product to ensure proper operation and to prevent damage.
2. Important Safety Instructions
- Always have the unit professionally installed by a qualified technician to ensure correct wiring and functionality.
- Do not operate the unit in a manner that distracts you from driving. Always prioritize road safety.
- Ensure all connections are secure and properly insulated to prevent short circuits and electrical hazards.
- Avoid exposing the unit to extreme temperatures, direct sunlight for prolonged periods, or excessive moisture.
- Do not attempt to disassemble or modify the unit. This may void the warranty and cause damage.
3. Package Contents
Please verify that all items are present in your package:
- Power Acoustik PTID-4003 Main Unit
- Wiring Harness
- Mounting Hardware
- Remote Control (may vary by region)
- User Manual (this document)
4. Product Overview
Familiarize yourself with the front panel controls and features of your PTID-4003 unit:
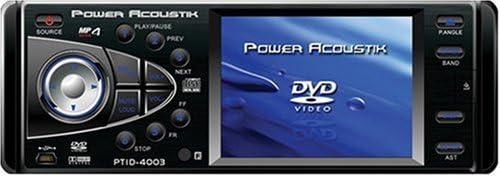
Figure 1: Front Panel Layout of the Power Acoustik PTID-4003. This image displays the unit's front face, featuring a 3.6-inch LCD screen on the right and various control buttons and a central rotary knob on the left. Key controls visible include SOURCE, MP4 indicator, PLAY/PAUSE, PREV, NEXT, MUTE/LOUD, PANGLE, BAND, AST, and STOP buttons. A USB port is also visible on the lower left, and the model number PTID-4003 is printed below the central controls.
- SOURCE Button: Selects the input source (e.g., DVD, Radio, Auxiliary).
- PLAY/PAUSE Button: Controls playback for media sources.
- PREV/NEXT Buttons: Navigates tracks, chapters, or radio presets.
- MUTE/LOUD Button: Mutes audio or activates loudness enhancement.
- PANGLE Button: Adjusts the viewing angle of the monitor screen.
- BAND Button: Switches between radio bands (FM1, FM2, FM3, AM1, AM2).
- AST Button: Activates Auto Store for radio stations.
- STOP Button: Stops media playback.
- Central Rotary Knob/Joystick: Primarily controls volume and menu navigation.
- USB Port: For connecting compatible USB devices.
- 3.6-Inch LCD Monitor: Displays video content and system information.
5. Installation Guide
Proper installation is crucial for optimal performance and safety. It is highly recommended that a qualified professional performs the installation.
- Preparation: Disconnect the vehicle's negative battery terminal before starting any electrical work.
- Mounting: Securely mount the PTID-4003 unit into the vehicle's dashboard using the provided mounting hardware. Ensure it is firmly in place to prevent movement during driving.
- Wiring Connections: Connect the main wiring harness to the vehicle's power, ground, and speaker wires according to the wiring diagram provided with the unit (not included in this manual).
- Auxiliary Inputs:
- Connect a backup camera to the dedicated Auxiliary Input for Back-Up Camera.
- Connect secondary audio/video sources to the A/V Input for Secondary Source Input.
- Antenna Connection: Connect the vehicle's AM/FM antenna to the unit.
- Final Checks: Before reconnecting the battery, double-check all wiring connections for correctness and security.
- Reconnect Battery: Reconnect the negative battery terminal.
6. Basic Operation
6.1 Power On/Off
Press the SOURCE button briefly to turn the unit on. Press and hold the SOURCE button to turn the unit off.
6.2 Source Selection
Repeatedly press the SOURCE button to cycle through available input sources such as DVD, AM/FM Radio, and Auxiliary Input.
6.3 DVD Playback
Insert a DVD disc into the disc slot. The unit should automatically switch to DVD mode and begin playback. Use the following controls:
- PLAY/PAUSE: Toggles between playing and pausing the DVD.
- PREV/NEXT: Skips to the previous or next chapter/track.
- STOP: Stops DVD playback.
- Central Rotary Knob: Adjusts volume.
6.4 AM/FM Radio Operation
Select the Radio source using the SOURCE button.
- BAND: Press to switch between FM1, FM2, FM3, AM1, and AM2 bands.
- Tuning: Use the central rotary knob or PREV/NEXT buttons for manual or seek tuning.
- AST (Auto Store): Press and hold the AST button to automatically scan and store strong stations into presets.
6.5 Monitor Controls
- PANGLE: Press the PANGLE button to adjust the viewing angle of the screen for optimal visibility.
- Brightness: Screen brightness is set to 300 Nit. Adjustments may be available through the system menu (refer to on-screen display options).
6.6 Audio Controls
- Volume: Rotate the central knob to increase or decrease the volume.
- MUTE/LOUD: Press to mute the audio. Press again to restore. Hold to activate/deactivate loudness.
- Equalizer/Sound Settings: Access through the system menu for bass, treble, balance, and fader adjustments.
7. Care and Maintenance
- Cleaning the Screen: Use a soft, lint-free cloth to gently wipe the screen. For stubborn marks, slightly dampen the cloth with water or a screen-safe cleaner. Avoid harsh chemicals.
- Cleaning the Unit: Wipe the exterior of the unit with a soft, dry cloth. Do not use abrasive cleaners.
- Disc Care: Handle DVD discs by their edges. Keep them clean and free of scratches to ensure proper playback.
- Temperature: Avoid operating the unit in extremely hot or cold conditions.
8. Troubleshooting Guide
If you encounter issues with your PTID-4003, refer to the table below for common problems and solutions.
| Problem | Possible Cause | Solution |
|---|---|---|
| Unit does not power on. | No power, incorrect wiring, blown fuse. | Check power and ground connections. Verify vehicle fuse and unit's inline fuse. Ensure ignition wire is connected. |
| No audio output. | Volume too low, Mute activated, incorrect speaker wiring. | Increase volume. Deactivate MUTE. Check speaker connections and polarity. |
| DVD disc does not play. | Disc is dirty, scratched, or incompatible format. | Clean the disc. Try a different disc. Ensure the disc format is supported (DVD R). |
| Radio reception is poor. | Antenna not connected, weak signal. | Ensure antenna is securely connected. Try tuning to a stronger station. |
| Clock settings are inconsistent. | Internal clock issue, power interruption. | Reset the clock through the system menu. If the issue persists after power cycles, contact customer support. |
| PANGLE (angle) button does not work. | Button malfunction, internal fault. | Ensure the unit is powered on and in a mode where angle adjustment is applicable. If the button remains unresponsive, contact customer support. |
If the problem persists after attempting these solutions, please contact Power Acoustik customer support.
9. Technical Specifications
- Model Number: PTID-4003
- Screen Size: 3.6 Inches
- Display Type: LCD
- Panel Brightness: 300 Nit
- Media Type: DVD R
- Audio Outputs: 5.1 Outputs Dolby Digital Output
- Auxiliary Inputs: 1 Auxiliary Input for Back-Up Camera, 1 A/V Input for Secondary Source Input
- Connectivity Technology: Auxiliary
- Item Weight: 5 pounds
- Product Dimensions: 12.1 x 9.4 x 3.8 inches
10. Warranty Information
The Power Acoustik PTID-4003 comes with a ONE YEAR WARRANTY from the date of purchase. This warranty covers manufacturing defects and workmanship under normal use. Please retain your proof of purchase for warranty claims. The warranty does not cover damage caused by improper installation, accident, misuse, abuse, negligence, unauthorized modification, or normal wear and tear. For detailed warranty terms and conditions, please refer to the warranty card included with your product or contact Power Acoustik customer support.
11. Customer Support
For technical assistance, troubleshooting beyond this guide, or warranty inquiries, please contact Power Acoustik customer support. Refer to the official Power Acoustik website or your product packaging for the most current contact information.


