
1. Introduction
This manual provides detailed instructions for the safe and proper installation and operation of your VideoSecu Tilt TV Wall Mount Bracket, model MP502B. This mount is designed to securely hold most 37 to 75-inch LCD, LED, and Plasma flat panel displays weighing up to 165 lbs. Please read all instructions carefully before beginning installation to ensure correct setup and to prevent damage or injury.
2. Safety Information
WARNING: Failure to read and follow all instructions can result in personal injury, property damage, or voiding of your warranty. Improper installation may cause serious injury.
- Do not install this product on walls that are not structurally sound. Ensure the mounting surface can safely support the combined weight of the mount and the display.
- Always use a stud finder to locate wall studs for secure mounting. If mounting to concrete or brick, use appropriate anchors (not always included).
- Do not exceed the maximum weight capacity of 165 lbs (75 kg).
- This product is intended for indoor use only.
- Ensure all screws are tightened securely, but do not overtighten.
- Keep children away during installation.
- If you have any doubts about the installation process, consult a qualified professional installer.
3. Package Contents
Verify that all components are present and undamaged before installation. If any parts are missing or defective, contact VideoSecu customer support.
- TV Wall Mount Bracket (Wall Plate and TV Brackets)
- 7 ft HDMI Cable
- Bubble Level
- Standard Hardware Pack (various screws, washers, spacers)
- User Manual (this document)

4. Specifications
| Model Number | MP502B |
| Mounting Type | Wall Mount |
| Movement Type | Tilt |
| Material | Alloy Steel |
| Color | Black |
| Compatible Devices | Television (LCD, LED, Plasma) |
| Minimum Supported Screen Size | 37 Inches |
| Maximum Supported Screen Size | 75 Inches |
| Maximum Weight Capacity | 165 lbs (75 kg) |
| Tilt Angle | 0 to 15 Degrees Forward |
| Wall Profile | 2.2 inches (5.6 cm) |
| VESA Compatibility | 200x200, 300x300, 400x400, 400x200, 400x300, 500x300, 600x200, 600x300, 600x400, 684x300, up to 700x400 mm |

5. Setup and Installation
Before you begin, ensure you have the necessary tools: a drill, stud finder, level, pencil, and screwdriver. Two people are recommended for safe installation.
5.1 Pre-Installation Checks
- TV Weight: Confirm your TV weighs less than 165 lbs (75 kg).
- VESA Pattern: Measure the horizontal and vertical distance between the mounting holes on the back of your TV. Ensure it falls within the VESA compatibility range (max 700x400mm).
- Wall Type: Identify if your wall is wood stud, concrete, or brick. Different wall types require different mounting hardware and procedures.
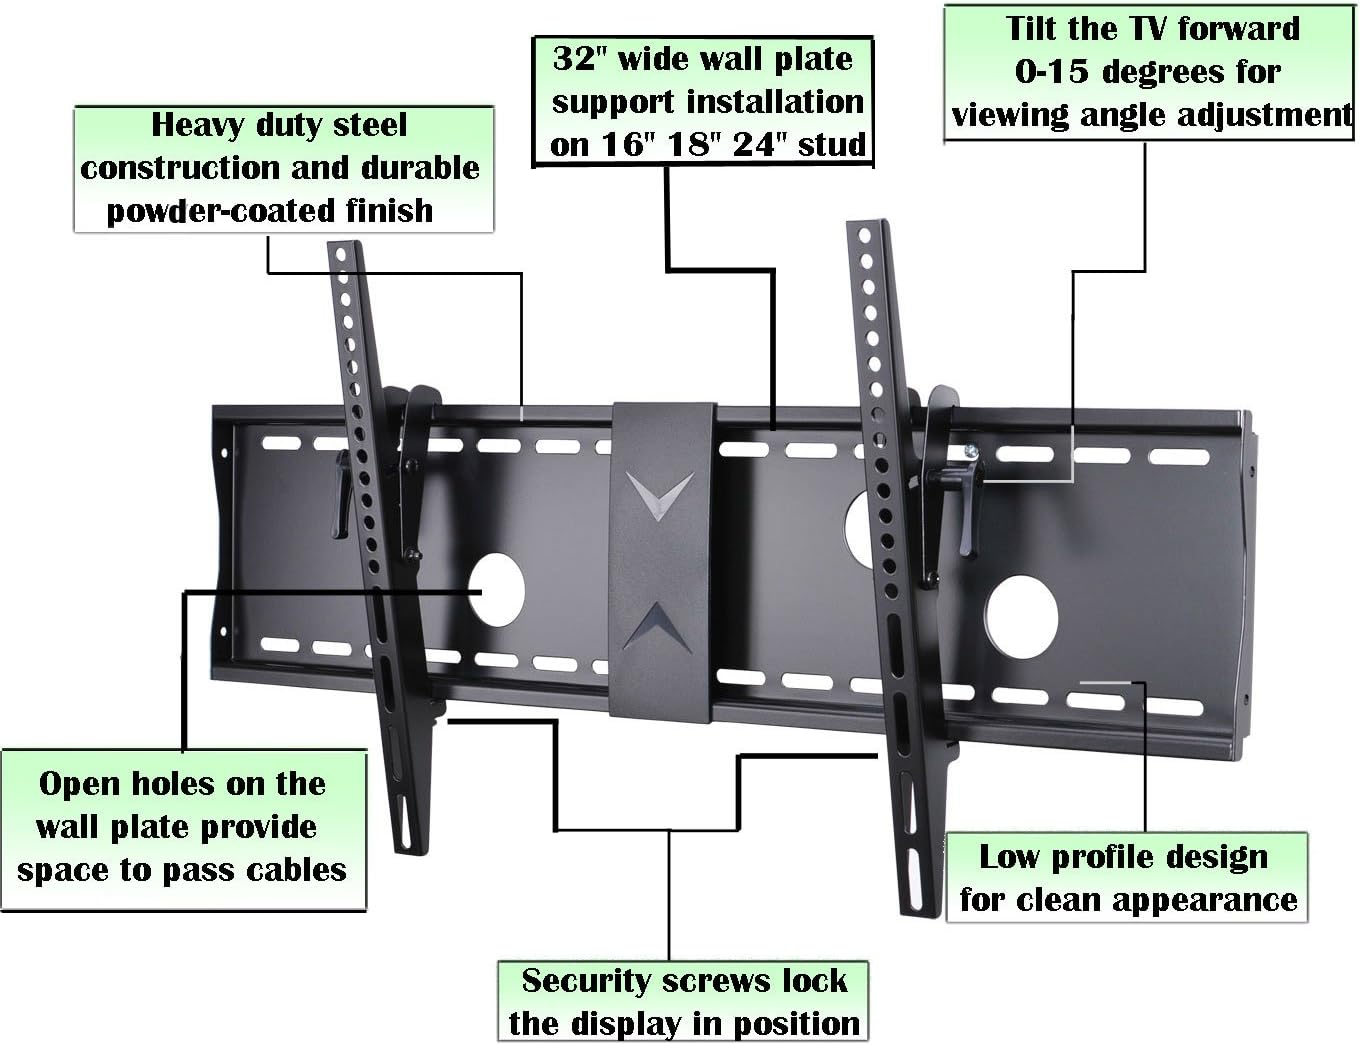
- Wall Plate Width: The wall plate is 32 inches wide. Ensure your TV is at least 37 inches wide to prevent the mount from being visible from the sides.
5.2 Mounting the Wall Plate
- Use a stud finder to locate the center of two adjacent wood studs. Mark these locations with a pencil. The mount supports stud spacing up to 30 inches.
- Hold the wall plate against the wall at the desired height. Use the included bubble level to ensure it is perfectly horizontal. Mark the drilling points through the holes on the wall plate.
- Drill pilot holes at the marked locations. For wood studs, use a 5/32 inch (4mm) drill bit. For concrete/brick, use a 3/8 inch (10mm) masonry drill bit and insert concrete anchors (if applicable).
- Attach the wall plate to the wall using the lag bolts and washers provided in the hardware pack. Tighten securely.
5.3 Attaching Brackets to TV
- Carefully place your TV face down on a soft, clean surface to prevent screen damage.
- Identify the correct diameter and length of screws from the hardware pack that fit your TV's mounting holes. Use washers and spacers if necessary to ensure a snug fit without overtightening.
- Attach the two vertical TV brackets to the back of your TV, aligning them with the VESA mounting holes. Ensure the hooks on the brackets are facing downwards and towards the bottom of the TV.

5.4 Mounting TV to Wall Plate
- With assistance, carefully lift the TV and hook the attached TV brackets onto the top edge of the wall plate.
- Gently lower the TV until the brackets are fully seated on the wall plate. The rail design allows for slight left and right shifting for final TV placement adjustment.
- Once the TV is positioned, locate the security lock screws at the bottom of the TV brackets. Tighten these screws to secure the TV to the wall plate, preventing accidental dislodgement.


6. Operating the Mount (Tilt Adjustment)
The VideoSecu MP502B mount allows for a forward tilt adjustment of 0 to 15 degrees to optimize your viewing angle and reduce glare.
- To adjust the tilt, locate the tilt control knobs or levers on the side of the TV brackets.
- Loosen the knobs or levers slightly to allow the TV to tilt.
- Carefully tilt the TV to your desired angle.
- Once the desired angle is achieved, tighten the tilt control knobs or levers firmly to secure the TV in position.

7. Maintenance
Regular maintenance helps ensure the longevity and safe operation of your TV wall mount.
- Cleaning: Wipe the mount with a soft, dry cloth. Avoid using abrasive cleaners or solvents.
- Periodic Checks: Periodically check all screws and connections to ensure they remain tight and secure. Re-tighten if necessary.
- Damage Inspection: Inspect the mount for any signs of damage or wear. If any damage is found, discontinue use and contact customer support.
8. Troubleshooting
If you encounter issues during or after installation, refer to the following common solutions.
- TV is not level: Ensure the wall plate was installed perfectly level. If the wall plate is level, check if the TV brackets are evenly attached to the TV. Slight adjustments can sometimes be made by loosening and re-tightening the TV bracket screws.
- Difficulty tilting the TV: Ensure the tilt control knobs/levers are sufficiently loosened before attempting to adjust the angle. Do not force the tilt mechanism.
- Mount feels unstable: Immediately remove the TV from the mount. Re-check all wall plate and TV bracket connections. Ensure lag bolts are securely fastened into wall studs and that the TV's weight does not exceed the mount's capacity. Consult a professional if uncertainty persists.
- Missing parts: Refer to the 'Package Contents' section. If parts are missing, contact VideoSecu customer support for replacements.
9. Warranty Information
VideoSecu products are typically covered by a limited warranty against defects in materials and workmanship. For specific warranty terms and conditions applicable to your MP502B mount, please refer to the warranty card included with your product or visit the official VideoSecu website. Keep your purchase receipt as proof of purchase for warranty claims.
10. Customer Support
If you have any questions, require technical assistance, or need to report a missing/defective part, please contact VideoSecu customer support. Contact information can usually be found on the product packaging, the official VideoSecu website, or through your retailer.
Please have your model number (MP502B) and purchase information ready when contacting support.