
Introduction
The NEIKO 10649A Micro Air Die Grinder is a precision pencil-style air tool designed for high-speed finishing and detailing tasks. It is ideal for applications requiring fine control, such as porting, deburring, grinding, cleaning, and polishing small parts. This manual provides essential information for the safe and effective use of your die grinder.
Key features include:
- High Speed Operation: Achieves a free air speed of 54,000 RPM.
- Variable Speed Control: Precision textured throttle allows for speed adjustment.
- Lightweight Design: Pencil-type form factor for enhanced control and maneuverability.
- Durable Construction: Includes a 5ft flexible nylon hose with a protective slip-on shield.
Safety Information
WARNING: Read all safety warnings and instructions before operating this tool. Failure to follow these warnings and instructions may result in electric shock, fire, and/or serious injury.
- Eye Protection: Always wear ANSI-approved safety goggles or safety glasses with side shields when operating this tool.
- Hearing Protection: Wear hearing protection during extended use to prevent hearing damage.
- Respiratory Protection: Wear a dust mask or respirator when grinding materials that produce dust.
- Proper Air Supply: Ensure your air compressor provides clean, dry air at the recommended pressure (90-120 PSI). Do not exceed the maximum operating pressure.
- Secure Workpiece: Always secure the workpiece in a vise or with clamps to prevent movement during operation.
- Inspect Tool: Before each use, inspect the tool for damage, loose parts, or worn accessories. Do not use a damaged tool.
- Accessory Compatibility: Use only accessories rated for the tool's maximum RPM. Ensure accessories are correctly installed and tightened.
- Keep Clear: Keep hands, hair, and loose clothing away from rotating parts.
- Disconnect Air: Disconnect the air supply before changing accessories, performing maintenance, or when the tool is not in use.
- Lubrication: This tool requires daily lubrication. Refer to the Maintenance section for details.
Package Contents
Verify that all items are present upon unpacking:
- NEIKO 10649A Micro Air Die Grinder (Pencil Type)
- 5ft Flexible Nylon Hose with Slip-on Shield
- Two Collet Wrenches
- 1/4 Inch Nipple (Milton style 1/4 Inch female plug)

Image: Included collet wrenches and 1/4 inch air nipple.
Specifications
| Specification | Value |
|---|---|
| Model Number | 10649A |
| Collet Size | 1/8 Inch (3mm) |
| Free Speed | 54,000 RPM |
| Overall Length | 5-1/4 Inch |
| Net Weight | 1/4 Pound (4 ounces) |
| Air Inlet Thread NPT | 1/4 Inch |
| Air Hose I.D. Size | 3/8 Inch |
| Average Air Consumption | 4.2 CFM |
| Noise Level | 73-75 dB |
| Vibration Level | 0.07 m/s² |
| Recommended Air Pressure | 90-120 PSI |
| Hose Length | 5 Feet |
| Power Source | Air Powered |
Setup
- Prepare Air Supply: Ensure your air compressor is set to the recommended operating pressure of 90-120 PSI. Use a clean, dry air supply.
- Lubricate Tool: Before first use and daily thereafter, apply 3-5 drops of pneumatic tool oil into the air inlet of the die grinder. This is crucial for the tool's longevity and performance.
- Attach Air Nipple: Thread the included 1/4 inch air nipple onto the air inlet of the die grinder. Ensure it is securely tightened.
- Connect Hose: Attach the 5ft flexible nylon hose to the air nipple. The hose includes a protective slip-on shield.
- Install Accessory:
- Insert the desired 1/8 inch (3mm) shank accessory into the collet.
- Using the two provided collet wrenches, tighten the collet nut to secure the accessory. Do not overtighten.
- Ensure the accessory is inserted as far as possible into the collet to minimize runout and vibration.
- Connect to Air Compressor: Connect the other end of the hose to your air compressor's quick-connect coupler.

Image: The die grinder with its flexible hose and protective shield.
Operating Instructions
- Safety First: Always wear appropriate personal protective equipment (PPE) including eye and hearing protection.
- Grip the Tool: Hold the die grinder firmly with both hands if possible, or with one hand providing stable control for precision work. The pencil-style design allows for comfortable, controlled grip.
- Start the Tool: Depress the throttle lever to start the grinder. The tool features a self-closing lever for safety.
- Adjust Speed: The precision textured throttle allows for variable speed control. Apply more pressure to the throttle for higher speeds, and less for lower speeds.
- Begin Work: Gently bring the rotating accessory into contact with the workpiece. Apply light, consistent pressure. Avoid excessive force, which can bog down the tool or damage the accessory.
- Maintain Control: Use smooth, controlled movements. For detailed work, use short, precise strokes.
- Stop the Tool: Release the throttle lever to stop the grinder. The self-closing lever will return to the OFF position.
- Disconnect Air: After use, always disconnect the air supply from the tool.
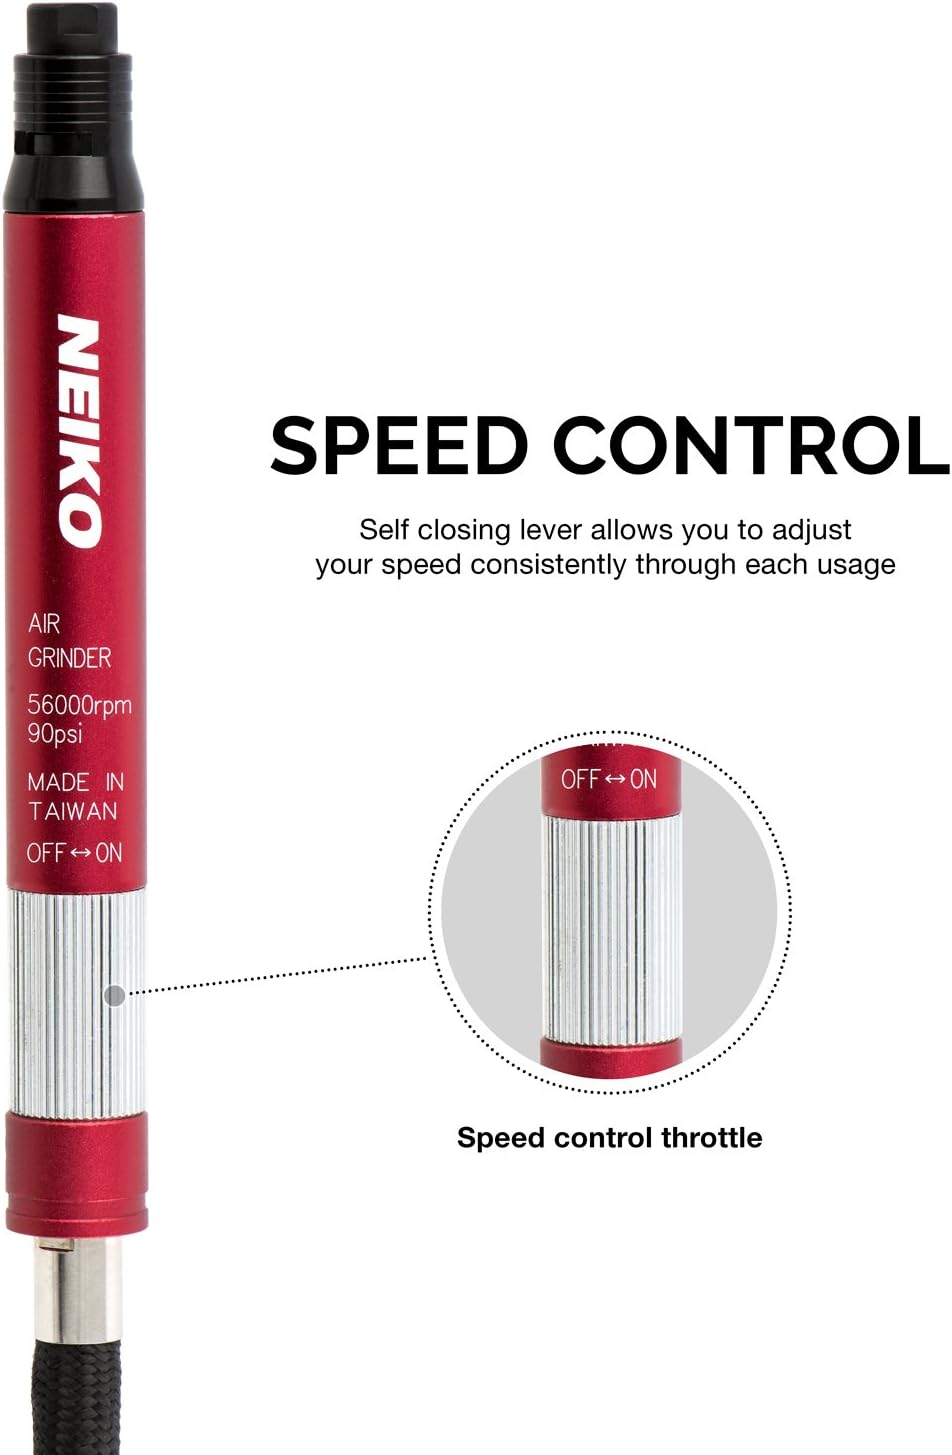
Image: Detail of the speed control throttle.

Image: Demonstrating the lightweight design for precision handling.
Maintenance
Regular maintenance ensures optimal performance and extends the lifespan of your NEIKO Micro Air Die Grinder.
- Daily Lubrication: Apply 3-5 drops of pneumatic tool oil into the air inlet before each day of use. This is critical for the internal components, as pencil grinders can generate heat from friction if not properly oiled, leading to permanent loss of RPM.
- Clean Air Supply: Ensure your air compressor's filter and moisture trap are regularly cleaned and drained to provide clean, dry air to the tool. Do not use a moisture trap if it prevents proper oiling of the tool.
- Clean Tool: After each use, wipe down the exterior of the tool with a clean, dry cloth. Remove any debris from the collet area.
- Inspect Collet and Accessories: Regularly inspect the collet for wear or damage. Replace worn collets to ensure proper gripping of accessories. Inspect accessories for damage or excessive wear and replace as needed.
- Storage: Store the tool in a clean, dry environment when not in use.
Troubleshooting
| Problem | Possible Cause | Solution |
|---|---|---|
| Tool does not start or runs slowly | Low air pressure; Clogged air inlet; Lack of lubrication; Damaged internal components | Check air compressor pressure; Clean air inlet; Apply pneumatic tool oil; Contact customer support if issue persists |
| Excessive vibration or runout | Accessory not properly seated; Worn or damaged collet; Bent accessory; Damaged internal components | Re-seat accessory; Inspect and replace collet if necessary; Replace bent or damaged accessory; Ensure accessory is inserted as far as possible |
| Tool gets hot during operation | Lack of lubrication; Excessive continuous use | Apply pneumatic tool oil; Allow tool to cool down; Ensure proper air pressure is maintained |
| Air leaks from tool | Loose connections; Worn O-rings or seals | Tighten all connections; Inspect and replace O-rings or seals if necessary |
Warranty and Support
For warranty information, please refer to the documentation included with your purchase or visit the official NEIKO website. Warranty terms and conditions may vary.
For technical assistance, replacement parts, or any other support inquiries, please contact NEIKO customer service through their official channels. Contact information can typically be found on the NEIKO website or your purchase receipt.