
1. Introduction
The Behringer Minimix Mix800 is an ultra-compact karaoke machine designed for studio and stage applications. It features a revolutionary Voice Canceller, an integrated digital echo/reverb processor, two independent microphone channels, and a dedicated 2-band EQ for vocal enhancement.
2. Safety Instructions
- Power Supply: Use only the specified power adapter. Incorrect voltage can damage the unit and void the warranty.
- Moisture: Do not expose the unit to rain or moisture. Avoid placing liquids near the device.
- Ventilation: Ensure adequate ventilation. Do not block ventilation openings.
- Servicing: Do not attempt to service the unit yourself. Refer all servicing to qualified personnel.
- Cleaning: Clean only with a dry cloth.
3. Controls and Connectors
3.1 Front Panel

Figure 1: Front Panel Overview of the Minimix Mix800
- MIC LEVEL 1 & 2: Rotary controls to adjust the input level for Microphone Input 1 and 2.
- CLIP Indicators: Red LEDs that illuminate when the input signal is too high, indicating potential clipping. Reduce the MIC LEVEL if these light up.
- MIC INPUT 1 & 2: 1/4-inch TS jack inputs for connecting microphones.
- EQ HIGH: Adjusts the high-frequency content of the microphone signals.
- EQ LOW: Adjusts the low-frequency content of the microphone signals.
- FX LEVEL: Controls the amount of echo/reverb effect applied to the microphone signals.
- ECHO/REVERB Button: Activates or deactivates the integrated digital effects processor.
- 24 BIT Indicator: Lights up when the 24-bit digital effects processor is active.
- VOICE CANCELLER Button: Activates or deactivates the voice canceller function.
- IN/OUT Indicator: Lights up when the main output is active.
- OUTPUT LEVEL: Rotary control to adjust the overall output volume of the Mix800.
- CLIP Meter: LED meter displaying the output signal level. Aim for levels around 0 dB for optimal performance without clipping.
- POWER Button: Turns the unit on or off.
3.2 Rear Panel
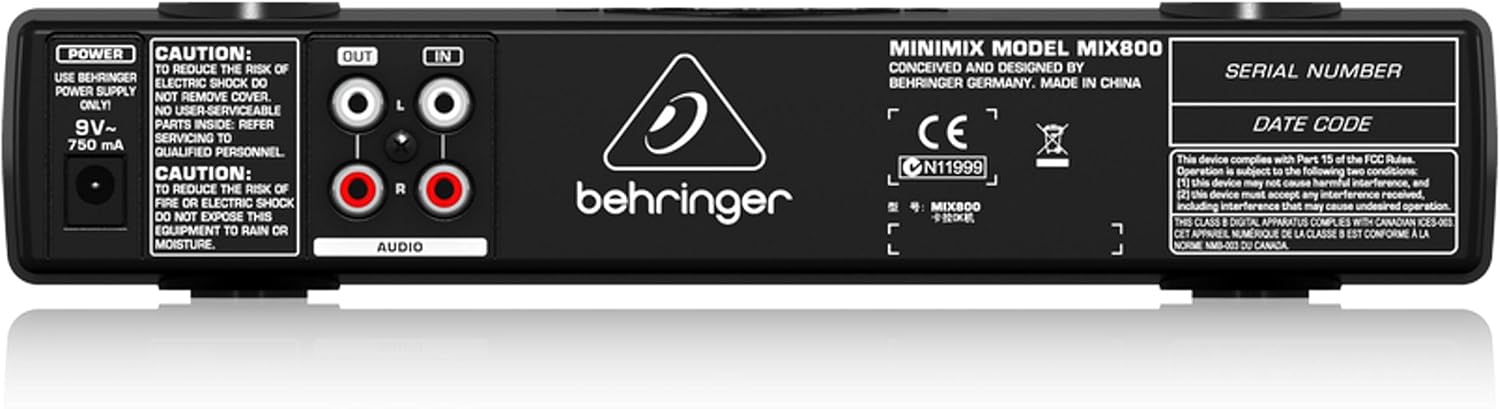
Figure 2: Rear Panel Overview of the Minimix Mix800
- POWER Input: Connection for the external 9V~ 750mA power adapter.
- AUDIO OUT (L/R): RCA outputs for connecting the Mix800 to an amplifier, powered speakers, or a recording device.
- AUDIO IN (L/R): RCA inputs for connecting an external audio source, such as a CD player, media player, or computer.
4. Setup
Follow these steps to set up your Behringer Minimix Mix800:
- Connect Audio Source: Connect your external audio source (e.g., CD player, computer, smartphone) to the AUDIO IN (L/R) RCA inputs on the rear panel using appropriate RCA cables.
- Connect Output: Connect the AUDIO OUT (L/R) RCA outputs on the rear panel to your amplifier, powered speakers, or sound system using RCA cables.
- Connect Microphones: Plug your microphones into the MIC INPUT 1 and MIC INPUT 2 1/4-inch jacks on the front panel.
- Connect Power: Connect the supplied 9V~ 750mA power adapter to the POWER input on the rear panel, then plug the adapter into a suitable power outlet.
- Power On: Press the POWER button on the front panel to turn on the Mix800.
5. Operating Instructions
Once set up, you can begin using your Minimix Mix800:
- Adjust Microphone Levels: Speak into your microphones and slowly turn up the MIC LEVEL 1 and MIC LEVEL 2 controls. Adjust until the sound is clear and loud, but ensure the CLIP indicators do not light up consistently. Occasional flashes are acceptable.
- Adjust EQ: Use the EQ HIGH and EQ LOW controls to shape the tone of your vocals. Increase EQ HIGH for brighter vocals, and EQ LOW for more warmth or bass.
- Apply Effects: Press the ECHO/REVERB button to activate the digital effects. Adjust the FX LEVEL knob to control the amount of echo or reverb added to your vocals.
- Use Voice Canceller: Press the VOICE CANCELLER button to attempt to remove vocals from the incoming stereo audio source. Note that the effectiveness of this feature can vary depending on the original audio track.
- Set Output Level: Adjust the OUTPUT LEVEL knob to control the overall volume sent to your sound system. Monitor the CLIP Meter to prevent distortion.
6. Maintenance
- Cleaning: Disconnect the power before cleaning. Use a soft, dry cloth to wipe the exterior of the unit. Do not use liquid cleaners or solvents.
- Storage: When not in use for extended periods, store the unit in a dry, dust-free environment.
- Cable Care: Ensure all cables are free from kinks or damage. Avoid pulling cables forcefully from their connectors.
7. Troubleshooting
| Problem | Possible Cause | Solution |
|---|---|---|
| No sound output | Power off; incorrect connections; output level too low; amplifier off. | Check power, all cable connections (input/output), increase OUTPUT LEVEL, ensure amplifier is on. |
| Microphone not working | Mic level too low; faulty microphone/cable; mic not fully inserted. | Increase MIC LEVEL, test with another microphone/cable, ensure mic cable is fully inserted and making proper contact. |
| Distorted sound | Input/output levels too high (clipping). | Reduce MIC LEVEL or OUTPUT LEVEL until CLIP indicators/meter no longer show consistent clipping. |
| Voice Canceller ineffective | Original audio track not suitable for voice cancellation. | The effectiveness varies greatly with the source material. This is a characteristic of the technology. |
8. Specifications
| Feature | Detail |
|---|---|
| Model Name | MINIMIX MIX800 |
| Item Dimensions (L x W x H) | 9.55" x 4.72" x 1.89" |
| Item Weight | 1.3 pounds |
| Microphone Inputs | 2 x 1/4" TS Jacks |
| Audio Inputs | RCA (L/R) |
| Audio Outputs | RCA (L/R) |
| Effects | Digital Echo/Reverb (24-bit) |
| Equalization | 2-band (High, Low) |
| Power Supply | 9V~ 750mA (external adapter) |
9. Official Product Video
Video 1: Manufacturer's overview of the Behringer Minimix Mix800, demonstrating its features and capabilities.
10. Warranty and Support
For detailed warranty information, please refer to the official Behringer website: http://www.music-group.com/warranty.aspx. For technical support or service inquiries, please contact Behringer customer service.


