
Introduction
The RCA DRC8052N DVD Recorder is designed for recording and playing back video content on DVD discs. This device allows you to record from various sources such as a television, camcorder, or other video devices, and archive your favorite movies and shows. It features an HDMI output for a high-quality digital connection and upconversion to high-definition resolution, enhancing your viewing experience. The unit also supports DivX playback and includes convenient front audio/video input jacks for easy connectivity.
Setup
Follow these steps to set up your RCA DRC8052N DVD Recorder:
- Unpacking: Carefully remove the DVD recorder and all accessories from the packaging. Ensure all components are present.
- Power Connection: Connect the power cord to the DC IN 9V port on the rear of the unit and then plug it into a standard electrical outlet.
- Video Output Connection:
- For optimal picture quality, connect an HDMI cable from the HDMI OUT port on the DVD recorder to an HDMI IN port on your television.
- Alternatively, use composite video (yellow) and stereo audio (red/white) cables to connect the VIDEO OUT and AUDIO OUT (R/L) ports on the DVD recorder to corresponding input ports on your television.
- Video Input Connection (for recording):
- To record from a camcorder, connect it to the DV-Input port on the front panel. This digital connection is ideal for transferring digital video.
- For other video sources (e.g., VCR, cable box), use the AUDIO IN (R/L) and VIDEO IN jacks on the rear panel, or the convenient Front Audio/Video Input Jacks.
- Remote Control Batteries: Insert two AA batteries into the remote control unit, observing the correct polarity. The remote control is essential for full functionality.
- Initial Power On: Press the POWER button on the unit or remote control to turn on the DVD recorder. Follow any on-screen prompts for initial setup.
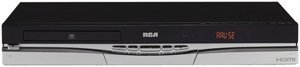
Figure 1: Front view of the RCA DRC8052N DVD Recorder, showing the disc tray and control buttons.
Operating Instructions
This section details the basic operation of your DVD recorder.
Playing a DVD
- Ensure the DVD recorder is powered on and your TV is set to the correct input source (e.g., HDMI 1, AV1).
- Press the OPEN/CLOSE button to open the disc tray.
- Place a DVD disc onto the tray with the label side facing up.
- Press the OPEN/CLOSE button again to close the tray. The disc will load automatically.
- Use the PLAY, PAUSE, STOP, and navigation buttons on the remote control to manage playback.
Recording to DVD
The RCA DRC8052N supports recording to DVD+R/+RW and DVD-R/-RW discs.
- Insert a blank recordable DVD disc into the disc tray.
- Select the input source you wish to record from (e.g., DV-Input, AV-Input) using the remote control.
- Ensure the source device is playing or transmitting the content you want to record.
- Press the RECORD button on the remote control or the unit to begin recording.
- Press the STOP button to end the recording.
- Finalize the disc if necessary, following the on-screen instructions, to ensure it can be played on other DVD players.
HDMI with HD Upconversion
When connected via HDMI, the DVD recorder can upconvert standard DVD images to high-definition resolution (up to 1080i), providing a clearer and more detailed picture on compatible HD televisions.
DivX Playback
This unit is DivX certified, allowing playback of DivX video files stored on compatible discs. Insert a disc containing DivX files, and the interactive user interface will guide you through selecting and playing the content.
Maintenance
Proper care ensures the longevity and optimal performance of your DVD recorder.
- Cleaning the Unit: Use a soft, dry cloth to clean the exterior of the unit. Do not use liquid cleaners or abrasive materials, as they may damage the finish.
- Disc Care: Handle discs by their edges to avoid fingerprints and scratches. Store discs in their cases when not in use. Clean dirty discs with a soft, lint-free cloth, wiping from the center outwards.
- Ventilation: Ensure the unit has adequate ventilation. Do not block any ventilation openings on the top, sides, or bottom of the recorder. Avoid placing the unit in an enclosed space or on soft surfaces that may obstruct airflow.
- Power Off: When not in use for extended periods, it is recommended to unplug the unit from the power outlet.
Troubleshooting
If you encounter issues with your RCA DRC8052N DVD Recorder, refer to the following common solutions:
| Problem | Possible Cause / Solution |
|---|---|
| Unit does not power on. | Ensure the power cord is securely connected to both the unit and a working electrical outlet. |
| No picture or sound on TV. | Check all video and audio cable connections (HDMI, composite). Ensure your TV is set to the correct input source (e.g., HDMI 1, AV1). |
| Disc does not play. | Ensure the disc is inserted correctly with the label side up. Check if the disc is clean and free of scratches. Verify the disc format is compatible with the player (e.g., DVD-Video, DivX). Some discs may be region-coded and not compatible. |
| Cannot record. | Ensure a blank, recordable DVD disc (DVD+R/+RW or DVD-R/-RW) is inserted. Verify the input source is correctly selected and providing a signal. Check if the disc has sufficient free space. |
| Remote control not working. | Check and replace the batteries (2 AA batteries required). Ensure there are no obstructions between the remote and the unit's sensor. The remote control is necessary for full operation. |
| Unit takes a long time to start up. | A brief startup sequence (approximately 20 seconds) is normal for this device before it fully responds to commands. |
Specifications
- Brand: RCA
- Model Number: DRC8052N
- Product Dimensions: 16.9 x 11 x 2.6 inches
- Item Weight: 10.1 pounds
- Batteries: 2 AA batteries required (for remote control)
- Special Features: Compact design
- Media Type: DVD (+R/+RW, -R/-RW)
- Resolution: Up to 1920x1080 (via HDMI upconversion)
- Connector Type: RCA, HDMI
- Connectivity Technology: HDMI, RCA
- Audio Output Mode: Stereo
- Supported Audio Format: Dolby Digital, DTS, PCM
- Total HDMI Ports: 1
Warranty and Support
For detailed warranty information, please refer to the warranty card included with your product or visit the official RCA website. For technical support or service inquiries, please contact RCA customer service through their official channels.


