
Introduction
This manual provides comprehensive instructions for the operation, maintenance, and troubleshooting of your RCA RP5025 Digital Voice Recorder. Please read this manual thoroughly before using the device to ensure proper functionality and to maximize its features. Keep this manual for future reference.
Product Overview
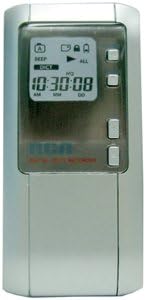
Figure 1: Front view of the RCA RP5025 Digital Voice Recorder. The device features a prominent LCD display showing time and recording status, along with several control buttons on the right side for navigation and operation.
The RCA RP5025 is a compact digital voice recorder designed for clear audio capture and playback. It features 64 MB of built-in memory, allowing for approximately 30 hours of recording time. Key features include an LCD display, built-in flash record and speaker, Auto Voice Record (VOR), variable speed playback, intro scan, date and time stamp, and the ability to organize messages into two folders with up to 198 messages each. It also includes a low-battery indicator and a headphone jack for private listening.
Setup
1. Battery Installation
The RCA RP5025 requires batteries for operation. Locate the battery compartment on the back of the device. Insert the specified batteries, ensuring correct polarity (+/-) as indicated inside the compartment. Close the battery cover securely.
2. Initial Power On
After installing batteries, press and hold the Power button (usually located on the side or front) until the LCD display illuminates. The device may prompt you to set the date and time during the first power-on. Follow the on-screen instructions to set these parameters using the navigation buttons.
3. Setting Date and Time
Accurate date and time settings are crucial for the date & time stamp feature. Navigate to the 'Settings' or 'Menu' option on the device. Select 'Date/Time' and use the control buttons to adjust the year, month, day, hour, and minute. Confirm your selections to save the settings.
Operating Instructions
1. Recording Messages
- Start Recording: Press the RECORD button. The recording indicator will appear on the LCD.
- Pause Recording: Press the RECORD button again during recording. Press it once more to resume.
- Stop Recording: Press the STOP button. The recorded message will be saved automatically.
- Auto Voice Record (VOR): To enable VOR, navigate to the settings menu and activate the VOR function. The recorder will automatically start recording when sound is detected and pause when silence occurs.
2. Playing Back Messages
- Select Message: Use the FORWARD or REVERSE buttons to navigate through saved messages.
- Start Playback: Press the PLAY button.
- Adjust Volume: Use the VOLUME UP/DOWN buttons during playback.
- Variable Speed Playback: Access this feature through the menu to adjust playback speed without altering pitch.
- Intro Scan: Activate Intro Scan from the menu to play the first few seconds of each message, allowing for quick message identification.
- Stop Playback: Press the STOP button.
3. Managing Messages (Editing Functions)
- Delete Message: Select the message you wish to delete, then access the 'Delete' option from the menu. Confirm your selection.
- Move Message: Messages can be moved between the two available folders (Folder 1 and Folder 2). Select a message, then choose the 'Move' option and select the destination folder.
- Organizing Folders: The device supports two folders, each capable of holding up to 198 messages. Use the folder navigation buttons to switch between folders.
Maintenance
1. Cleaning the Device
Wipe the exterior of the recorder with a soft, dry cloth. Do not use liquid cleaners, aerosols, or solvents, as these can damage the device. Ensure no moisture enters the device openings.
2. Battery Care
If the device will not be used for an extended period, remove the batteries to prevent leakage and potential damage. Replace batteries when the low-battery indicator appears on the LCD display to ensure continuous operation and prevent data loss.
3. Storage
Store the voice recorder in a cool, dry place, away from direct sunlight, extreme temperatures, and high humidity. Avoid dropping or subjecting the device to strong impacts.
Troubleshooting
| Problem | Possible Cause | Solution |
|---|---|---|
| Device does not power on. | Dead or incorrectly installed batteries. | Check battery polarity. Replace with fresh batteries. |
| Cannot record. | Memory full; device in playback mode. | Delete old messages to free up space. Ensure device is in record mode. |
| Poor audio quality during playback. | Microphone obstructed; recording environment too noisy; low battery. | Ensure microphone is clear. Record in a quieter environment. Replace batteries. |
| LCD display is blank or dim. | Low battery; device is off. | Replace batteries. Press the Power button to turn on the device. |
Specifications
- Model: RCA RP5025
- Memory Capacity: 64 MB
- Recording Time: Approximately 30 hours
- Display: LCD
- Features: Built-in flash record & speaker, Auto Voice Record (VOR), Variable speed playback, Intro scan, Date & time stamp, 2 folders (198 messages each), Low-battery indicator, Headphone jack, Editing functions.
- Power Source: Batteries (type not specified in input, assuming common AAA/AA)
- Dimensions: 9.49 x 5.98 x 1.42 inches (Package Dimensions)
- Weight: 4.8 ounces
- Headphones Jack: 3.5mm Audio
- Microphone: Built-In, Mono
Warranty Information
RCA products typically come with a limited warranty covering defects in materials and workmanship. For specific warranty terms and conditions, please refer to the warranty card included with your product packaging or visit the official RCA website. Keep your purchase receipt as proof of purchase for warranty claims.
Customer Support
For technical assistance, troubleshooting beyond this manual, or service inquiries, please contact RCA customer support. You can often find contact information (phone numbers, email, or support portals) on the official RCA website or within the product packaging. When contacting support, please have your product model number (RP5025) and serial number (if applicable) ready.
RCA Official Website: www.rca.com (Please note: This is a general placeholder link, actual support link may vary.)

