1. Introduction
This manual provides essential information for the proper installation, operation, and maintenance of your Wagner QS ZX529A Semi-Metallic Disc Brake Pad Set. These brake pads are engineered to restore your vehicle's braking performance to optimal levels, offering reliable stopping power and a smooth, quiet braking experience. Please read this manual thoroughly before installation and retain it for future reference.
2. Product Overview
The Wagner QS ZX529A Disc Brake Pad Set is designed for front axle applications in specific Dodge Dakota models. Key features include:
- Semi-Metallic Composition: Ensures consistent friction application for reliable stopping.
- Chamfered Edges and Integrally Molded Shims: Designed to reduce vibration and minimize noise.
- 100% Post-Cure Process: Guarantees even friction performance throughout the pad's lifespan, enhancing durability.
- OE Matched Friction Formulations: Engineered to meet original equipment (OE) standards for balanced braking performance.
- Application-Specific Design: Tailored for precise fit and function in compatible vehicles.

Image 2.1: Components of the Wagner QS ZX529A Disc Brake Pad Set, including four brake pads and associated hardware.
3. Vehicle Compatibility
This Wagner QS ZX529A Disc Brake Pad Set is specifically designed for the front axle of the following vehicle:
- 1991–1998 Dodge Dakota
Always verify compatibility with your vehicle's make, model, and year before installation. Consult your vehicle's service manual for specific brake system requirements.
4. Installation Guidelines
Brake system work requires specialized knowledge and tools. If you are not experienced with automotive brake repair, it is recommended to seek professional assistance. Improper installation can lead to brake failure and serious injury.
4.1 Safety Precautions
- Always wear appropriate personal protective equipment (PPE), including safety glasses and gloves.
- Ensure the vehicle is securely supported on jack stands on a level surface.
- Never rely solely on a jack for vehicle support.
- Avoid inhaling brake dust, which may contain harmful substances.
4.2 General Installation Steps (Consult Vehicle Service Manual for Specifics)
- Preparation: Gather all necessary tools and new components. Ensure the vehicle is cool and the parking brake is engaged.
- Wheel Removal: Loosen lug nuts, raise the vehicle, secure with jack stands, and remove the wheel.
- Caliper Removal: Carefully remove the brake caliper bolts and slide the caliper off the rotor. Do not let the caliper hang by the brake hose; support it with a wire or bungee cord.
- Old Pad Removal: Remove the old brake pads from the caliper bracket.
- Caliper Bracket Cleaning: Clean the caliper bracket thoroughly, removing any rust or debris.
- New Hardware Installation: Install new brake hardware (shims, clips) as provided with the Wagner QS set. These are designed to reduce noise and vibration.
- Piston Retraction: Use a suitable tool to retract the caliper piston(s) to accommodate the new, thicker brake pads. Open the brake fluid reservoir cap before retracting pistons.
- New Pad Installation: Install the new Wagner QS ZX529A brake pads into the caliper bracket, ensuring they are seated correctly.
- Caliper Reinstallation: Reinstall the caliper over the new pads and rotor, tightening caliper bolts to the manufacturer's specified torque.
- Wheel Reinstallation: Reinstall the wheel and hand-tighten lug nuts. Lower the vehicle and torque lug nuts to specification.
- Brake System Check: Before driving, pump the brake pedal several times until it feels firm. Check the brake fluid level and top off if necessary. Inspect for any leaks.

Image 4.1: Detailed view of Wagner QS brake pad features, including chamfers, shims, slots, and the post-cured process for even friction performance.
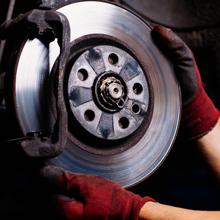
Image 4.2: Close-up illustrating the application-specific chamfers, shims, and slots designed to reduce noise and vibration.
5. Operating Principles and Break-In Procedure
After installing new brake pads, a proper break-in (or bedding-in) procedure is crucial for optimal performance and longevity. This process helps to transfer an even layer of friction material from the pads to the rotor surface, ensuring consistent braking and preventing noise.
5.1 Break-In Procedure
- Find a safe, open area where you can perform several stops without interruption.
- Accelerate to approximately 35 mph (56 km/h) and apply moderate brake pressure to slow down to about 10 mph (16 km/h). Do not come to a complete stop.
- Repeat this process 5-6 times, allowing a short period between stops for the brakes to cool slightly.
- After the last stop, drive for several minutes without applying the brakes to allow them to cool completely.
- Avoid hard braking or prolonged heavy braking for the first 200-300 miles (320-480 km) after installation.
Following this procedure will ensure the brake pads and rotors are properly conditioned for optimal performance.
6. Maintenance
Regular inspection and maintenance of your brake system are vital for safety and performance.
6.1 Recommended Inspection Intervals
- Inspect brake pads, rotors, and fluid levels every 12,000 miles (19,000 km) or annually, whichever comes first.
- Check for uneven pad wear, cracks, or excessive scoring on rotors.
- Ensure brake fluid is at the correct level and appears clean.
6.2 Pairing with Rotors
For optimal braking performance and longevity, it is recommended to pair Wagner QS brake pads with Wagner E-Shield® rotors.
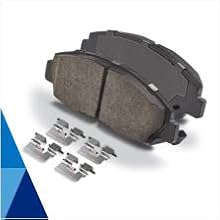
Image 6.1: Wagner QS brake pads shown alongside Wagner E-Shield rotors, illustrating the recommended pairing for enhanced braking system performance.
7. Troubleshooting Common Issues
This section addresses common issues that may arise with brake systems. Note that these are general guidelines, and a professional diagnosis is always recommended for persistent problems.
| Symptom | Possible Cause | Action |
|---|---|---|
| Squealing/Screeching Noise | Improper break-in, worn pads, missing shims, glazed rotors, foreign material. | Ensure proper break-in. Inspect pads for wear and shims for correct installation. Check rotors for glazing or damage. Clean brake components. |
| Grinding Noise | Severely worn pads (metal-on-metal contact), foreign object. | Immediately inspect and replace worn pads. Check for and remove any foreign objects. |
| Vibration/Pulsation | Warped rotors, uneven pad wear, loose caliper components. | Inspect rotors for runout or thickness variation. Check for proper caliper and hardware installation. |
| Soft/Spongy Pedal | Air in brake lines, low brake fluid, faulty master cylinder. | Bleed brake system to remove air. Check brake fluid level and for leaks. Inspect master cylinder. |
If you experience any of these symptoms, it is crucial to address them promptly to maintain vehicle safety. Consult a qualified mechanic if you are unsure about diagnosis or repair.
8. Specifications
| Attribute | Detail |
|---|---|
| Brand | Wagner |
| Model Number | ZX529A |
| Material | Semi-Metallic (Friction Material), Stainless Steel (Hardware) |
| Auto Part Position | Front |
| Vehicle Service Type | Passenger Car (Dodge Dakota 1991-1998) |
| Item Weight | 4.46 pounds |
| Product Dimensions | 9.5 x 6.5 x 2.5 inches |
| UPC | 008536324324 |
| OEM Part Number | ZX529A |
9. Warranty and Support
For information regarding product warranty, technical support, or specific application questions, please refer to the official Wagner Brakes website or contact their customer service department. Keep your purchase receipt as proof of purchase.
Manufacturer: Wagner Brake
Website: Visit the Wagner Store on Amazon


