
Introduction
This manual provides comprehensive instructions for the Dorman 13560 Slotted Hex Nut Assortment. It covers proper handling, installation, and maintenance to ensure optimal performance and longevity of the nuts in various applications.
The Dorman 13560 assortment includes slotted hex nuts made from carbon steel, designed for secure fastening. These nuts are commonly used in automotive and mechanical assemblies where a cotter pin or similar locking device is required to prevent loosening.
Product Overview

Image: A close-up view of three Dorman slotted hex nuts, showcasing their hexagonal shape and the slots cut into the castle-like top for cotter pin insertion.
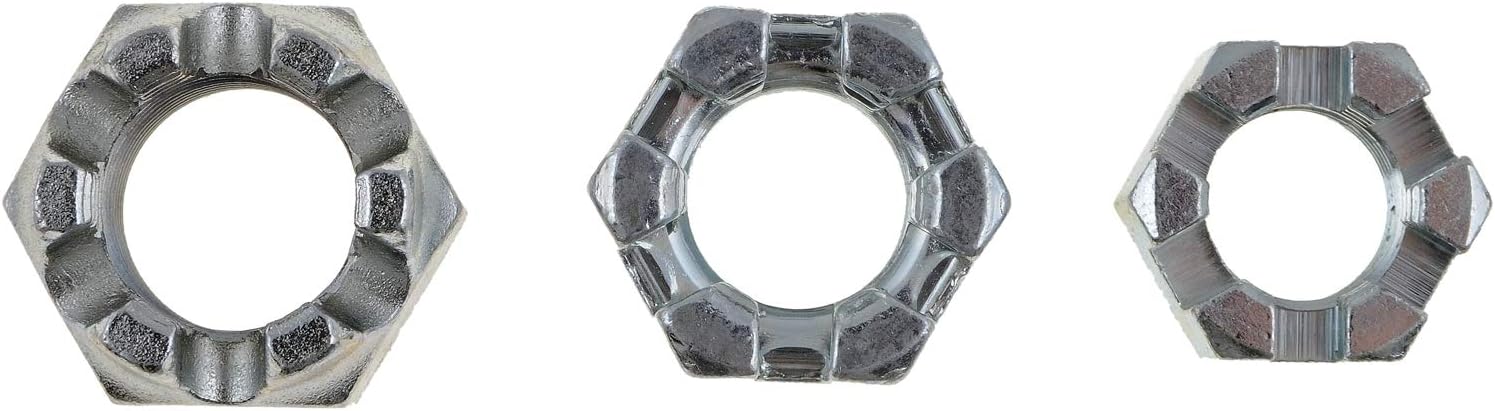
Image: A top-down perspective of three Dorman slotted hex nuts, highlighting the internal threading and the precise cuts of the slots.
The Dorman 13560 Slotted Hex Nut Assortment provides a selection of nuts essential for various fastening needs. These nuts feature a hexagonal body for wrench application and a slotted or "castle" top designed to accept a cotter pin or safety wire, preventing accidental loosening due to vibration or torque.
Key features include:
- Material: Carbon Steel for durability and strength.
- Finish: Polished, Machined exterior.
- Drive System: External Hex, Slotted for secure tightening and locking.
- Thread Type: Unified National Coarse (UNC), Fully Threaded.
Setup and Installation
Proper installation is crucial for the secure and reliable performance of slotted hex nuts.
Required Tools
- Correct size wrench or socket for the hex nut.
- Cotter pin or safety wire of appropriate size.
- Pliers or cotter pin tool for bending/securing the cotter pin.
- Torque wrench (recommended for critical applications).
Installation Steps
- Prepare the Fastener: Ensure the bolt or threaded rod is clean and free of debris.
- Thread the Nut: Hand-thread the slotted hex nut onto the bolt until it is finger-tight.
- Tighten the Nut: Use the appropriate wrench or socket to tighten the nut. For applications requiring specific torque, use a torque wrench to achieve the manufacturer's recommended torque specification.
- Align for Cotter Pin: Continue tightening the nut until one of the slots aligns with the hole in the bolt or shaft. It is generally acceptable to tighten slightly past the desired torque to achieve alignment, but never loosen to align.
- Insert Cotter Pin: Insert a new cotter pin through the aligned slot in the nut and the hole in the bolt.
- Secure Cotter Pin: Bend the ends of the cotter pin to secure it in place, preventing the nut from rotating. Ensure the cotter pin is fully spread and does not interfere with surrounding components.
Operating Considerations
While slotted hex nuts do not have "operating" procedures in the traditional sense, their function is critical to the operation of the assembly they secure.
- Vibration Resistance: The primary operational benefit of a slotted hex nut with a cotter pin is its resistance to loosening under vibration or dynamic loads.
- Load Bearing: Ensure the nut is appropriately sized and torqued for the intended load. Over-tightening can strip threads, while under-tightening can lead to premature failure.
- Environmental Factors: Consider the operating environment. Carbon steel nuts are suitable for many applications but may require additional corrosion protection in highly corrosive environments.
Maintenance
Regular inspection and proper maintenance extend the life and ensure the safety of assemblies using slotted hex nuts.
- Periodic Inspection: Regularly inspect nuts and cotter pins for signs of wear, corrosion, or damage. Check for any signs of loosening.
- Cotter Pin Replacement: Always replace cotter pins with new ones when disassembling and reassembling a joint. Cotter pins are designed for single use.
- Cleaning: Keep nuts and mating threads clean. Dirt or debris can affect torque accuracy and fastening integrity.
- Corrosion Protection: If operating in a corrosive environment, consider applying appropriate anti-corrosion coatings or lubricants to the nuts and bolts.
Troubleshooting
| Problem | Possible Cause | Solution |
|---|---|---|
| Nut loosens after installation | Cotter pin not installed or improperly secured; insufficient torque; incorrect nut size. | Ensure cotter pin is correctly inserted and bent; re-torque to specification; verify correct nut and bolt sizing. |
| Difficulty threading nut | Damaged threads on nut or bolt; debris in threads; incorrect thread type. | Inspect threads for damage; clean threads thoroughly; ensure nut and bolt have matching thread types (e.g., UNC). |
| Nut or cotter pin corrodes | Exposure to moisture or corrosive agents; lack of protective coating. | Apply anti-corrosion coating; consider using nuts made from corrosion-resistant materials for specific environments. |
Specifications
The Dorman 13560 Slotted Hex Nut Assortment features the following general specifications:
- Part Number: 13560
- Material: Carbon Steel
- Fastener Type: Hex
- Exterior Finish: Machined
- Color: Multi (referring to the assortment)
- Finish Type: Polished
- Drive System: External Hex, Slotted
- Item Dimensions (L x W x H): 5.5 x 2 x 1.5 inches (for the package)
- Item Weight: 1.6 ounces (for the product, not package)
- Thread Type: Unified National Coarse (UNC)
- Grade Rating: Commercial
- Thread Style: Slotted
- Thread Coverage: Fully Threaded
- Thread Class: Coarse
- UPC: 037495135603
- Manufacturer: Dorman Products
Warranty and Support
For specific warranty information regarding the Dorman 13560 Slotted Hex Nut Assortment, please refer to the official Dorman Products website or contact Dorman customer support directly.
Dorman Products is committed to providing high-quality automotive aftermarket solutions.
Contact Information:
- Website: www.dormanproducts.com
- Customer Service: Refer to the website for current contact methods (phone, email, etc.).