
Introduction
This manual provides essential information for the proper installation, function, and maintenance of your Standard Motor Products VC250 Vacuum Control unit. The VC250 is designed as a replacement vacuum advance unit for automotive applications, playing a critical role in engine timing and performance. Please read this manual thoroughly before installation or service.
Safety Information
Always observe the following safety precautions when working with automotive components:
- Disconnect the vehicle's battery before beginning any electrical work to prevent accidental shorts or injury.
- Wear appropriate personal protective equipment, including safety glasses and gloves.
- Ensure the vehicle is securely supported on jack stands if working underneath it.
- Allow the engine to cool completely before handling hot components.
- Refer to your vehicle's specific service manual for detailed instructions and torque specifications.
Setup and Installation
The Standard Motor Products VC250 Vacuum Control unit is a direct-fit replacement part. Professional installation is recommended for optimal performance and safety.
Tools Required (General)
- Basic hand tools (wrenches, screwdrivers)
- Vacuum pump/gauge (for testing)
- Vehicle-specific service manual
Installation Steps (General Guidelines)
- Preparation: Ensure the engine is off and cool. Disconnect the negative battery terminal. Locate the existing vacuum advance unit on the distributor.
- Removal of Old Unit: Carefully disconnect the vacuum hose from the old unit. Remove any retaining clips, screws, or bolts securing the old unit to the distributor. Note the orientation of the old unit for correct installation of the new one.
- Install New VC250: Position the new Standard Motor Products VC250 unit in the same orientation as the removed unit. Secure it with the appropriate retaining hardware. Ensure it is seated correctly.
- Connect Vacuum Hose: Reconnect the vacuum hose to the port on the VC250. Ensure a snug fit to prevent vacuum leaks.
- Final Checks: Reconnect the battery. Start the engine and check for proper operation and any vacuum leaks. It is advisable to verify engine timing with a timing light after installation, as a new vacuum advance unit can affect timing.

Figure 1: Overview of the Standard Motor Products VC250 Vacuum Control unit. This image shows the main body and the mounting bracket with attachment points.
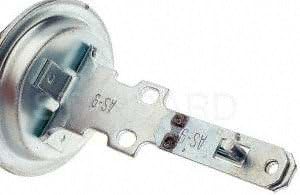
Figure 2: Another view of the VC250, highlighting the integrated mounting bracket and the arm that connects to the distributor's breaker plate.

Figure 3: A detailed close-up of the vacuum port on the VC250 unit, where the vacuum hose connects.
Operating Principle
The VC250 Vacuum Control unit is a passive component that responds to engine vacuum. It is connected to a vacuum source on the engine (typically manifold vacuum or ported vacuum, depending on the vehicle's design). As engine vacuum changes, the diaphragm inside the VC250 moves, which in turn rotates the distributor's breaker plate. This rotation advances or retards the ignition timing, optimizing combustion efficiency for various engine loads and speeds. Proper function of this unit is crucial for fuel economy and engine performance.
Maintenance
The Standard Motor Products VC250 Vacuum Control unit is designed for long-term reliability and typically requires minimal maintenance. However, periodic inspection is recommended:
- Vacuum Hose Inspection: Regularly check the vacuum hose connected to the VC250 for cracks, kinks, or loose connections. A compromised hose can lead to vacuum leaks and incorrect timing.
- Unit Inspection: Visually inspect the unit for any signs of physical damage or corrosion.
- Functionality Check: If engine performance issues arise, a vacuum pump can be used to test the diaphragm's movement and ability to hold vacuum. Consult your vehicle's service manual for specific testing procedures and vacuum specifications.
Troubleshooting
If you experience issues that you suspect are related to the vacuum control unit, consider the following:
Common Symptoms of a Faulty Vacuum Control Unit:
- Poor engine performance, especially during acceleration.
- Reduced fuel economy.
- Engine pinging or knocking (detonation).
- Rough idle.
- Failure to pass emissions tests.
Diagnostic Steps:
- Visual Inspection: Check the vacuum hose for any obvious damage or disconnections.
- Vacuum Test: Disconnect the vacuum hose from the VC250. Connect a hand-held vacuum pump to the unit's port. Apply vacuum (e.g., 15-20 inHg) and observe if the unit holds vacuum. If it does not, the diaphragm may be ruptured, indicating a faulty unit.
- Movement Check: While applying vacuum with the pump, observe the arm of the vacuum control unit. It should retract smoothly as vacuum is applied and return to its original position when vacuum is released.
- Timing Check: Use a timing light to check engine timing with and without vacuum applied to the unit. The timing should advance when vacuum is applied. Consult your vehicle's service manual for correct timing specifications.
If the unit fails any of these tests, replacement is likely necessary.
Specifications
| Model Number | VC250 |
| Manufacturer | Standard Motor Products |
| Item Weight | 8.8 ounces |
| Package Dimensions | 5.71 x 4.11 x 2.66 inches |
| Manufacturer Part Number | VC250 |
Warranty and Support
For warranty information or technical support regarding your Standard Motor Products VC250 Vacuum Control unit, please refer to the warranty documentation included with your purchase or visit the official Standard Motor Products website. You may also contact their customer service directly for assistance.