
1. Introduction
This manual provides essential information for the proper installation, maintenance, and understanding of the Standard Motor Products 462B Carburetor Kit. This kit is designed to facilitate the rebuilding of specific carburetors, restoring their functionality and efficiency. Please read all instructions carefully before proceeding with any work.
1.1 Kit Contents
The Standard Motor Products 462B Carburetor Kit typically includes the necessary gaskets, seals, and small components required for a comprehensive carburetor rebuild. The exact contents are:
- Carburetor Kit components (various gaskets, seals, and small parts)
Refer to the image below for a visual representation of the kit components.

Figure 1.1: Overview of the Standard Motor Products 462B Carburetor Kit components. This image displays the various gaskets, seals, and small metal parts included in the kit, arranged for clear visibility.
2. Safety Precautions
WARNING:
- Always disconnect the vehicle's battery before working on the fuel system.
- Work in a well-ventilated area to avoid inhaling fuel fumes.
- Wear appropriate personal protective equipment, including safety glasses and gloves.
- Fuel is highly flammable. Keep open flames, sparks, and other ignition sources away from the work area.
- Dispose of old fuel and carburetor components according to local environmental regulations.
- If unsure about any step, consult a qualified automotive technician.
3. Installation Instructions
The installation of a carburetor rebuild kit requires mechanical aptitude and familiarity with automotive fuel systems. It is highly recommended to consult a vehicle-specific service manual for detailed disassembly and reassembly procedures for your particular carburetor model.
3.1 General Installation Steps (Consult Vehicle Service Manual for Specifics)
- Preparation: Ensure the engine is cool. Disconnect the battery. Relieve fuel system pressure if applicable.
- Carburetor Removal: Carefully disconnect all fuel lines, vacuum hoses, electrical connections, and linkage from the carburetor. Remove the carburetor from the intake manifold.
- Disassembly: On a clean workbench, systematically disassemble the carburetor, keeping all parts organized. Note the orientation and location of each component. Refer to your vehicle's service manual for specific disassembly sequences.
- Cleaning: Thoroughly clean all metal carburetor components using a suitable carburetor cleaner. Ensure all passages and jets are free of debris and varnish. Inspect components for wear or damage.
- Kit Component Replacement: Replace all gaskets, seals, O-rings, and any other specified components from the 462B kit. Ensure new parts match the old ones in size and shape.
- Reassembly: Reassemble the carburetor following the reverse order of disassembly, using the new components from the kit. Pay close attention to torque specifications for fasteners as outlined in your service manual.
- Carburetor Installation: Install the rebuilt carburetor back onto the intake manifold, reconnecting all fuel lines, vacuum hoses, electrical connections, and linkage.
- Initial Adjustments: Perform initial adjustments such as idle speed and mixture settings as specified in your vehicle's service manual.
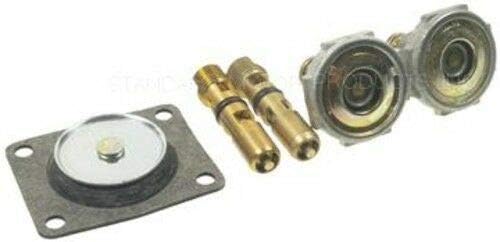
Figure 3.1: Close-up view of specific components from the 462B Carburetor Kit, including a diaphragm and various jets. These parts are crucial for fuel delivery and air-fuel mixture regulation.
4. Post-Installation Checks and Initial Operation
After installing the rebuilt carburetor, perform the following checks before starting the engine:
- Double-check all fuel line connections for tightness to prevent leaks.
- Verify all vacuum hoses are correctly connected and not cracked or damaged.
- Ensure all electrical connections are secure.
- Check throttle linkage for smooth operation and full range of motion without binding.
- Reconnect the battery.
Starting the Engine:
Start the engine and allow it to reach operating temperature. Carefully inspect for any fuel leaks or unusual noises. Adjust idle speed and mixture settings as necessary, referring to your vehicle's service manual for precise specifications. Test drive the vehicle to confirm proper acceleration, deceleration, and overall engine performance.
5. Maintenance
Regular maintenance of your carburetor is crucial for optimal engine performance and longevity. While the 462B kit provides new components for a rebuild, ongoing care is still necessary.
- Fuel Filter: Regularly replace the fuel filter to prevent contaminants from reaching the carburetor.
- Air Filter: Ensure the air filter is clean and replaced as per vehicle manufacturer recommendations to prevent dirt from entering the carburetor.
- Fuel Quality: Use high-quality fuel to minimize deposits and varnish buildup within the carburetor.
- Periodic Inspection: Periodically inspect fuel lines, vacuum hoses, and carburetor linkages for wear, leaks, or damage.
6. Troubleshooting Common Issues
If you experience issues after installing the carburetor kit, consider the following common problems and solutions:
| Symptom | Possible Cause | Solution |
|---|---|---|
| Engine hard to start or won't start | Incorrect fuel mixture, clogged idle passages, vacuum leak, improper float level. | Verify initial adjustments. Check for vacuum leaks. Re-check float level. Ensure all passages are clear. |
| Rough idle or stalling | Vacuum leak, incorrect idle mixture, clogged idle circuit, worn throttle shaft. | Check for vacuum leaks. Adjust idle mixture. Clean idle circuit. Inspect throttle shaft for excessive play. |
| Fuel leaks | Improperly seated gaskets, loose fuel line connections, damaged float needle/seat. | Inspect all gasket surfaces and fuel line connections. Ensure float needle and seat are properly installed and sealing. |
| Poor acceleration or hesitation | Accelerator pump malfunction, clogged main jets, vacuum leak. | Verify accelerator pump operation. Clean main jets. Check for vacuum leaks. |
If troubleshooting steps do not resolve the issue, it is advisable to seek assistance from a certified automotive technician.
7. Product Specifications
| Attribute | Detail |
|---|---|
| Brand | Standard Motor Products |
| Model Number | 462B |
| Manufacturer | HYGRADE |
| Product Type | Auto Part (Carburetor Rebuild Kit) |
| Package Dimensions | 9.25" L x 6.75" W x 1.25" H |
| Item Weight | 0.01 ounces (Product), 0.54601 lbs (Package) |
| Country Of Origin | China |
| Exterior Finish | Machined |
| UPC | 091769073121 |
8. Warranty and Support
For specific warranty information regarding the Standard Motor Products 462B Carburetor Kit, please refer to the documentation included with your purchase or contact Standard Motor Products directly. Warranty terms typically cover manufacturing defects.
Customer Support:
If you have questions about the installation, compatibility, or performance of this kit, please contact the retailer where the product was purchased or visit the official Standard Motor Products website for support resources.