
1. Introduction
The Milwaukee 49-22-8510 Right Angle Attachment is engineered to facilitate drilling and driving tasks in confined or difficult-to-reach areas. This attachment is compatible with most cordless drills and utilizes standard 1/4-inch hex accessories. Its robust construction, featuring an all-metal housing and steel gears with ball bearing support, ensures durability and efficient power transfer, handling up to 235 inch-pounds of torque. The compact design, measuring only 2 inches wide, allows access to very tight spaces. A quick-change chuck simplifies accessory changes.
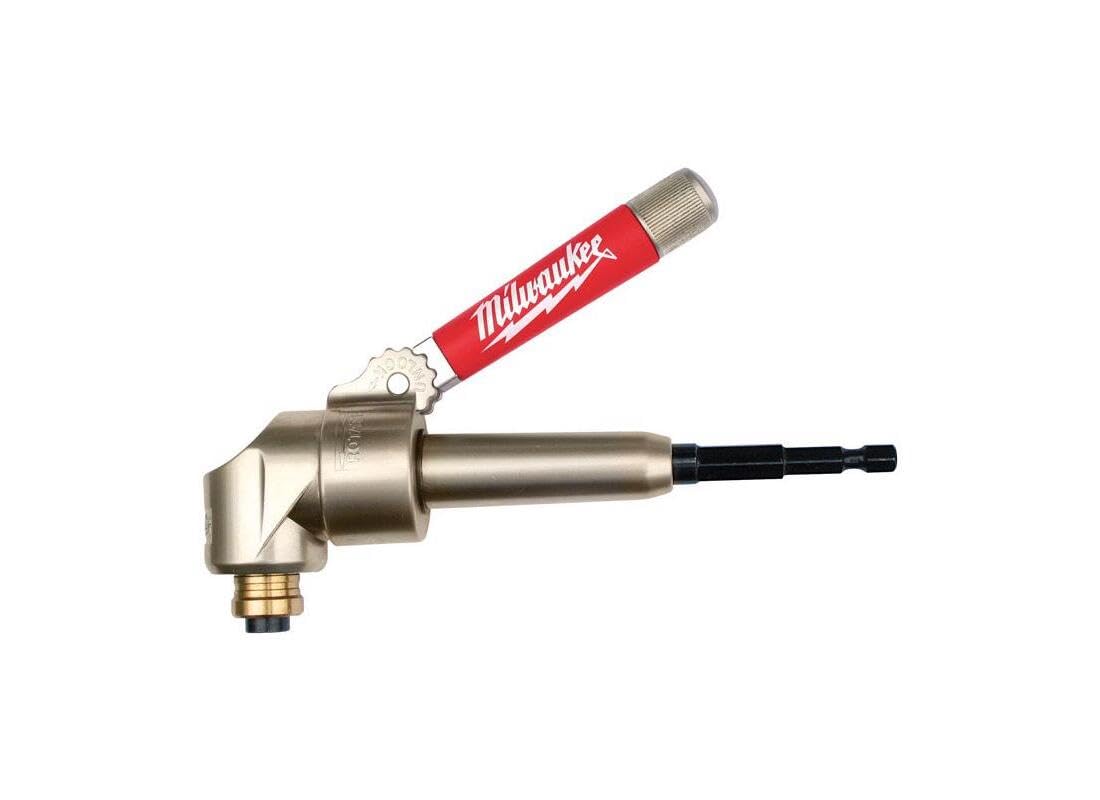
Figure 1.1: The Milwaukee 49-22-8510 Right Angle Attachment. This image displays the compact design and overall structure of the attachment, ready for use with a drill.
2. Safety Information
Always observe basic safety precautions when using this attachment with power tools to reduce the risk of personal injury. Read and understand all instructions before operation.
- Wear appropriate personal protective equipment, including eye protection, hearing protection, and gloves.
- Ensure the power tool is disconnected from its power source (battery removed for cordless drills) before attaching or removing the right angle attachment or any accessories.
- Verify that the attachment and accessories are securely fastened before operating the power tool.
- Do not exceed the maximum recommended torque of 235 inch-pounds or maximum RPM of 1750 for this attachment.
- This attachment is not designed for use with impact drivers or corded power tools.
- Maintain a firm grip on the power tool and attachment during operation to prevent loss of control, especially when drilling larger holes or driving long screws.
- Keep hands and loose clothing away from rotating parts.
- Ensure the work area is well-lit and clear of obstructions.
3. Product Overview
3.1 Components
- Hex Drive Shank: The end that inserts into your drill's chuck. Features a 1/4-inch hex shank, expanding to 5/16-inch hex further up for higher torque applications.
- Right Angle Head: The main body containing the gears and chuck mechanism.
- Quick-Change Chuck: Accepts standard 1/4-inch hex drive accessories. Features a magnetic interior for bit retention.
- Adjustable Handle: A red handle with the Milwaukee logo, which can be adjusted for optimal grip and leverage.
- Lubrication Port: A small hole near the chuck end for maintenance.
3.2 Key Features
- Durable Construction: All-metal housing with steel gears and ball bearing construction for longevity.
- High Torque Capacity: Handles up to 235 inch-pounds of torque.
- Compact Design: Only 2 inches wide, ideal for tight spaces.
- Versatile Compatibility: Designed for cordless drills, accepting standard 1/4-inch hex accessories.
- Adjustable Handle: Pivots from 0 to 90 degrees and rotates 360 degrees for ergonomic use.
4. Setup
4.1 Attaching to a Drill
- Ensure your drill's battery is removed or the tool is unplugged.
- Open the chuck of your cordless drill wide enough to accept the 1/4-inch hex drive shank of the right angle attachment.
- Insert the hex drive shank fully into the drill chuck.
- Tighten the drill chuck securely around the attachment's shank.
4.2 Inserting and Removing Accessories
The attachment features a quick-change magnetic chuck for 1/4-inch hex drive accessories.
- Pull the chuck collar forward (outward) to unlock the mechanism.
- Insert the 1/4-inch hex shank of the accessory (e.g., drill bit, screwdriver bit) all the way into the chuck. The internal magnet will assist in seating the bit.
- Release the chuck collar. It should snap back into place, securing the bit.
- Gently pull on the accessory to confirm it is securely locked in the chuck.
- To remove an accessory, pull the chuck collar forward again and withdraw the bit.

Figure 4.1: Demonstrating the compact size of the attachment, held in hand. This illustrates how the tool can be maneuvered in tight spaces.
5. Operating Instructions
5.1 Adjusting the Handle
The red handle can be adjusted to optimize grip and leverage for various applications:
- Loosen the red handle by unscrewing it a few turns.
- To pivot the handle: Tilt the handle towards the chuck end (past 90 degrees) to unlock the rotating collar.
- Rotate the handle/collar assembly around the body of the attachment to the desired position (there are 12 detents for precise positioning).
- Tilt the handle back to lock the collar in place.
- Tighten the red handle securely.
5.2 General Operation
- Always select the appropriate accessory for the task (e.g., drill bit for drilling, screwdriver bit for driving).
- Ensure the drill is set to a suitable speed and torque setting for the material and accessory being used. The attachment has a maximum RPM of 1750.
- When drilling, apply steady, even pressure. Avoid excessive force, which can cause the bit to bind or the tool to kick back.
- For driving screws, ensure the bit is fully engaged with the screw head to prevent stripping.
- The compact design allows access to spaces as narrow as 2 inches.

Figure 5.1: The attachment in use with a spade bit, demonstrating its capability for drilling larger holes in wood in a confined space.

Figure 5.2: The attachment being used to drive a screw into a metal stud, showcasing its utility in construction and installation tasks.
6. Maintenance
Regular maintenance ensures the longevity and optimal performance of your right angle attachment.
- Cleaning: Keep the attachment clean and free of dust and debris. Use a dry cloth to wipe down the exterior.
- Lubrication: The attachment features a small lubrication port near the chuck end. Periodically apply a small amount of light oil or lithium grease to this port to ensure smooth operation of the internal gears.
- Inspection: Regularly inspect the attachment for any signs of wear, damage, or loose components. Discontinue use if any damage is found and seek professional repair if necessary.
- Storage: Store the attachment in a dry, clean place, away from extreme temperatures and moisture.
7. Troubleshooting
| Problem | Possible Cause | Solution |
|---|---|---|
| Accessory (bit) does not stay in chuck. | Chuck collar not fully released or bit not fully inserted. | Ensure the chuck collar is pulled forward, insert the 1/4-inch hex bit completely, then release the collar. Pull on the bit to confirm it is secure. Only use 1/4-inch hex quick-release shank bits. |
| Attachment feels stiff or makes unusual noise. | Lack of lubrication or internal wear/damage. | Apply light oil or lithium grease to the lubrication port. If the issue persists, discontinue use and have the unit inspected by a qualified technician. |
| Reduced performance or excessive heat. | Exceeding torque/RPM limits, or internal damage. | Ensure you are not exceeding the maximum torque (235 in.-lbs.) or RPM (1750). Check for binding. If the problem continues, professional inspection is recommended. |
8. Specifications
| Model Number | 49-22-8510 |
| Brand | Milwaukee |
| Material | Metal |
| Maximum Torque | 235 inch-pounds |
| Maximum Rotational Speed | 1750 RPM |
| Chuck Type | 1/4-inch Hex Quick-Change Magnetic |
| Product Dimensions | Approximately 10"L x 2"W x 6"H (overall dimensions, attachment width is 2 inches) |
| Item Weight | 1.04 pounds |
| Compatibility | Cordless Drills (not for impact drivers or corded power tools) |
Note: Specifications are subject to change without notice. Torque and RPM values are based on product description and user reviews, which are more specific to the attachment's performance than generic product specifications.
9. Warranty and Support
For specific warranty information, please refer to the documentation included with your purchase or visit the official Milwaukee website. For technical support or service inquiries, please contact Milwaukee customer service.
Milwaukee Tool Official Website: www.milwaukeetool.com

