1. Introduction
Thank you for purchasing the Singing Machine SMG900 3 Carousel Karaoke System. This powerful and versatile unit is designed to provide hours of entertainment, allowing you to sing along to your favorite music, record performances, and even use it as an amplifier for musical instruments. Please read this manual thoroughly before operating the unit to ensure proper use and to maximize your enjoyment of its features.
2. Important Safety Information
- Do not expose the unit to rain or moisture.
- Do not block any ventilation openings.
- Do not install near any heat sources such as radiators, heat registers, stoves, or other apparatus (including amplifiers) that produce heat.
- Protect the power cord from being walked on or pinched.
- Only use attachments/accessories specified by the manufacturer.
- Unplug this apparatus during lightning storms or when unused for long periods of time.
- Refer all servicing to qualified service personnel.
3. Package Contents
Ensure all items are present in the package:
- Singing Machine SMG900 Karaoke System
- Remote Control
- Microphone (if included in your specific model variant)
- Power Cord
- Audio/Video Cables (RCA type, if included)
- Instruction Manual (this document)
4. Product Overview
Familiarize yourself with the main components of your Singing Machine SMG900.
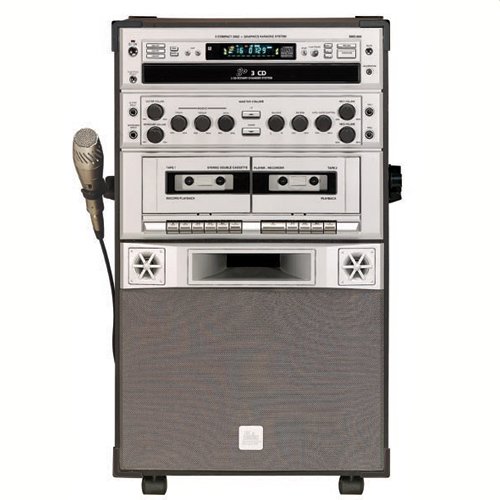
Front view of the Singing Machine SMG900 3 Carousel Karaoke System, showing the 3-disc CD+G player, dual cassette decks, control panel, microphone input, and integrated speakers.
Front Panel Controls and Features:
- 3-Disc Carousel CD+G Player: For playing music CDs and CD+G discs (which display lyrics on a connected TV).
- Dual Cassette Decks: For playing and recording audio cassettes, including dubbing performances.
- Master Volume Control: Adjusts the overall sound output.
- Microphone Volume Controls: Independent controls for two microphone inputs.
- Echo Control: Adds an echo effect to vocals.
- Digital Key Control: Adjusts the musical key of the song to match your vocal range.
- Balance Control: Adjusts the balance between the vocal track and the music on multiplex CD+G discs.
- Microphone Inputs: Two 1/4-inch jacks for connecting microphones.
- Guitar/Keyboard Input: 1/4-inch jack for connecting musical instruments, allowing the unit to function as an amplifier.
- Integrated Speakers: Deliver powerful sound output.
Rear Panel Connections:
- Audio/Video Output Jacks: RCA jacks for connecting to a television or external audio system.
- AC Power Input: For connecting the power cord.
5. Setup
5.1 Unpacking and Placement
- Carefully remove the unit from its packaging.
- Place the unit on a stable, flat surface. Ensure adequate ventilation around the unit.
- Keep the unit away from direct sunlight, heat sources, and moisture.
5.2 Power Connection
- Ensure the unit's power switch is in the OFF position.
- Connect the supplied AC power cord to the AC power input on the rear of the unit.
- Plug the other end of the power cord into a standard wall outlet (AC 110-120V, 60Hz).
5.3 Connecting to a Television (for CD+G Lyrics)
- Locate the Audio/Video Output jacks on the rear of the karaoke system.
- Connect the yellow RCA cable to the VIDEO OUT jack on the karaoke system and to the VIDEO IN jack on your television.
- Connect the red and white RCA cables to the AUDIO OUT (R and L) jacks on the karaoke system and to the AUDIO IN (R and L) jacks on your television.
- Set your television's input source to the corresponding Video/AV input.
5.4 Connecting Microphones and Instruments
- Microphones: Plug your 1/4-inch microphone cables into the MIC 1 and MIC 2 input jacks on the front panel.
- Guitar/Keyboard: Plug your 1/4-inch instrument cable into the GUITAR/KEYBOARD input jack on the front panel.
6. Operating Instructions
6.1 CD+G Playback
- Press the POWER button to turn on the unit.
- Press the OPEN/CLOSE button on the CD player to open the disc tray.
- Place up to three CD+G or audio CDs onto the carousel. Ensure the discs are seated correctly.
- Press the OPEN/CLOSE button again to close the tray.
- Select the desired disc using the DISC SELECT buttons.
- Press the PLAY/PAUSE button to start playback. Lyrics will appear on the connected TV screen if a CD+G disc is playing.
- Use the SKIP buttons to navigate between tracks.
- Adjust the MASTER VOLUME, MIC VOLUME, ECHO, and DIGITAL KEY CONTROL as desired.
6.2 Cassette Operation (Playback and Recording)
6.2.1 Cassette Playback
- Open the cassette deck door (Tape 1 or Tape 2).
- Insert a cassette tape.
- Close the deck door.
- Press the PLAY button for the selected deck.
- Adjust the MASTER VOLUME.
6.2.2 Recording Your Performance (CD+G to Cassette)
- Insert a blank cassette into Tape Deck 2 (Record/Playback).
- Start playing your CD+G track.
- Press the RECORD button on Tape Deck 2. The unit will begin recording the audio from the CD+G player and any connected microphones.
- To stop recording, press the STOP button on Tape Deck 2.
6.2.3 Cassette Dubbing (Tape 1 to Tape 2)
- Insert the source cassette into Tape Deck 1 (Playback).
- Insert a blank cassette into Tape Deck 2 (Record/Playback).
- Press the PLAY button on Tape Deck 1.
- Press the RECORD button on Tape Deck 2. The content from Tape 1 will be dubbed to Tape 2.
- To stop dubbing, press the STOP button on both decks.
6.3 Using Digital Key Control
The Digital Key Control allows you to raise or lower the musical key of the song without changing the tempo. This is useful for matching the song's key to your vocal range. Use the KEY+ and KEY- buttons on the control panel or remote control to adjust the key.
6.4 Using as an Amplifier
Connect a guitar or keyboard to the GUITAR/KEYBOARD input jack on the front panel. Adjust the MASTER VOLUME and the instrument's own volume controls to achieve the desired sound level. The unit's powerful 40-watt output makes it suitable for practice or small performances.
6.5 Remote Control Operation
The included remote control provides convenient access to most functions, including power, play/pause, skip, disc select, and key control. Ensure the remote has fresh batteries and is pointed towards the front of the unit during use.
7. Maintenance
- Cleaning: Wipe the unit with a soft, dry cloth. Do not use abrasive cleaners or solvents.
- CD Player Care: Handle CDs by their edges. Keep the disc tray clean. If the lens gets dirty, use a specialized CD lens cleaner.
- Cassette Deck Care: Periodically clean the tape heads and pinch rollers with a cotton swab lightly dampened with isopropyl alcohol.
- Storage: If storing the unit for an extended period, unplug it from the power outlet and store it in a cool, dry place.
8. Troubleshooting
| Problem | Possible Cause | Solution |
|---|---|---|
| No power | Power cord not connected; Power outlet not active. | Ensure power cord is securely plugged in; Try a different outlet. |
| No sound from speakers | Master volume too low; Mute function active; Cables loose. | Increase Master Volume; Check if unit is muted; Ensure all audio cables are securely connected. |
| No lyrics on TV | Not a CD+G disc; TV input incorrect; Video cable loose. | Ensure you are playing a CD+G disc; Select correct TV input (AV/Video); Check video cable connection. |
| Microphone not working | Microphone volume too low; Microphone not plugged in correctly; Microphone faulty. | Increase MIC VOLUME; Ensure microphone is fully plugged into the correct jack; Test with another microphone if available. |
| Cassette recording issues | Tape protection tab removed; Tape heads dirty. | Ensure the record protection tab on the cassette is intact; Clean tape heads. |
9. Specifications
| Feature | Detail |
|---|---|
| Model Number | SMG900 |
| Power Output | 40 Watts |
| Disc Compatibility | CD, CD+G |
| Cassette Decks | Dual (Playback/Record) |
| Microphone Inputs | 2 (1/4-inch) |
| Instrument Input | 1 (1/4-inch for Guitar/Keyboard) |
| Video Output | RCA (Yellow) |
| Audio Output | RCA (Red/White) |
| Power Source | AC 110-120V, 60Hz |
| Dimensions (approx.) | 78.23 x 47.75 x 43.69 cm (Package Dimensions) |
| Weight (approx.) | 17.42 kg |
10. Warranty and Support
For warranty information, please refer to the warranty card included with your product or visit the official Singing Machine website. Keep your purchase receipt as proof of purchase.
If you encounter any issues not covered in the troubleshooting section, or require further assistance, please contact Singing Machine customer support. Contact details can typically be found on the manufacturer's website or on the product packaging.


