1. Introduction
This manual provides essential instructions for the safe and efficient operation of your Jwin JD-VD603 5.1 channel Progressive Scan DVD Home Theater System. Please read this manual thoroughly before using the product and retain it for future reference.
The Jwin JD-VD603 is designed to deliver a comprehensive home entertainment experience, featuring a 160W output, Dolby Digital support, and compatibility with various media formats including DVD, JPEG, CD, CD-R, CD-RW, WMA, and Picture CD.
2. Important Safety Instructions
To reduce the risk of electric shock, fire, etc., always follow these basic safety precautions:
- Read Instructions: Read all safety and operating instructions before operating the appliance.
- Retain Instructions: Keep the safety and operating instructions for future reference.
- Heed Warnings: Adhere to all warnings on the appliance and in the operating instructions.
- Follow Instructions: Follow all operating and use instructions.
- Water and Moisture: Do not use this apparatus near water.
- Cleaning: Clean only with a dry cloth.
- Ventilation: Do not block any ventilation openings. Install in accordance with the manufacturer's instructions.
- Heat: Do not install near any heat sources such as radiators, heat registers, stoves, or other apparatus (including amplifiers) that produce heat.
- Power-Cord Protection: Protect the power cord from being walked on or pinched.
- Lightning: Unplug this apparatus during lightning storms or when unused for long periods.
- Servicing: Refer all servicing to qualified service personnel.
3. Setup Guide
3.1 Unpacking
Carefully remove all components from the packaging. Ensure all items listed in the packing list are present. Retain packaging for future transport or storage.
3.2 Component Identification
Familiarize yourself with the main unit, satellite speakers, subwoofer, and remote control.
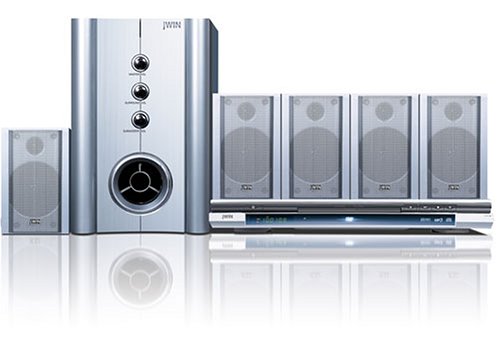
Figure 1: Main unit and speaker components of the Jwin JD-VD603 Home Theater System. This image shows the central DVD player unit and the accompanying satellite speakers, illustrating the overall system layout.
3.3 Speaker Placement
For optimal 5.1 channel surround sound, position the speakers as follows:
- Front Left/Right: Place these speakers to the left and right of your TV, at ear level.
- Center: Position the center speaker directly above or below your TV, centered.
- Surround Left/Right: Place these speakers to the sides or slightly behind your listening position, at ear level or slightly higher.
- Subwoofer: Place the subwoofer on the floor, preferably in a corner or near a wall for enhanced bass.
3.4 Connections
Ensure the system is unplugged from the power outlet before making any connections.
- Speaker Connections: Connect each speaker to the corresponding output terminals on the main unit. Ensure correct polarity (+ to + and - to -).
- Video Output: Connect the main unit to your TV using a composite video cable (yellow RCA), S-Video cable, or component video cables (red, green, blue RCA) for progressive scan output.
- Audio Input (Optional): If connecting external audio sources, use the auxiliary audio input (red and white RCA jacks).
- Power Connection: Once all other connections are made, plug the power cord into a wall outlet.
4. Operating Instructions
4.1 Basic Operation
- Power On/Off: Press the POWER button on the front panel or remote control.
- Disc Playback: Open the disc tray, place a DVD or CD with the label side up, and close the tray. Playback should begin automatically or by pressing PLAY.
- Volume Control: Use the VOLUME +/- buttons on the remote control to adjust the sound level.
- Source Selection: Press the FUNCTION or INPUT button to switch between DVD, AUX, or other available sources.
4.2 DVD/CD Playback
- Play/Pause: Press PLAY/PAUSE to start or temporarily stop playback.
- Stop: Press STOP to end playback.
- Skip Tracks/Chapters: Use the SKIP buttons (|<< / >>|) to navigate between tracks or chapters.
- Fast Forward/Rewind: Use the FF/REW buttons (<< / >>) for fast scanning.
- Menu Navigation: Use the arrow keys and ENTER button on the remote to navigate disc menus.
4.3 Progressive Scan
The JD-VD603 supports progressive scan output for improved picture quality on compatible televisions. Ensure your TV is set to accept progressive scan signals and connect using component video cables (YPbPr).
4.4 Media Compatibility
This system supports the following media formats:
- DVD-Video
- Audio CD
- CD-R/RW (with MP3, WMA, JPEG files)
- Picture CD (JPEG images)
5. Maintenance
5.1 Cleaning the Unit
- Exterior: Wipe the exterior surfaces with a soft, dry cloth. Do not use abrasive cleaners, waxes, or solvents.
- Disc Tray: Keep the disc tray clean and free of dust.
5.2 Disc Care
- Handle discs by their edges to avoid fingerprints.
- Store discs in their cases when not in use.
- Clean dirty discs with a soft, lint-free cloth, wiping from the center outwards.
6. Troubleshooting
Before contacting customer support, please refer to the following table for common issues and solutions:
| Problem | Possible Cause | Solution |
|---|---|---|
| No power | Power cord not connected; Power outlet faulty | Ensure power cord is securely plugged in; Try a different outlet |
| No sound | Volume too low; Speakers not connected; Incorrect input source | Increase volume; Check speaker connections; Select correct input source |
| No picture | Video cable not connected; Incorrect TV input; TV not compatible with progressive scan | Check video cable connections; Select correct TV input; Try composite video if component fails |
| Disc not playing | Disc dirty or scratched; Disc format not supported; Disc inserted incorrectly | Clean or replace disc; Check disc compatibility; Insert disc label side up |
7. Specifications
- Model: JD-VD603
- Output Power: 160 Watts (Peak Power Handling - Speakers)
- Channels: 5.1 Channel
- Video Output: Progressive Scan (Component), Composite, S-Video
- Audio Decoding: Dolby Digital Output
- Disc Compatibility: DVD, JPEG, CD, CD-R, CD-RW, WMA, Picture CD
- Product Dimensions (LxWxH): 43 x 43 x 35 cm
- Item Weight: 15 kg
- Manufacturer: JWIN
8. Warranty and Support
For warranty information and customer support, please refer to the warranty card included with your product or visit the official JWIN website. Keep your purchase receipt as proof of purchase for warranty claims.
For technical assistance or service inquiries, please contact JWIN customer service through their official channels.