
1. Introduction and Overview
This manual provides essential instructions for the safe and effective use of your Fujifilm Finepix E510 digital camera. The Finepix E510 is a 5.2-megapixel digital camera equipped with a 3.2x optical zoom lens, a 2-inch TFT LCD monitor, and various features designed for capturing high-quality photographs and videos.
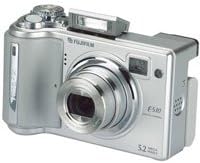
Image: Front view of the Fujifilm Finepix E510 digital camera, showcasing its silver body, lens, and built-in flash.
Key features include:
- 5.2-megapixel sensor for detailed image capture.
- 3.2x optical zoom and 4.1x digital zoom capabilities.
- 2-inch TFT LCD monitor for framing and reviewing images.
- Multiple preprogrammed scene modes for various shooting conditions.
- PictBridge compatibility for direct printing.
- Uses readily available AA-size batteries.
2. Package Contents
Upon opening your Fujifilm Finepix E510 package, please verify that the following item is present:
- Fujifilm Finepix E510 Camera Body
Note: Batteries (2x AA-size) and an xD Picture Card (memory card) are typically sold separately. A 16MB xD Picture Card was originally included with new units.
3. Setup
3.1. Inserting Batteries
- Locate the battery compartment cover on the bottom or side of the camera.
- Slide or lift the cover to open it.
- Insert two AA-size batteries, ensuring correct polarity (+/-) as indicated inside the compartment. Alkaline batteries are included, but rechargeable Ni-MH batteries are recommended for extended use.
- Close the battery compartment cover securely.
3.2. Inserting an xD Picture Card
- Locate the memory card slot, usually near the battery compartment.
- Open the memory card slot cover.
- Insert an xD Picture Card into the slot with the correct orientation until it clicks into place.
- Close the memory card slot cover securely.
4. Operating the Camera
4.1. Powering On/Off
Press the POWER button to turn the camera on or off. The lens will extend when powered on.
4.2. Basic Shooting
- Turn the camera on.
- Select your desired shooting mode using the mode dial (e.g., Auto, Program, Scene modes).
- Frame your shot using the 2-inch LCD monitor or the optical viewfinder.
- Press the shutter button halfway down to focus. The focus indicator will illuminate when focus is achieved.
- Press the shutter button fully down to take the picture.
4.3. Zoom Function
Use the zoom lever (typically located around the shutter button) to adjust the focal length. Move the lever towards 'W' for wide-angle (zooming out) and 'T' for telephoto (zooming in). The camera features 3.2x optical zoom and can extend to 4.1x digital zoom.
4.4. Flash Modes
The built-in flash can be set to various modes:
- Auto Flash: The camera automatically determines when to use the flash.
- Fill-in Flash: Flash fires with every shot, useful for brightening subjects in backlit conditions.
- Flash Off: Flash is disabled.
- Red-eye Reduction: Fires a pre-flash to reduce red-eye effect.
4.5. Shooting Modes
The Finepix E510 offers several shooting modes:
- Auto: Camera sets optimal settings automatically.
- Program (P): Camera sets aperture and shutter speed, but you can adjust other settings.
- Aperture Priority (Av/A): You set the aperture, camera sets shutter speed.
- Shutter Priority (Tv/S): You set the shutter speed, camera sets aperture.
- Manual (M): You control both aperture and shutter speed.
- Scene Modes: Includes Portrait, Macro, Landscape, Movie, and Custom settings for specific situations.
4.6. Video Recording
To record video:
- Select the Movie mode on the mode dial.
- Press the shutter button to start recording.
- Press the shutter button again to stop recording.
Video resolution is 320 x 240 pixels at 10 frames per second (AVI format).
5. Image Playback and Management
5.1. Viewing Images
- Turn the camera on and switch to Playback mode (usually indicated by a play icon).
- Use the directional buttons to navigate through your captured images and videos.
- Press the zoom button to zoom in on an image or view multiple images at once.
5.2. Deleting Images
- In Playback mode, select the image you wish to delete.
- Press the DELETE button (often marked with a trash can icon).
- Confirm your selection when prompted.
6. Connecting to a Computer and Printing
6.1. Connecting to a Computer
To transfer images to a computer:
- Ensure the camera is off.
- Connect the camera to your computer using a USB cable (not included).
- Turn the camera on. Your computer should recognize the camera as a removable storage device.
- Follow your computer's instructions to import photos.
6.2. Direct Printing (PictBridge)
The Finepix E510 supports PictBridge, allowing you to print directly to compatible printers without a computer.
- Connect the camera directly to a PictBridge-compatible printer using a USB cable.
- Follow the on-screen instructions on the camera's LCD to select images and print settings.
7. Maintenance and Care
- Cleaning the Lens: Use a soft, lint-free cloth specifically designed for camera lenses. Avoid touching the lens with your fingers.
- Cleaning the Body: Wipe the camera body with a soft, dry cloth. Do not use solvents or abrasive cleaners.
- Storage: Store the camera in a cool, dry place away from direct sunlight and extreme temperatures. Remove batteries if storing for an extended period.
- Battery Care: Use fresh batteries. If using rechargeable Ni-MH batteries, ensure they are fully charged before use.
8. Troubleshooting
| Problem | Possible Cause | Solution |
|---|---|---|
| Camera does not power on. | Batteries are dead or inserted incorrectly. | Replace with fresh batteries or reinsert them with correct polarity. |
| Pictures are blurry. | Camera shake, subject movement, or out of focus. | Hold the camera steady, use a faster shutter speed, or ensure proper focus before shooting. |
| Memory card error. | Card is full, corrupted, or inserted incorrectly. | Delete unnecessary images, format the card (this will erase all data), or reinsert the card. |
| Flash does not fire. | Flash is set to 'Off' or batteries are low. | Change flash mode to 'Auto' or 'Fill-in'. Replace batteries. |
9. Specifications
| Feature | Detail |
|---|---|
| Model Name | Finepix E510 |
| Photo Sensor Resolution | 5.2 MP |
| Optical Zoom | 3.2x |
| Digital Zoom | 3.9x |
| Screen Size | 2 Inches |
| Memory Storage | xD Picture Card (16 MB included) |
| Battery Type | 2 AA-size (Alkaline, Ni-MH recommended) |
| Connectivity | USB |
| Video Resolution | 320 x 240, 10 fps (AVI) |
| Image Stabilization | Digital, Optical |
| Item Weight | 8 ounces |
| Item Height | 2.4 inches |
| Supported File Format | RAW, JPEG |
10. Safety Information
- Do not expose the camera to water or moisture. The camera is not water-resistant.
- Avoid dropping the camera or subjecting it to strong impacts.
- Do not attempt to disassemble or modify the camera. Repairs should only be performed by authorized service personnel.
- Keep batteries out of reach of children. If a battery is swallowed, seek immediate medical attention.
- Do not point the camera's flash directly at people's eyes, especially infants, from a close distance.
11. Warranty and Support
Warranty information for your Fujifilm Finepix E510 digital camera is typically provided at the point of purchase or can be found on the official Fujifilm website. Please retain your proof of purchase for warranty claims.
For technical support, service, or further inquiries, please visit the official Fujifilm support website or contact their customer service department. Contact details can usually be found on the Fujifilm website or in the documentation provided with your camera.


