
1. Product Overview
The PetSafe Pet Screen Door provides a convenient and durable solution for allowing small pets, such as dogs and cats up to 30 lbs, independent access through screen doors. This heavy-duty pet door features a high-impact plastic frame and a tear-resistant mesh flap, designed for longevity and reliable performance in various climates. It integrates seamlessly into existing porch screens, window screens, and storm doors without obstructing visibility.

Image: A dog demonstrating the ease of use of the PetSafe Pet Screen Door.
Key Features:
- Independent Pet Access: Allows pets to enter and exit freely.
- Durable Construction: High-impact plastic frame and tear-resistant mesh flap.
- Dual Sliding Locks: Provides control over pet access.
- Easy Installation: Designed for DIY installation into most metal or vinyl-coated screens.
- Compatibility: Suitable for storm door screens, window screens, and porch screens.
2. Components Included
Before beginning installation, ensure all components are present:
- Exterior frame
- Interior frame with flap and locks
- Flat-head screws
- Pet Screen Door (assembled unit)
3. Installation Instructions
Follow these steps for proper installation of your PetSafe Pet Screen Door. It is recommended to remove the screen door from its frame and lay it flat for easier installation.
- Determine Placement: Choose a suitable location on your screen door or window screen. The bottom of the pet door should be at a comfortable height for your pet to step through.
- Mark and Cut Screen: Place the exterior frame of the pet door on the screen and trace its inner perimeter. Carefully cut out the marked section of the screen. Ensure the cut is clean and precise to prevent fraying.
- Assemble Frames: Align the two halves of the pet door frame (interior and exterior) over the cut-out section of the screen. The screen material should be sandwiched between the two frames. Press firmly to snap the frames together. You may need to use a rubber mallet to ensure a secure fit around the entire perimeter.
- Secure with Screws: Use the provided flat-head screws to further secure the two frames together. Drive the screws into the designated holes around the frame. This step is crucial for long-term durability and to prevent the door from detaching, especially with active pets.
- Reinstall Screen: Once the pet door is securely installed, reinstall your screen door or window screen into its original frame.
Video: A detailed guide on installing the PetSafe Pet Screen Door, including measuring, cutting, and securing the frames.

Image: The pet door frame being attached to the screen material.
4. Operating the Pet Screen Door
The PetSafe Pet Screen Door is designed for intuitive use by your pet. The lightweight mesh flap allows pets to push through easily.
Training Your Pet:
- Initially, hold the flap open or tape it up to allow your pet to see through and understand the new access point.
- Use treats or toys to encourage your pet to pass through the opening.
- Gradually lower the flap as your pet becomes comfortable, allowing them to push it open themselves.
Using the Dual Sliding Locks:
The pet door is equipped with dual sliding locks to control access. These locks can be engaged to prevent the flap from swinging, either in one direction or both, providing security when needed.
Video: Demonstration of a dog successfully using the PetSafe Pet Screen Door.

Image: Close-up of the durable frame and dual sliding locks.
5. Maintenance
Regular maintenance will ensure the longevity and proper function of your PetSafe Pet Screen Door.
- Cleaning: Periodically clean the frame and mesh flap with a damp cloth and mild soap. Avoid harsh chemicals that could damage the plastic or mesh.
- Inspect for Wear: Regularly check the mesh flap for any signs of tearing or damage. While designed to be tear-resistant, extreme use or sharp objects can cause wear.
- Check Frame Security: Ensure the frame remains securely attached to the screen. If any looseness is observed, re-tighten the screws.
6. Troubleshooting
If you encounter issues with your PetSafe Pet Screen Door, consider the following:
- Pet Hesitation: If your pet is reluctant to use the door, continue with positive reinforcement training using treats and praise. Ensure the flap is not too stiff for them to push.
- Door Detaching from Screen: If the pet door frame separates from the screen, it may indicate insufficient initial securing or excessive force from the pet. Re-secure the frames, ensuring the screen is taut and all screws are tightly fastened. For added security, some users have found success with applying a strong adhesive between the frame halves during re-installation.
- Flap Not Closing Properly: Check for any debris or obstructions in the hinge area or along the edges of the flap that might prevent it from closing completely.
Video: A user demonstrating the pet door's function and discussing reinforcement for durability.
7. Specifications
| Feature | Detail |
|---|---|
| Model Number | P1-ZB-11 |
| Weight Limit | Up to 30 Pounds |
| Frame Material | Plastic |
| Dog Breed Size | Small |
| Item Dimensions (LxWxH) | 13 x 0.75 x 9.75 inches |
| Item Weight | 16 ounces (1 pound) |
| Color | Brown |
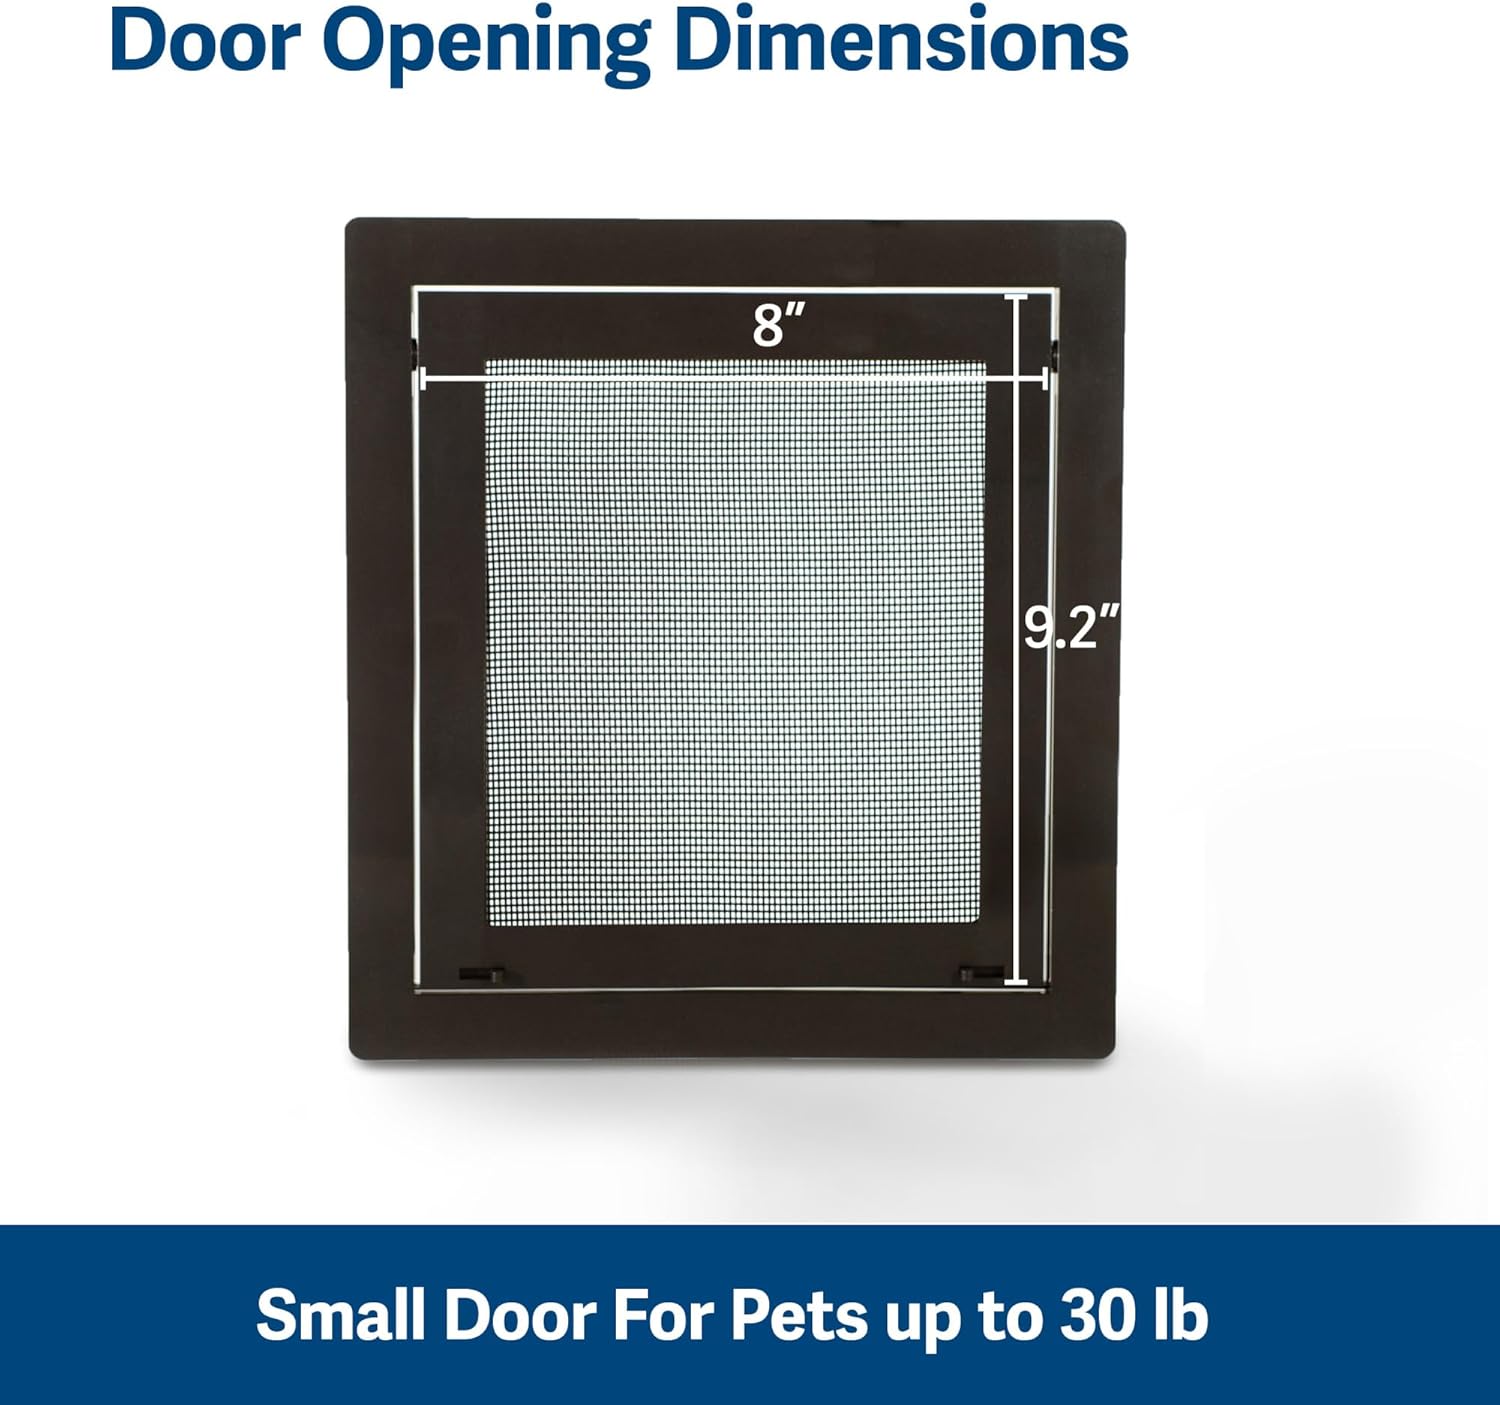
Image: Door opening dimensions for the small size.
8. Warranty and Support
The PetSafe Pet Screen Door comes with a 1-year limited warranty. For warranty claims, technical assistance, or any product-related inquiries, please contact PetSafe customer support. Refer to the product packaging or the official PetSafe website for the most current contact information.