1. Introduction
This manual provides comprehensive instructions for the safe and efficient operation, setup, and maintenance of your BenQ PB7200 DLP Video Projector. Please read this manual thoroughly before using the projector and retain it for future reference.
2. Product Overview
The BenQ PB7200 is a high-performance DLP video projector designed for various applications, offering clear and vibrant image projection.
Key Features
- 1,024 x 768 native resolution for sharp images.
- 2,200 ANSI lumens of brightness for clear viewing in various lighting conditions.
- 2000:1 contrast ratio for distinct dark and light areas.
- Includes a remote control with a laser pointer and wireless mouse functionality.
- Compatible with both PC and Mac systems.
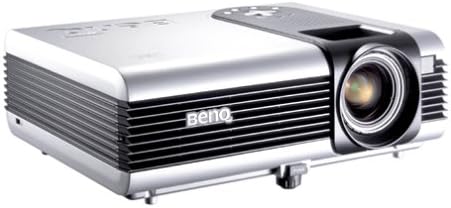
Figure 2.1: An angled view of the BenQ PB7200 DLP Video Projector, showcasing its silver casing, ventilation grilles on the side, and the prominent lens assembly on the front right.
3. Setup Guide
3.1 Unpacking
Carefully remove the projector and all accessories from the packaging. Verify that all components are present according to the packing list. Retain the original packaging for future transport or storage.
3.2 Placement
Position the projector on a stable, flat surface. Ensure adequate ventilation around the unit to prevent overheating. The distance from the screen will determine the image size. Adjust the projector's height and angle to achieve the desired projection area.
3.3 Connections
Connect your video source (e.g., computer, DVD player) to the appropriate input port on the projector. The BenQ PB7200 supports various connectivity options, including Display Port. Connect the power cord to the projector and then to a grounded electrical outlet.
4. Operating Instructions
4.1 Power On/Off
To power on the projector, press the power button on the control panel or the remote control. The power indicator light will illuminate. To power off, press the power button again. Allow the projector to cool down completely before unplugging it.
4.2 Image Adjustment
- Focus Ring: Rotate the lens focus ring to sharpen the projected image.
- Zoom Lever: Adjust the zoom lever to change the size of the projected image without moving the projector.
- Keystone Correction: Use the keystone correction function (usually via remote or menu) to correct trapezoidal distortion if the projector is not perfectly perpendicular to the screen.
4.3 Source Selection
Press the "Source" button on the projector's control panel or remote control to cycle through available input sources (e.g., PC, Video). Select the input corresponding to your connected device.
4.4 Remote Control Functions
The remote control allows for convenient operation from a distance. It includes buttons for power, source selection, menu navigation, volume control, and a laser pointer for presentations. Refer to the remote control diagram (not provided in this document) for specific button layouts.
5. Maintenance
5.1 Lamp Replacement
The projector lamp has a finite lifespan. When the lamp life is nearing its end, a warning message may appear. To replace the lamp, ensure the projector is powered off and cooled down. Follow the specific instructions in the full service manual for safe lamp module replacement. Use only genuine BenQ replacement lamps (Manufacturer Part #: 60.J5016.CB1) to ensure optimal performance and safety.
5.2 Cleaning
- Projector Casing: Wipe the casing with a soft, dry cloth. Do not use abrasive cleaners or solvents.
- Projection Lens: Gently clean the lens with a lens cleaning cloth or lens paper. Avoid touching the lens surface with your fingers.
- Air Filters: Regularly check and clean the air filters to maintain proper ventilation and prevent dust buildup. Refer to the full service manual for filter access and cleaning procedures.
6. Troubleshooting
This section addresses common issues you might encounter with your BenQ PB7200 projector. For more complex problems, contact BenQ customer support.
- No Image on Screen:
- Ensure the projector is powered on and the power indicator is lit.
- Verify that the video source is properly connected and powered on.
- Check that the correct input source is selected on the projector.
- Confirm that the lamp is functioning; if not, it may need replacement.
- Image is Blurry:
- Adjust the focus ring on the projector lens.
- Ensure the projection surface is flat and the projector is stable.
- Image is Distorted (Trapezoid Shape):
- Adjust the keystone correction feature in the projector's menu or via the remote control.
- Reposition the projector to be as perpendicular to the screen as possible.
- Projector Overheating:
- Ensure ventilation vents are not blocked.
- Clean the air filters if they are dusty.
- Operate the projector in an environment with adequate airflow.
7. Technical Specifications
| Feature | Specification |
|---|---|
| Native Resolution | 1024 x 768 |
| Brightness | 2,200 ANSI lumens |
| Contrast Ratio | 2000:1 |
| Connectivity Technology | Display Port |
| Recommended Uses | Home Cinema |
| Special Feature | Integrated speakers |
| Item Weight | 8.86 pounds |
| Package Dimensions | 12.99 x 10.67 x 8.46 inches |
| Model Number | PB7200 |
| Manufacturer | BenQ |
| Date First Available | November 17, 2003 |
8. Warranty and Support
8.1 Warranty Information
The BenQ PB7200 DLP Video Projector is covered by a 3-year limited warranty from the date of purchase. This warranty covers defects in materials and workmanship under normal use. Please retain your proof of purchase for warranty claims.
8.2 Customer Support
For technical assistance, warranty service, or further inquiries, please visit the official BenQ support website or contact their customer service department. You can find more information and support resources on the BenQ Store on Amazon or the official BenQ website.


