
Introduction
This manual provides detailed instructions for the proper use and maintenance of your Gateway DC-T50 Digital Camera. Please read this manual thoroughly before operating the camera to ensure optimal performance and longevity.
The Gateway DC-T50 is a 5-megapixel digital camera featuring a 3x optical zoom lens, a 1.5-inch TFT LCD display, and video recording capabilities. It is designed for ease of use, allowing you to capture high-quality images and video clips.
1. Setup
1.1 Unpacking and Contents
Carefully unpack all items from the box. Ensure the following components are present:
- Gateway DC-T50 Digital Camera
- Rechargeable Lithium-ion Battery
- Battery Charger
- 32 MB SD Memory Card
- Neck Strap
- USB Cable (for computer connection)
- User Manual (this document)
1.2 Battery Installation and Charging
- Locate the battery compartment cover on the bottom of the camera.
- Slide the cover latch and open the compartment.
- Insert the Lithium-ion battery according to the polarity indicators inside the compartment.
- Close the battery compartment cover securely.
- To charge the battery, insert it into the provided battery charger and connect the charger to a power outlet. The charging indicator light will show the charging status.
- Allow the battery to fully charge before first use.
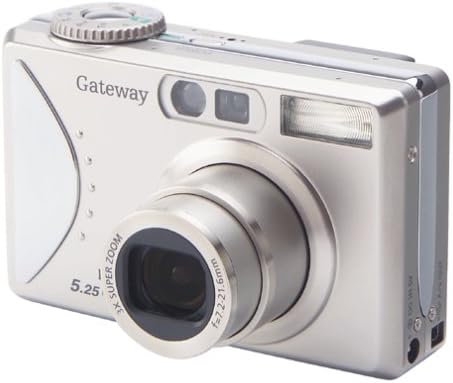
Image: Side view of the Gateway DC-T50 camera, illustrating the location of the battery and SD card compartment.
1.3 SD Memory Card Installation
- Ensure the camera is powered off.
- Open the battery/SD card compartment cover.
- Insert the 32 MB SD memory card into the SD card slot with the metal contacts facing down and towards the camera. Push until it clicks into place.
- Close the compartment cover.
- To remove the SD card, gently push it in until it springs out, then pull it out.
1.4 Attaching the Neck Strap
Thread the neck strap through the strap eyelet on the camera body and secure it according to the strap's instructions. This helps prevent accidental drops.
2. Operating the Camera
2.1 Powering On/Off
Press the POWER button located on the top of the camera to turn it on or off. The lens will extend when powered on.

Image: Front view of the Gateway DC-T50 digital camera with the lens extended, ready for use.
2.2 Basic Photography
- Select Mode: Use the mode dial (if present) or menu options to select your desired shooting mode (e.g., Auto, Macro, Movie).
- Compose Shot: Use the 1.5-inch TFT LCD display or the optical viewfinder to frame your subject.
- Zoom: Use the zoom controls (typically a rocker switch) to adjust the 3x optical zoom. Digital zoom is also available.
- Focus: The camera will automatically focus when the shutter button is half-pressed.
- Capture: Fully press the SHUTTER button to take a picture.

Image: Rear view of the Gateway DC-T50 digital camera, highlighting the LCD screen and various control buttons for navigation and settings.
2.3 Shooting Modes
- Automatic Mode: The camera automatically adjusts settings for most shooting conditions.
- Macro Mode: For close-up photography of small objects. Activate via the menu or a dedicated button.
- Movie Mode: Records video clips at 15 frames per second (fps) with sound.
2.4 Flash Settings
The built-in flash can be adjusted to various modes (e.g., Auto, Fill-in, Red-eye Reduction, Off) through the camera's menu or a dedicated flash button.
2.5 Self-Timer
Activate the 10-second self-timer for self-portraits or group photos. The camera will count down before taking the picture.
2.6 Reviewing and Deleting Images
Enter playback mode (usually indicated by a play icon button) to view your captured photos and videos on the LCD screen. Use the directional pad to navigate. To delete an unwanted image, select it and press the DELETE button (often represented by a trash can icon).
2.7 Connecting to a Computer
Use the provided USB cable to connect the camera to your computer. The camera should appear as a removable disk drive, allowing you to transfer images and videos to your computer for storage, editing, or sharing.
3. Maintenance
- Cleaning the Lens: Use a soft, lint-free cloth specifically designed for camera lenses. Avoid touching the lens with your fingers.
- Cleaning the LCD Screen: Wipe gently with a soft, dry cloth. Do not use abrasive cleaners.
- Battery Care: Store the battery in a cool, dry place when not in use. Avoid fully discharging the battery frequently to prolong its lifespan.
- Storage: When not in use for extended periods, remove the battery and store the camera in a dry, dust-free environment, away from extreme temperatures.
- Water Resistance: This camera is not water-resistant. Avoid exposure to moisture or liquids.
4. Troubleshooting
| Problem | Possible Cause / Solution |
|---|---|
| Camera does not power on. |
|
| "Card Error" message appears. |
|
| Pictures are blurry. |
|
| Flash does not fire. |
|
| Cannot transfer photos to computer. |
|
5. Specifications
| Feature | Detail |
|---|---|
| Model Name | DC-T50 |
| Effective Still Resolution | 5 Megapixels |
| Optical Zoom | 3x |
| Digital Zoom | 4x |
| Display | 1.5-inch TFT Color LCD |
| Storage Media | Secure Digital (SD) Card (32 MB included) |
| Battery Type | Rechargeable Lithium-ion |
| Video Resolution | 5 MP (for video clips) |
| Frame Rate (Video) | 15 fps |
| Self-Timer | 10 seconds |
| Supported File Format | JPEG (images), MP4 (video), WAV (audio) |
| Color | Titanium Silver |
| Manufacturer | Gateway |
6. Warranty and Support
6.1 Limited Warranty
The Gateway DC-T50 Digital Camera comes with a 1-year limited warranty from the date of purchase. This warranty covers manufacturing defects under normal use. It does not cover damage caused by misuse, accidents, unauthorized modifications, or external factors. Please retain your proof of purchase for warranty claims.
6.2 Customer Support
For technical assistance, warranty service, or further inquiries, please refer to the official Gateway support channels or website. Contact information can typically be found on the manufacturer's official product page or included documentation.


