
Conair GS10
Conair GS10 Deluxe Fabric Steamer Instruction Manual
Model: GS10
Important Safety Instructions
When using electrical appliances, especially when children are present, basic safety precautions should always be followed, including the following:
- READ ALL INSTRUCTIONS BEFORE USING.
- DANGER – Any appliance is electrically live even when the switch is off. To reduce the risk of death by electric shock:
- Always unplug appliance immediately after using.
- Do not place or store appliance where it can fall or be pulled into a tub or sink.
- Do not place in or drop into water or other liquid.
- If an appliance falls into water, unplug it immediately. Do not reach into the water.
- WARNING – To reduce the risk of burns, electrocution, fire, or injury to persons:
- An appliance should never be left unattended when plugged in.
- Close supervision is necessary when this appliance is used by, on, or near children or invalids.
- Use this appliance only for its intended use as described in this manual. Do not use attachments not recommended by the manufacturer.
- Never operate this appliance if it has a damaged cord or plug, if it is not working properly, or if it has been dropped or damaged, or dropped into water.
- Keep the cord away from heated surfaces. Do not pull, twist, or wrap cord around the appliance.
- Never block the air openings of the appliance or place it on a soft surface, such as a bed or couch, where the air openings may be blocked. Keep the air openings free of lint, hair, and the like.
- Never use while sleeping.
- Never drop or insert any object into any opening.
- Do not use outdoors or operate where aerosol (spray) products are being used or where oxygen is being administered.
- Do not use an extension cord with this appliance.
- The steamer head and hose become hot during use. Allow to cool before handling.
- Always ensure the water tank is properly seated before operating.
- Do not direct steam at people, pets, or plants. Steam is hot and can cause burns.
Product Overview
The Conair GS10 Deluxe Fabric Steamer is designed to quickly and efficiently remove wrinkles from garments, drapes, and upholstery using high-velocity steam. It offers a convenient and gentle alternative to traditional ironing.
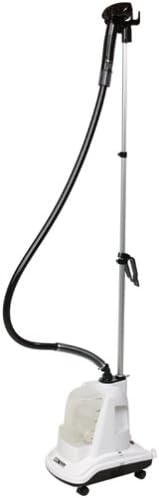
Figure 1: Conair GS10 Deluxe Fabric Steamer with telescopic pole and steam hose extended. This view shows the main unit, water tank, and the steam nozzle attached to the pole.

Figure 2: Conair GS10 Deluxe Fabric Steamer from a side angle, demonstrating the hose coiled around the pole for compact storage. The water tank is visible on the base unit.
Key Features:
- High-velocity steam jets from a 6-inch head for effective wrinkle removal.
- Faster and easier alternative to ironing, gentle on various fabrics.
- Removable water tank provides up to 75 minutes of continuous steaming.
- Heats up in approximately one minute.
- Equipped with sturdy casters for easy mobility.
- Telescopic rod for hanging garments, adjustable up to 65 inches.
- Automatic safety shutoff when water tank runs dry.
- Low-water indicator light.
- Stay-cool wand handle for safe operation.
- Built-in cord wrap for tidy storage.
Note: No official product videos were available from the manufacturer for inclusion in this manual.
Setup and Assembly
- Unpack Components: Carefully remove all components from the packaging. Ensure you have the main steamer unit, telescopic pole, steam hose with nozzle, and water tank.
- Assemble Telescopic Pole: Insert the bottom end of the telescopic pole into the designated opening on the top of the main steamer unit. Push down firmly until it clicks into place.
- Attach Hose Holder: Slide the hose holder onto the telescopic pole at a comfortable height. This will support the steam nozzle when not in use.
- Fill Water Tank: Remove the water tank from the base unit. Unscrew the cap at the bottom of the tank and fill it with clean, cool tap water. Do not overfill. Replace the cap securely.
- Insert Water Tank: Place the filled water tank back into the base unit, ensuring it is seated firmly and correctly.
- Position Steamer: Place the steamer on a flat, stable surface. Ensure the power cord can reach an electrical outlet without being strained.
Operating Instructions
- Power On: Plug the steamer into a standard electrical outlet. The power indicator light will illuminate.
- Heat Up: Allow the steamer approximately one minute to heat up. Steam will begin to emit from the nozzle when ready.
- Prepare Garment: Hang the garment on the telescopic pole or a hanger. For best results, ensure the fabric is taut.
- Begin Steaming: Hold the steam nozzle a few inches away from the fabric. Move the nozzle slowly up and down the garment, allowing the steam to penetrate the fibers. For stubborn wrinkles, you may gently press the nozzle against the fabric.
- Steam Technique:
- For most fabrics, steam from top to bottom.
- For delicate fabrics, hold the nozzle further away.
- Always test on an inconspicuous area first.
- Refilling Water: If the water tank runs dry, the automatic shutoff will activate, and the low-water indicator light will turn on. Unplug the unit, allow it to cool for a few minutes, then refill the water tank as described in the "Setup and Assembly" section. Reinsert the tank and plug the unit back in to resume steaming.
- Power Off: When finished steaming, unplug the unit from the electrical outlet. Allow the unit to cool completely before storing.
Maintenance and Care
Proper maintenance ensures the longevity and optimal performance of your steamer.
- Empty Water Tank: After each use, or at least weekly, remove the water tank and empty any remaining water. This prevents mineral buildup.
- Cleaning Nozzle: Periodically wipe the steam nozzle with a damp cloth to remove any lint or residue. Ensure the unit is unplugged and cool.
- Descaling (Mineral Buildup Removal):
Depending on your water hardness, mineral deposits may build up over time, affecting steam output. To descale:
- Unplug the steamer and allow it to cool completely.
- Remove the water tank and empty it.
- Fill the water tank with a mixture of 50% white vinegar and 50% water.
- Place the tank back into the unit.
- Plug in the steamer and allow it to steam the entire mixture.
- Unplug and let cool. Empty any remaining solution.
- Rinse the tank thoroughly with fresh water and run a full tank of fresh water through the steamer to flush out any vinegar residue.
- Storage: Store the steamer in a cool, dry place. The hose can be coiled around the telescopic pole for compact storage. Ensure the water tank is empty before storing.
Troubleshooting
| Problem | Possible Cause | Solution |
|---|---|---|
| No steam or very little steam. |
|
|
| Water spitting from nozzle. |
|
|
| Water leaking from base. |
|
|
| Unit does not turn on. |
|
|
Specifications
| Feature | Detail |
|---|---|
| Brand | Conair |
| Model Number | GS10 |
| Wattage | 1300 watts |
| Voltage | 120V AC (implied by 1.3E+3 Volts (AC) and typical US appliances) |
| Item Weight | 9 pounds (4.08 kg) |
| Product Dimensions (L x W x H) | 17.72 x 16.92 x 13.78 inches (45.01 x 42.98 x 35.00 cm) |
| Water Tank Capacity | Provides up to 75 minutes of steaming time |
| Color | White |
| UPC | 074108209931, 074108188854 |
Warranty and Support
Limited Warranty:
The Conair GS10 Deluxe Fabric Steamer is covered by a 2-year limited warranty against defects in materials and workmanship from the date of purchase. This warranty does not cover damage resulting from accident, misuse, abuse, commercial use, or unauthorized modification of the product.
For specific warranty terms and conditions, please refer to the warranty card included with your product or visit the official Conair website.
Customer Support:
If you experience any issues with your Conair GS10 Deluxe Fabric Steamer or require assistance, please contact Conair Customer Service. You can typically find contact information, including phone numbers and online support portals, on the official Conair website or within the product packaging.
When contacting support, please have your product model number (GS10) and proof of purchase readily available.
Ask a question about this manual
Ask about setup, troubleshooting, compatibility, parts, safety, or missing instructions. Manuals+ will review the question and use this page’s manual context to help answer it.