
Introduction
The BLACK+DECKER SmartGrind Deluxe Coffee Bean Burr Mill is designed to provide a consistent and flavorful coffee grind for various brewing methods. This appliance crushes coffee beans rather than chopping them, preserving the beans' natural aroma and flavor. Please read this manual thoroughly before operating your new burr mill to ensure safe and efficient use.
Important Safeguards
When using electrical appliances, basic safety precautions should always be followed to reduce the risk of fire, electric shock, and/or injury to persons, including the following:
- Read all instructions.
- To protect against electrical hazards, do not immerse cord, plugs, or appliance in water or other liquid.
- Close supervision is necessary when any appliance is used by or near children.
- Unplug from outlet when not in use, before putting on or taking off parts, and before cleaning.
- Avoid contact with moving parts.
- Do not operate any appliance with a damaged cord or plug, or after the appliance malfunctions or has been dropped or damaged in any manner. Contact customer service for examination, repair, or electrical or mechanical adjustment.
- The use of attachments not recommended or sold by the appliance manufacturer may cause fire, electric shock, or injury.
- Do not use outdoors.
- Do not let cord hang over edge of table or counter, or touch hot surfaces.
- Do not place on or near a hot gas or electric burner, or in a heated oven.
- Do not use appliance for other than intended use.
- Check bean container for presence of foreign objects before using.
- Do not use to grind anything other than roasted whole coffee beans.
Parts Identification
Familiarize yourself with the components of your coffee bean burr mill:
- Bean Container: Holds whole coffee beans for grinding.
- Lid: Covers the bean container.
- Grind Selector: Adjusts the fineness of the grind (Fine, Medium, Coarse).
- Grinding Chamber: Where beans are crushed.
- Timer Dial: Sets the grinding duration.
- On/Off Button: Initiates and stops the grinding process.
- Ground Coffee Container: Collects the ground coffee.
- Base Unit: Houses the motor and controls.
- Cleaning Brush/Scoop: For cleaning and measuring.
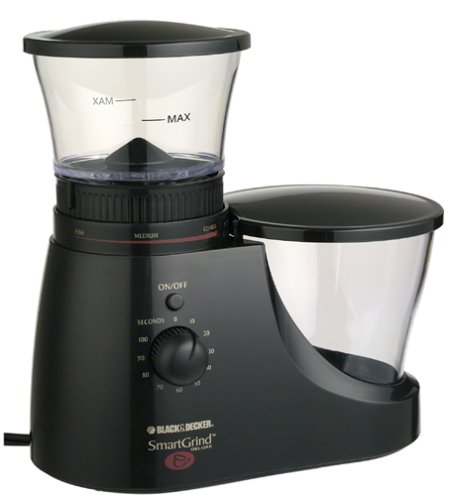
This image shows the Black & Decker SmartGrind Deluxe Coffee Bean Burr Mill, highlighting its compact design and main components like the bean hopper and ground coffee container.
Setup
Before first use, follow these steps:
- Unpack the burr mill and remove all packaging materials.
- Wash the bean container lid, bean container, and ground coffee container in warm, soapy water. Rinse thoroughly and dry completely. The base unit should be wiped with a damp cloth. Do not immerse the base unit in water.
- Ensure all parts are dry before assembly.
- Place the ground coffee container into its designated slot on the base unit.
- Place the bean container onto the base unit, ensuring it is securely locked in place.
- Place the lid onto the bean container.
- Position the burr mill on a stable, flat, and dry surface.
Operating Instructions
Follow these steps to grind your coffee beans:
1. Filling the Bean Container
- Remove the lid from the bean container.
- Pour whole roasted coffee beans into the bean container. The container can hold enough beans for up to 20 cups of coffee. Do not overfill.
- Replace the lid securely.
2. Selecting Grind Setting
- Rotate the grind selector to your desired setting:
- Fine: Ideal for espresso machines.
- Medium: Suitable for drip coffee makers.
- Coarse: Best for percolators or French presses.
3. Setting Grinding Time
- Turn the timer dial to select the desired grinding duration. The timer adjusts according to the amount of coffee beans you wish to grind. Start with a shorter time and adjust as needed to achieve your preferred consistency and quantity.
- The mill features an auto shutoff feature once the set time expires.
4. Starting and Stopping
- Plug the appliance into a standard electrical outlet.
- Press the On/Off button to start the grinding process.
- The mill will operate for the set time and then automatically shut off. To stop grinding manually before the timer expires, press the On/Off button again.
- Once grinding is complete, unplug the appliance.
5. Removing Ground Coffee
- Carefully remove the ground coffee container from the base unit.
- Transfer the ground coffee to your coffeemaker filter or storage container. The included scoop can assist with this.
Maintenance and Cleaning
Regular cleaning ensures optimal performance and extends the life of your burr mill.
Daily Cleaning
- Always unplug the appliance before cleaning.
- Remove the ground coffee container and empty any remaining grounds. Wash it in warm, soapy water, rinse, and dry thoroughly.
- Use the provided cleaning brush to remove any coffee grounds from the grinding chamber and around the burrs.
- Wipe the exterior of the base unit with a damp cloth. Do not use abrasive cleaners or immerse the base unit in water.
Deep Cleaning (Periodically)
- For a more thorough cleaning, you may carefully remove the upper burr (refer to specific instructions in your product's full manual if available, as removal methods can vary). Clean both burrs with the brush.
- Ensure all parts are completely dry before reassembling and storing the appliance.
Troubleshooting
If you encounter issues with your burr mill, refer to the following table:
| Problem | Possible Cause | Solution |
|---|---|---|
| Grinder does not start. | Appliance not plugged in. Timer not set. Bean container or lid not properly secured. | Ensure the power cord is securely plugged into an outlet. Set the timer dial. Check that the bean container and lid are correctly in place and locked. |
| Beans are not grinding or feeding. | Bean container is empty. Beans are bridging (clogging) in the hopper. | Add more whole coffee beans. Gently tap the side of the bean container to dislodge beans. Ensure only whole roasted coffee beans are used. |
| Ground coffee is too fine/coarse. | Incorrect grind setting selected. | Adjust the grind selector to the desired fineness (Fine, Medium, Coarse). |
| Excessive coffee grounds mess. | Static electricity. Ground coffee container not fully seated. | Tap the unit gently after grinding before removing the ground coffee container to allow grounds to settle. Ensure the ground coffee container is fully inserted. |
| Motor sounds strained or stops. | Overfilling the bean container. Foreign object in grinding chamber. Overheating. | Do not overfill. Unplug and check for foreign objects. Allow the unit to cool down if it has been running for an extended period. |
Specifications
| Feature | Detail |
|---|---|
| Brand | BLACK+DECKER |
| Model Number | CBM7B |
| Product Dimensions | 8.9 x 6.2 x 5.5 inches |
| Item Weight | 2.58 pounds |
| Material | Plastic |
| Capacity | Up to 20 cups of coffee beans |
| Grind Settings | Fine, Medium, Coarse |
| Manufacturer | Black & Decker |
Warranty and Support
For warranty information, product registration, or technical support, please refer to the documentation included with your purchase or visit the official BLACK+DECKER website. Keep your purchase receipt as proof of purchase for any warranty claims.
Online Support: www.blackanddecker.com/support