1. Why Securing your iPad is Important
In this modern connected age more and more of our personal and professional lives are interwoven into our smart phones and tablets. Taking good measures to keep these devices secure should be of paramount importance.
This guide will walk you through the general steps and best practices in securing your iPad.
2. Set a passcode
Tips: The following steps are based on iOS devices running iOS 11 and later. For earlier versions, options may be similar, but may not exactly match the instructions provided.
To set a Passcode on your iOS device
- Tap Settings.

- Tap Touch ID & Passcode.

- Tap Turn Passcode On.

- Enter the desired passcode.

Tips:
Do not use a passcode that can be easily guessed. Avoid using passcodes that contain personally identifiable information such as your birthdate, street address, your telephone number, etc. - To choose a different type of passcode, tap Passcode Options on the passcode entry screen.

- There are options to choose between a custom-length alpanumeric code, a custom-length numeric code, or between a standard 4 or 6 digit numeric passcode. The type of passcode chosen is personal preference. More information about types of passcodes can be found below.

- Upon entering a passcode, you will be prompted to re-enter it for verification purposes.

- Once the passcode has been successfully set, you will be returned to the Touch ID & Passcode screen. Earlier options have been replaced with options for removing or changing the passcode that was just set.

Types of passcodes
iOS devices have long been protected by numeric passcodes, giving iOS users a way to keep their devices safe from hackers and prying eyes. For a long time, passcodes were only 4-digit numeric codes, but Apple began using a 6-digit passcode as the default option. Longer and more complex passcodes offer greater security, as their complexity makes guessing, hacking, or cracking a passcode much more difficult. This is where custom-length numeric and alphanumeric options come into play.
- Custom Alphanumeric Code: This allows for a custom-length passcode to be created using both letters and numbers.

- Custom Numeric Code: This allows for a custom-length passcode to be created using numbers only.

- 6-Digit Numeric Code: Beginning with iOS 9, Apple began using a six-digit passcode as the default passcode option. This is the most common type of passcode used with iOS devices today.

- 4-Digit Numeric Code: The 4-digit numeric passcode was the original passcode option that iOS devices used as a standard. This is also commonly referred to as a “PIN-style” passcode.

3. Enable Find My iPhone
Find My iPhone isn’t just handy for locating a missing iOS device it can also be used to lock or erase a device in a worst case scenario.
To enable Find My iPhone:
- Select Settings.

- Select your Apple ID.

- Select iCloud.

- Select Find My iPhone.

- Ensure that both Find My iPhone and Send Last Location are on.

Tips:
If your device is not connected to an iCloud account, it will need to be signed into one in order for this feature to be available.
Once enabled, there are two ways you can remotely use Find My iPhone:
- Using the Find My iPhone app on another mobile device.
- Using the Apple iCloud website: https://www.icloud.com/
Warning:
Find My iPhone will only work on an iPad if it is connected to a cellular network or Wi-Fi. If the iPad does not have connectivity, Find My iPhone will not be able to communicate with the device.
4. Enable Two-Step Verification for Your Apple ID & iCloud
Enabling a two-step verification for your Apple ID will further prevent unauthorized use of your account.
Tips:
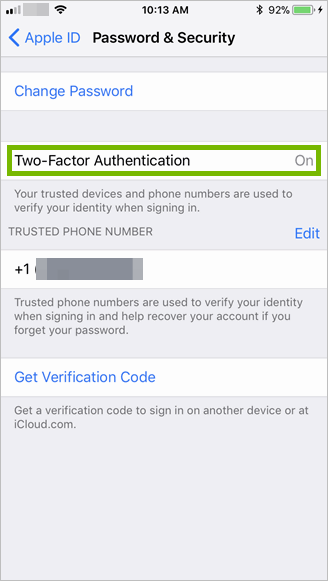
o-factor authentication is an extra layer of security for your Apple ID. The first is your password, the second will be a special code or prompt displayed on your iPhone.
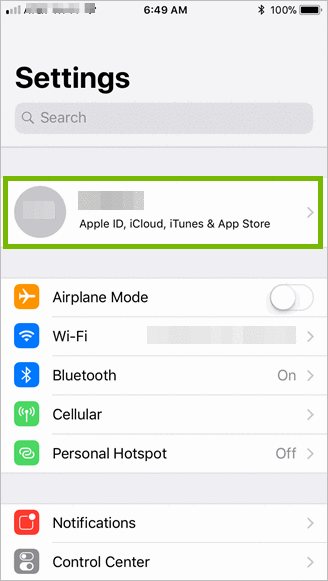
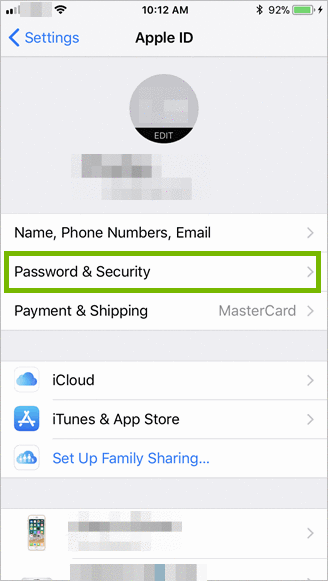
Enable two-step verification
- On your iPhone, tap Settings.

- Tap on your name, at the top.

- Tap Password & Security.

- Tap Two-Factor Authentication to turn it on.

- Follow the prompts on your iPhone’s screen to complete setting up two-factor authentication.
Warning:
You will need to have your iPhone available whenever you are using your Apple ID, such as making purchases from the Apple App Store, or making changes to your Apple ID from your computer.
5. Disable Lock Screen Notifications
Although useful, lock screen notifications are a privacy risk.
To disable lock screen notifications:
- Tap Settings.

- Tap Notifications.

- Select the App you would like to disable notifications for, E.g. Mail.
- Toggle off Show on Lock Screen.

- Repeat steps 3 and 4 for any App that can potentially display sensitive information.
6. Exercise caution
And lastly, exercise caution when using your tablet.
Be cautious of:
- What websites you visit.
- What you tap on while on websites.
- Links and attachments in emails.
- Granting 3rd party apps permissions.
- Who you let use your tablet.


