1. Introduction
Thank you for purchasing the 7018B Car MP5 Player. This device is designed to enhance your in-car entertainment and connectivity with its 7-inch touch screen, Bluetooth capabilities, multimedia playback, and support for various car functions. Please read this manual carefully to ensure proper installation, operation, and maintenance of your new car MP5 player.
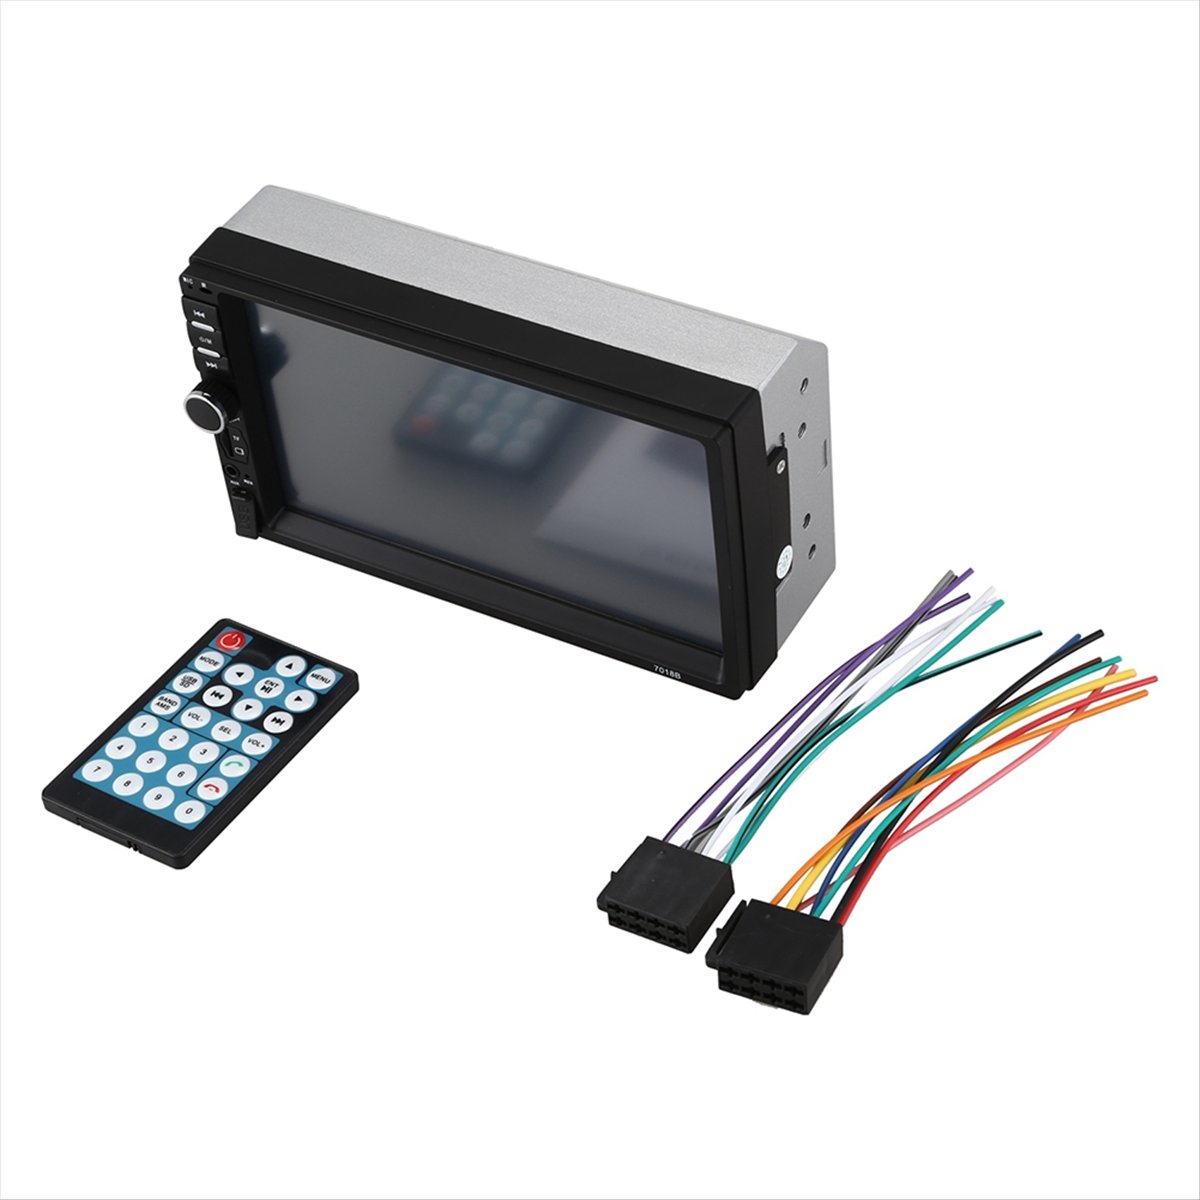
2. Package Contents
Please check the package for the following items:
- 1 x 7018B Car MP5 Player
- 1 x Remote Control (Note: Button batteries not included, please prepare separately)
- 2 x Power Cords (Wiring Harnesses)

3. Specifications
| Feature | Description |
|---|---|
| Model Name | 7018B |
| Interface | USB / TF / AUX |
| Screen | 7 inch Touch Screen |
| Connectivity | Built-in Bluetooth + Microphone, Mirror Link support |
| Hands-free Calls | Supported |
| Charging | Fast phone charging, Power output for USB devices |
| Video Formats | RMVB/RM/3GP/MPEG/XVID/DAT/VOB/MP4 |
| Audio Formats | MP3/WMA/OGG/APE/AAC/FLAC/WAV |
| Picture Formats | JPG |
| Radio Function | FM (Frequency: 87.5-108MHz) |
| Storage Device Support | USB disk / TF card |
| Display Features | Automatic conversion colorful lights, 24 hours digital clock, date |
| Material | Plastic + Metal |
4. Product Overview
4.1 Front Panel
The front panel features the 7-inch touch screen display, along with physical buttons for common functions such as power, volume, mode selection, and track control. A USB port and TF card slot are typically located on the front for easy access.
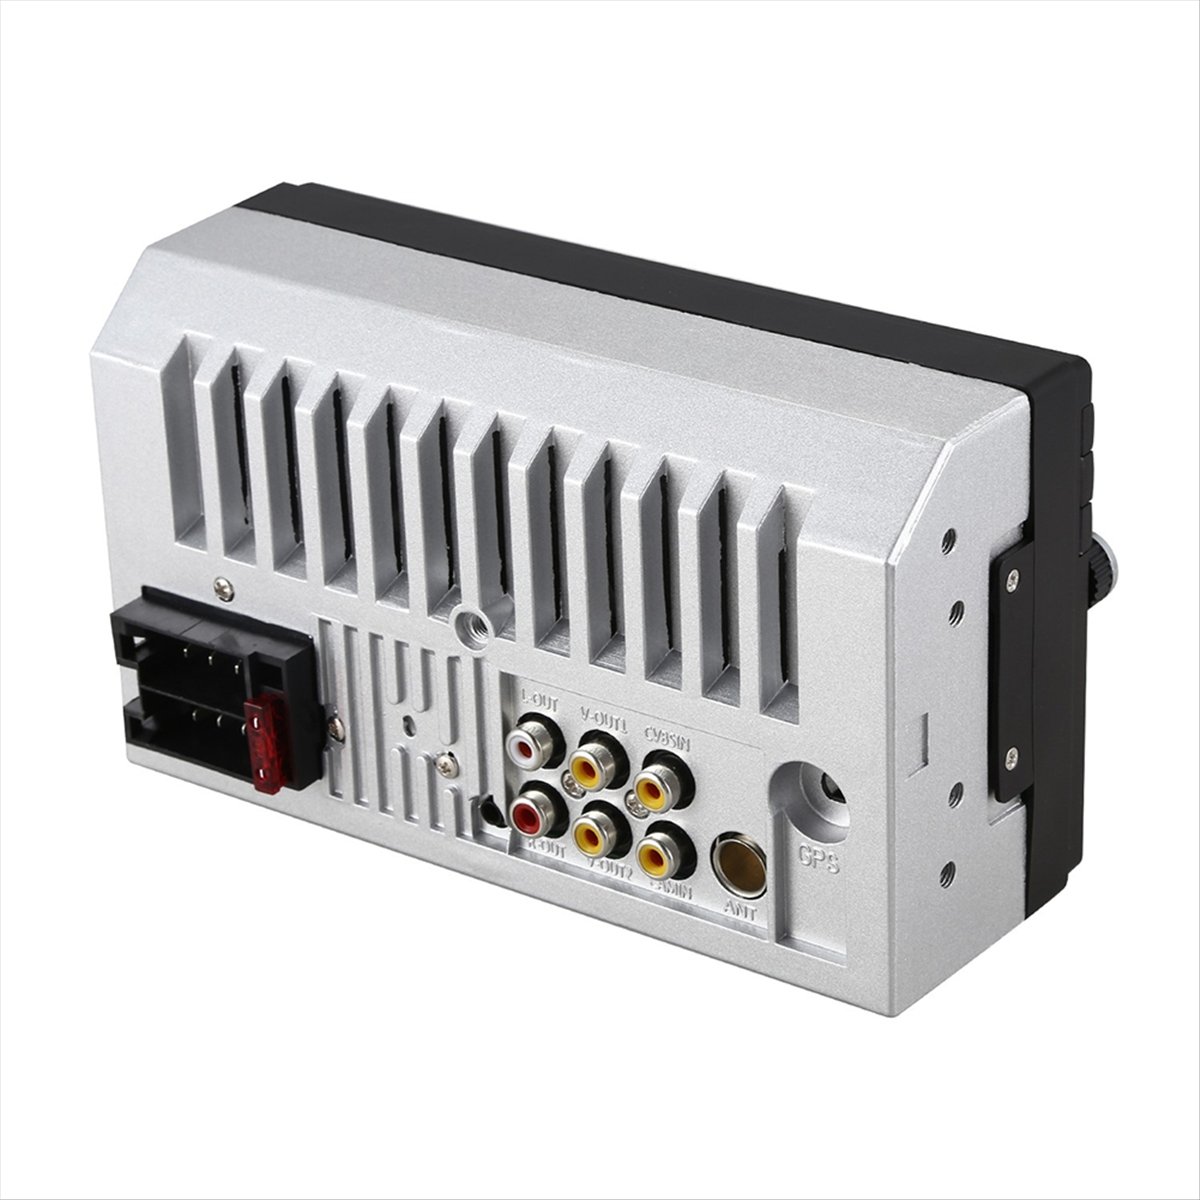
4.2 Rear Panel Connections

The rear panel provides all necessary connections for power, speakers, audio/video input/output, and external accessories. Refer to the image above for specific port locations:
- Power Interface: Connects to the vehicle's power supply.
- Speaker Interface: Connects to vehicle speakers.
- Audio Output: RCA outputs for external amplifiers.
- Video Input: RCA input for external video sources.
- Radio Antenna: Connects to the vehicle's radio antenna.
- Rear View Access: Input for a rearview camera.
- GPS: Port for GPS antenna or module.
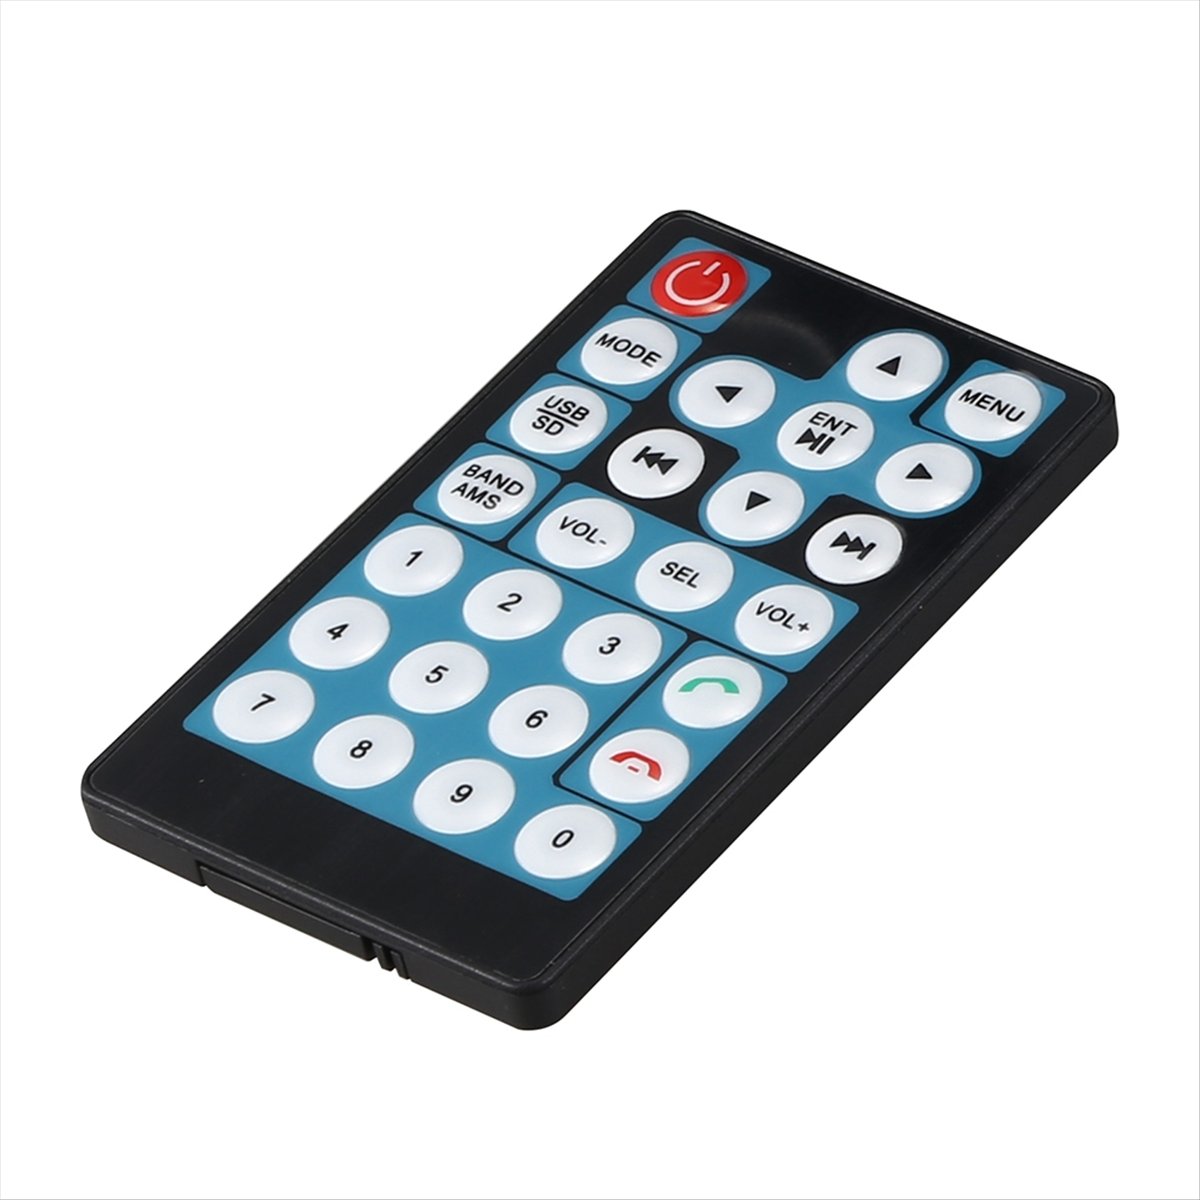
4.3 Remote Control
The remote control allows convenient operation of the MP5 player from a distance. It includes buttons for power, mode selection, volume control, track navigation, menu access, and call handling.
5. Setup and Installation
Important: Professional installation is highly recommended. Incorrect wiring can damage the device or your vehicle's electrical system. Disconnect the vehicle's battery before starting installation.
5.1 Wiring Connections
Refer to the rear panel diagram (Section 4.2) and the provided wiring harnesses for correct connections:
- Power Connection: Connect the main power harness to your vehicle's electrical system. Ensure the ACC (switched power), B+ (constant 12V), and Ground wires are correctly identified and connected.
- Speaker Connection: Connect the speaker wires from the harness to your vehicle's speakers. Ensure correct polarity for each speaker (positive to positive, negative to negative).
- Radio Antenna: Connect your vehicle's radio antenna cable to the 'Radio Antenna' port.
- AUX Input: If using an external audio source via AUX, connect it to the AUX input ports.
- Video Output: If connecting to external monitors, use the 'Video Output' RCA ports.
- Rear View Camera (Optional): If installing a rearview camera, connect its video output to the 'Rear View Access' input on the player. Ensure the camera's power and trigger wire are correctly connected to the vehicle's reverse light circuit.
- GPS Antenna (Optional): If using an external GPS antenna, connect it to the 'GPS' port.
5.2 Mounting the Unit
Once all wiring is complete and tested, carefully slide the MP5 player into the dashboard opening until it clicks into place or can be secured with mounting brackets (not included, typically part of vehicle-specific installation kits).
6. Operating Instructions
6.1 Basic Operation
- Power On/Off: Press the power button on the front panel or remote control.
- Volume Control: Use the rotary knob on the front panel or the VOL+/- buttons on the remote.
- Mode Selection: Press the 'MODE' button on the front panel or remote to switch between Radio, USB, TF, AUX, Bluetooth, and Video modes.
- Touch Screen: Navigate menus and control functions by touching the icons on the 7-inch display.
6.2 Radio (FM)
- Select 'Radio' mode.
- Use the touch screen or remote to scan for stations (87.5-108MHz).
- Save preferred stations to presets for quick access.
6.3 Media Playback (USB/TF/AUX)
- USB/TF Card: Insert a USB disk into the USB port or a TF card into the TF card slot. The player should automatically switch to the respective mode or prompt you to select it.
- AUX Input: Connect your external audio device to the AUX input. Select 'AUX' mode.
- Use the touch screen or remote to browse files, play, pause, skip tracks, or adjust playback settings.
6.4 Bluetooth Function
- Select 'Bluetooth' mode.
- On your mobile device, search for available Bluetooth devices and select '7018B' (or similar name).
- Pair the devices. A confirmation message may appear on the screen.
- Once paired, you can make/receive hands-free calls and stream audio from your phone.
- Use the remote control's call buttons to answer or end calls.
6.5 Mirror Link
The Mirror Link function allows you to display your smartphone's screen on the MP5 player's display. Follow the on-screen instructions when selecting the Mirror Link option. This typically involves connecting your phone via USB and enabling USB debugging or screen mirroring features on your phone.
6.6 Rear View Camera Display
When a rearview camera is properly installed and connected, the display will automatically switch to the camera view when the vehicle is put into reverse gear.
6.7 GPS Portable Navigation
The 7018B supports HD GPS Portable Navigation. This typically means the unit can interface with an external GPS module or application via Mirror Link to provide navigation functionality. Consult your specific GPS software or external device manual for detailed usage.
7. Maintenance
- Cleaning the Screen: Use a soft, lint-free cloth to gently wipe the touch screen. Do not use abrasive cleaners or solvents, as they may damage the screen.
- General Cleaning: Wipe the unit's exterior with a soft, damp cloth. Ensure no liquids enter the device.
- Avoid Extreme Temperatures: Do not expose the unit to extreme heat or cold, as this can affect its performance and lifespan.
- Remote Control Batteries: Replace the remote control batteries when its range or responsiveness decreases.
8. Troubleshooting
| Problem | Possible Solution |
|---|---|
| No power | Check power connections (B+, ACC, Ground). Ensure vehicle battery is charged. Check fuses. |
| No sound | Check speaker connections. Ensure volume is not muted or too low. Verify audio source is playing. |
| Bluetooth not connecting | Ensure Bluetooth is enabled on both devices. Delete previous pairings and try re-pairing. Move devices closer. |
| Touch screen unresponsive | Restart the unit. Ensure the screen is clean and free of debris. |
| USB/TF card not recognized | Ensure the card/drive is inserted correctly. Check file format compatibility. Try a different USB/TF card. |
| Rearview camera not displaying | Check camera video input connection. Verify camera power and trigger wire connections. |
9. User Tips
No specific user tips are available from buyer reviews or Q&A at this time. Always ensure all wiring is secure and properly insulated to prevent electrical issues.
10. Warranty and Support
For any issues not covered in this manual, or for warranty claims, please contact the seller or retailer from whom you purchased the product. Keep your purchase receipt as proof of purchase.


