1. Introduction
Thank you for choosing the VEVOR Racing Wheel Stand FC-P04. This foldable racing cockpit is designed to provide an immersive and stable racing simulation experience, compatible with a wide range of steering wheels, pedals, and shifters from major brands like Logitech, Thrustmaster, Fanatec, Hori, and Mad Catz. This manual will guide you through the assembly, operation, and maintenance of your new racing wheel stand.
2. Safety Information
- Read all instructions carefully before assembly and use.
- Ensure all bolts and fasteners are securely tightened before each use to prevent instability.
- Do not exceed the maximum weight capacity of 330 lbs (150 kg).
- Place the stand on a stable, level surface to prevent tipping.
- Keep hands and fingers clear of moving parts during adjustment to avoid pinching.
- Keep children and pets away from the stand during assembly and use.
- Store the stand in a safe place when not in use to prevent accidental injury.
3. Package Contents
Please check the package to ensure all components are present:
- Main Frame Components (Base, Seat Frame, Pedal Plate, Steering Wheel Plate, Shifter Mount)
- Assembly Hardware (Bolts, Nuts, Washers, Allen Keys)
- Instruction Manual
4. Specifications
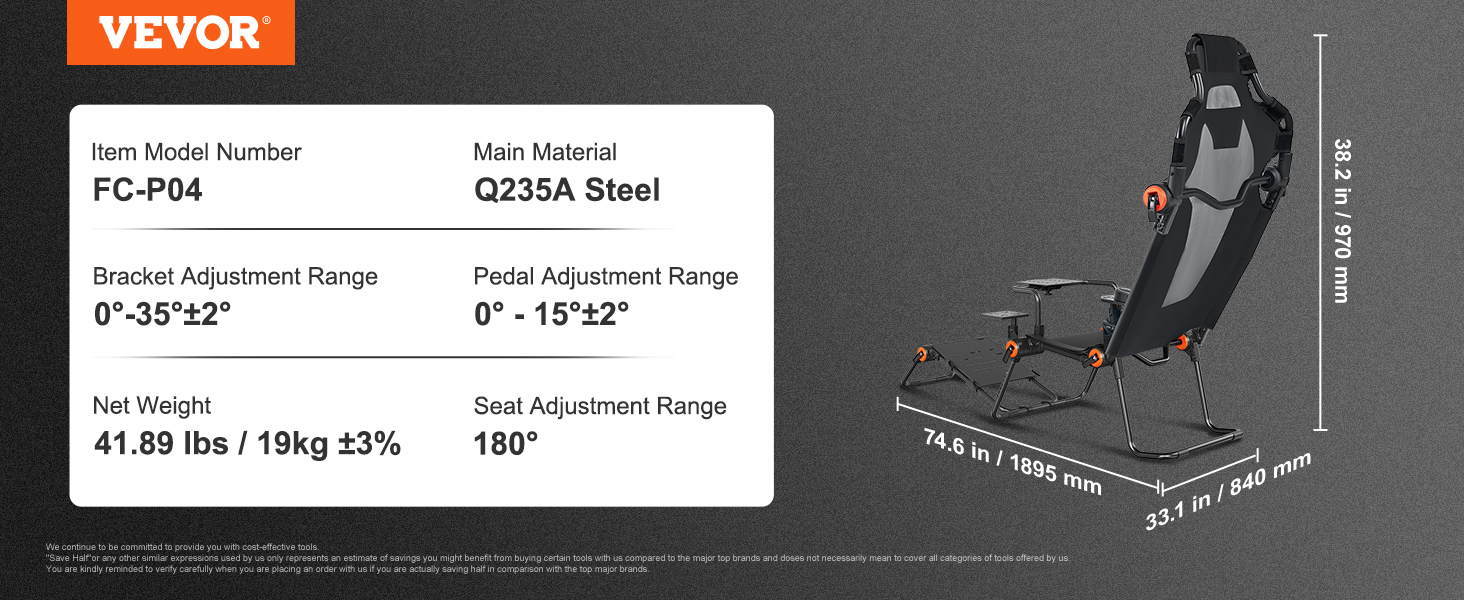
Image: VEVOR Racing Wheel Stand FC-P04 with key dimensions and specifications.
| Feature | Detail |
|---|---|
| Item Model Number | FC-P04 |
| Main Material | Q235A Steel |
| Bracket Adjustment Range | 0°-35° |
| Pedal Adjustment Range | 0°-15° |
| Seat Adjustment Range | 180° |
| Net Weight | 41.89 lbs (19 kg) |
| Max. Weight Capacity | 330 lbs (150 kg) |
| Package Dimensions (L x W x H) | 79 cm x 69 cm x 23 cm |
5. Assembly and Setup
Follow these steps to assemble your VEVOR Racing Wheel Stand:
- Unpack Components: Carefully remove all parts from the packaging and lay them out. Verify all components listed in Section 3 are present.
- Assemble Main Frame: Connect the base frame components according to the diagrams provided in your package. Ensure all connections are aligned and hand-tighten bolts initially.
- Attach Seat: Secure the seat frame to the main base. The seat is designed for comfort with upgraded lumbar support and all-season fabric.
- Install Pedal Plate: Attach the pedal plate to the front section of the stand. The plate features pre-installed holes for various pedal sets. Adjust the angle as desired (0°-15°).

Image: Universal base with pre-installed holes for steering wheels and pedals.
- Mount Steering Wheel Plate: Secure the steering wheel plate to the adjustable bracket. This plate also has pre-drilled holes for compatibility with most steering wheels.
- Attach Shifter Mount: Install the universal gear lever mount. It can be flexibly installed on either the left or right side for user preference.

Image: Diagram showing adjustable steering wheel height, pedal angle, seat angle, and flexible speed lever installation.
- Final Tightening: Once all components are in place and aligned, fully tighten all bolts using the provided tools. Ensure the stand is stable and free from wobble.
6. Operation and Adjustments
The VEVOR Racing Wheel Stand offers multiple adjustment points to customize your racing experience:
- Steering Wheel Height: The steering wheel bracket can be adjusted within a 0-35mm range to suit your arm length and comfort.
- Pedal Angle: The pedal plate allows for angle adjustments between 0° and 15° for optimal foot positioning.
- Seat Recline: The integrated seat supports a full 180° adjustment, allowing you to switch between various racing postures, including Standard GT and Formula Dual modes.
- Shifter Position: The shifter mount can be positioned on either the left or right side of the stand, depending on your preference.

Image: Visual representation of various adjustable components and seating postures (Standard GT, Formula Dual).
7. Maintenance
- Cleaning: Wipe down the carbon steel frame and fabric with a damp cloth. Avoid harsh chemicals that may damage the finish or fabric.
- Inspection: Periodically check all bolts and connections for tightness. Re-tighten if necessary to maintain stability.
- Storage: When not in use, the stand can be easily folded without disassembly for compact storage. Rotate the locking mechanisms to fold the unit. Store in a dry place away from extreme temperatures.

Image: Illustration of the racing wheel stand in unfolded and folded states, demonstrating compact storage.
8. Troubleshooting
- Stand feels wobbly: Ensure all assembly bolts are fully tightened. Check that the stand is placed on a flat, stable surface.
- Difficulty adjusting components: Make sure any locking mechanisms or quick-release levers are disengaged before attempting to adjust the steering wheel, pedals, or seat.
- Peripherals (wheel, pedals, shifter) don't fit: Verify that your specific peripheral model is compatible with the pre-drilled patterns on the stand. Some older or niche models may require custom adapters (not included).
9. User Tips
- Check all hardware: When assembling, double-check that all necessary screws and mounting hardware for your specific pedal set are included and used correctly to ensure a secure fit.
- Optimize for comfort: Take the time to experiment with all the adjustment options (steering wheel height, pedal angle, seat recline, shifter position) to find your most comfortable and ergonomic racing posture for extended gaming sessions. The upgraded lumbar support is designed for long-lasting comfort.
- Ensure stability: The carbon steel frame is designed for stability. Always ensure the stand is fully assembled and all connections are tight to prevent any movement during intense gameplay, providing a 'zero wobble' experience.
10. Warranty and Support
For warranty information, technical support, or any questions regarding your VEVOR Racing Wheel Stand, please contact the seller or manufacturer directly. Keep your purchase receipt as proof of purchase.


