ZENDURE Hub 2000 Solar Flow Smart PV Hub User Manual

DISCLAIMER
Read all safety guidelines, warnings and other product information in this manual carefully, and read any labels or stickers attached to the product before using. Users take full responsibility for the safe usage and operation of this product. Familiarize yourself with relevant regulations in your area. You are solely responsible for being aware of all relevant regulations and using Zendure products in a way that is compliant.
Keep this manual for future reference.
Before You Begin
The information contained herein is subject to change without notice.
For the latest version, please visit :
https://zendure.com/pages/download-center.
Specifications
SolarFlow system include Hub 2000 and Add-on battery AB1000 or AB2000 or SuperBase V. SolarFlow and Microinverter constitute a small grid-connected PV energy storage system, which aims to help users to save electricity bills.
This product cannot be used during power outages.


Hub 2000 controller doesn’t include a battery pack, and the battery needs to be purchased separately. For more information about battery AB1000 or AB2000 or SuperBase V, please check the user manual of AB1000 or AB2000 or SuperBase V.
* This charging power can be upgraded to 960W with a firmware version upgrade.
SAFETY INSTRUCTION
Usage
- Please check whether SolarFlow is damaged, cracked, liquid leakage, heat or other abnormalities or cables are damaged before operating. If any, please stop using the product immediately and contact our customer service.
- Keep a distance of 50mm between Hub 2000 and other objects.
- During the operation of the solar energy system, avoid direct sunlight to prevent the SolarFlow system from overheating. Do not place the SolarFlow near any heat source.
- Do not use around strong static electricity or magnetic fields.
- It is prohibited to place the equipment in an environment with flammable, explosive gas, or smoke. Since SolarFlow relies on the shell to dissipate heat, over-temperature of the shell will lead to damage.
- Do not attempt to replace the internal components of the equipment by any unauthorized personnel.
- Please install the product according to our user manual to avoid damage to the product or injury to other people.
- Ensure before finishing installation, the solar cable, the Microinverter cable to home grid are disconnected.
- Ensure that Hub 2000 and Microinverter are installed firmly to avoid accidents and product damage caused by dropping.
- SolarFlow has a protection level of IP65, so the product cannot be immersed in liquids. If the product accidentally falls into water during use, please place it in a safe and open area and keep it away until it is completely dry. The dried product should not be used again and should be properly disposed of according to the disposal guidelines in this manual.
- Please ensure proper ventilation while in use, inadequate ventilation may cause permanent damage to the equipment.
- Do not place anything on the top of SolarFlow, please install it where people cannot touch it.
- Do not move or shake the unit while operating as vibrations and sudden impacts may lead to poor connections to the hardware inside.
- Case of fire, only a dry powder fire extinguisher is suitable for the product.
- Only clean the ports with a dry cloth.
- Keep out of reach of children and pets.
- For safety purposes, please use only the original charger and cables designed for the equipment. We are not liable for damage caused by third-party equipment and may render your warranty invalid.
FCC STATEMENT
This device complies with Part 15 of the FCC Rules. Operation is subject to the following two conditions:
(1) This device may not cause harmful interference,and
(2) This device must accept any interference received, including interference that may cause undesired operation.
any Changes or modifications not expressly approved by the party responsible for compliance could void the user’s authority to operate the equipment.
NOTE:
This equipment has been tested and found to comply with the limits for a Class B digital device, pursuant to Part 15 of the FCC Rules. These limits are designed to provide reasonable protection against harmful interference in a residential installation. This equipment generates uses and can radiate radio frequency energy and, if not installed and used in accordance with the instructions, may cause harmful interference to radio communications. However, there is no guarantee that interference will not occur in a particular installation. If this equipment does cause harmful interference to radio or television reception, which can be determined by turning the equipment off and on, the user is encouraged to try to correct the interference by one or more of the following measures:
Reorient or relocate the receiving antenna.
Increase the separation between the equipment and receiver.
Connect the equipment into an outlet on a circuit different from that to which the receiver is connected.
Consult the dealer or an experienced radio/TV technician for help.
FCC Radiation Exposure Statement
This equipment complies with FCC radiation exposure limits set forth for an uncontrolled environment. This equipment should be installed and operated with minimum distance 20cm between the radiator & your body.
EC DECLARATION OF CONFORMITY
ZENDURE TECHNOLOGY CO., LIMITED declares that the SolarFlow product (Hub 2000) complies with directive 2014/53/EU (RED) , 2011/65/EU(RoHS) , 2015/863/EU(RoHS) .
The full text of the Declaration of Conformity is available at the following web address : https://zendure.de/pages/download-center
![]() Declaration of conformity
Declaration of conformity
The EU Declaration of Conformity can be requested at the address: https://zendure.de/pages/download-center
![]() Disposal
Disposal
Disposal of packaging. Dispose of the packaging separately by type. Dispose of cardboard and paper in the waste paper collection. Foils for recycling collection.
![]() Dispose of old equipment (applies in the European Union and other European countries with separate collection (waste collection)) Old equipment must not be disposed of in household waste! Every consumer is legally obliged to dispose of old equipment that can no longer be used separately from household waste, for example at a collection point for recyclables.
Dispose of old equipment (applies in the European Union and other European countries with separate collection (waste collection)) Old equipment must not be disposed of in household waste! Every consumer is legally obliged to dispose of old equipment that can no longer be used separately from household waste, for example at a collection point for recyclables.
To ensure proper recycling and avoid negative impact on the environment, electronic devices must be taken to a collection point in their community or district. For this reason, electronic devices are marked with the symbol shown here.
Important Tips
![]() The solar PV system is grid-tied. Please check if it is allowed in your area. Depending on the region,of ficial approval may be required before or after installation.
The solar PV system is grid-tied. Please check if it is allowed in your area. Depending on the region,of ficial approval may be required before or after installation.
![]() Hub 2000 and AB1000 should be protected from direct sunlight to prevent rapid temperature increase.
Hub 2000 and AB1000 should be protected from direct sunlight to prevent rapid temperature increase.
![]() Please check the accessories before installation, some accessories need to be purchased separately.
Please check the accessories before installation, some accessories need to be purchased separately.
![]() After the installation, please first download the Zendure App to check electricity produced and set the power to the Microinverter.
After the installation, please first download the Zendure App to check electricity produced and set the power to the Microinverter.
![]() After SolarFlow installation, it will take about 5 minutes before it can be connected to the grid, and the data will be synchronized to the Zendure App within 20 minutes.
After SolarFlow installation, it will take about 5 minutes before it can be connected to the grid, and the data will be synchronized to the Zendure App within 20 minutes.
![]() Before setting the output to Microinverter, please confirm the rated power of your Microinverter, the output to Microinverter should not be greater than the rated power of your Microinverter.
Before setting the output to Microinverter, please confirm the rated power of your Microinverter, the output to Microinverter should not be greater than the rated power of your Microinverter.
![]() Please turn off the device (press and hold IOT Button for 6s to shut off SolarFlow. If battery is SuperBase V and still working , then also hold its Power Button for 3s to switch it off .) for removing or installing battery .
Please turn off the device (press and hold IOT Button for 6s to shut off SolarFlow. If battery is SuperBase V and still working , then also hold its Power Button for 3s to switch it off .) for removing or installing battery .
Getting Started
What’s in The Box

Product Overview
Button:

- TOP
- PV Input 1 positive electrode
- PV Input 1 negative electrode
- PV Input 2 positive electrode
- PV Input 2 negative electrode
- Aerial
- Hub Status Indicator
- IoT Button & Indicator
- Battery Status Indicator
- Microinverter Output positive electrode
- Microinverter Output negative electrode

- Bottom
- Aerial Port
- Battery Port
IoT Connection: After Hub 2000 is powered on, the IoT indicator starts to flash rapidly, and the device automatically enters the IoT connection. Users can directly connect to IoT on Zendure App.
Tips:
- After the device is bound to Zendure Apps, when SolarFlow is turned on again, the IoT indicator light flashes slowly until it can communicate with the Zendure App.
- If you want to re-bind the account and reset the IoT connection, please press and hold the IoT button for 3 seconds to start the IoT connection.
- Hub 2000 & AB1000o r AB2000 or SuperBase V Hardware Reset:Press and hold the IoT button 10 seconds to reset Hub 2000 & AB1000 or AB2000 or SuperBase V .
Tips:
- Both Solar panels and AB1000 or AB2000 or SuperBase V power supply can wake up Hub 2000.
- If the Hub 2000 is connected to a SuperBase V, it is recommended that you include at least one Solar Panel in your system, connected to the battery using a Solar Connector to XT-90 Cable. This will allow the battery to “wake up” even if its energy is completely drained, as long as there is some power coming in from the solar panel.
If the battery completely drained, please follow the steps below to reactivate it.
If there is input power available, press the Power Button for 1 second on the battery to initiate charging.
If there is no input power available, you will need to supply the battery with AC power first. - To protect the battery, AB1000 or AB2000 will be turned off at the factory, so please activate the battery by turning on SolarFlow for the first time (press and hold the IoT button for 2 seconds).
- Before unplugging a connection, please turn off SolarFlow .
Operation Guidelines:
Tips:
The working process of SolarFlow as follows:
First the Hub 2000 pwered on, then it will enter the working state (the Hub 2000 indicator will lit green), second the IoT function will be awakened, and the device will directly enter Wi-Fi connecting state (the IoT indicator flashes green), and finally, the Hub 2000 will send a signal to activate AB1000 or AB2000 (the AB1000 or AB2000 indicator flashes green for 2 seconds before entering a steady state).
If you’re using a SuperBase V, please follow the steps below to power up your Hub 2000 and establish the IOT connection.
- Press and hold the SuperBase V Power Button for 1 second to turn it on.
- Open the Zendure App, then press and hold the IOT Button on your SuperBase V for 3 seconds.
- In the app, turn on the Parallel Switch to provide power to the Hub 2000.
- Press and hold the IOT Button of your Hub 2000 for 3 seconds to finish making the connection.
Operation Guidelines:


Tips:
- Choose one of bluetooth or Wi-Fi on Zendure App, Wi-Fi is preferred .
- When your Hub 2000 is connected to either a SuperBase V, and power is being supplied to the solar input, your Hub 2000 will automatically turn on. If no battery is connected within 5 minutes, the Hub 2000 will initially switch to bypass mode and direct power to the micro-inverter (at a default output of 200W, determined in the Zendure App). However, if a SuperBase V is connected within this 5-minute window, the SolarFlow will continue to operate in its default mode.
If your Hub 2000 is connected to a SuperBase V, and it’s still receiving solar input power after being turned off, it will turn itself back on after 10 minutes and operate in bypass mode, directing power to the micro-invertor at a default of 200W (determined in the Zendure App).
If your Hub 2000 loses its Wi-Fi connection while receiving solar power, it will automatically switch to bypass mode and output power to the micro-inverter at a default of 200W (determined by the Zendure App).
Installation
- If you wish to verify and commission your solar system immediately, complete the installation when the weather is sunny.
- It is recommended that at least two people participate in the installation.
- Please remember whether connecting or disconnecting Hub 2000 with AB1000 or AB2000 or SuperBase V , solar panels or Microinverters.make sure SolarFlow is turned off by ways of below .
- Press and hold IOT Button for 6s to shut off SolarFlow.
If battery is SuperBase V and still working , then also hold its Power Button for 3s to switch it off .
Installation Steps Overview
A. Disconnect the solar panel,Microinverter and the home grid
B. Install Hub 2000
C. Install Smart Microinverter
D. Find a place to stack AB1000or AB2000 or SuperBase V .
E. Connect the top one AB1000 or AB2000 or SuperBase V to the Hub 2000
F. Connect the Microinverter to home grid
G. Connect the solar panels to the Hub 2000
H. Scan the QR code and download the Zendure app. Follow the instructions of the app to set up device.After 20 minutes, you will get the SolarFlow power storage system’s data on your Zendure app.
Tips:
According to the government’s regulations and to ensure safety, the Microinverter can only start working after connecting to a powered grid for 5 minutes. To improve the accuracy of the data, the system will verify and validate it for 15 minutes before showing it on the app.
Installation Tools
Before installation, please check all accessories and prepare the following tools (tools are not included in the purchase )

Disconnection
Tips:The method of disassembly is subject to the instructions of the Microinverter, and please confirm the warranty terms of the microinverse before disassembly.
If you have installed the balcony solar system, you need to disconnect it according to the following steps:

- Unplug the cables of the Microinverter and the home grid.
- Only unplug the cables of the first solar panel and the Microinverter.
Tips: The installation of the solar panel does not need to be moved unless you want to change the location. - The same way to unplug the cables of the second solar panel and the Microinverter.
- Unscrew the mounting screws of the Microinverter, remove the Microinverter fixed on the solar panel or metal bracket.
Tips: Ensure that the state after disconnection is as shown in following figure.

Install Hub 2000
Tips:
- Please install the Hub 2000 in a place out of direct sunlight.
- The length of our solar cables are 3 meter(need to be purchased additionally), so before confirming the location of the Hub 2000’s installation, please measure the distance from Solar connector of solar panel to Solar connector of Hub 2000.
- The Hub 2000 does not come with a Wi-Fi antenna installed. Please install the Wi-Fi antenna on the Smart PVHub before mounting it on the wall.

- Mark Location, Find a wall you plan to install, one person fixes the Hub 2000 on the wall with his hands, and the other person marks the positions of the four screw holes of the Hub 2000 with a marker.
- Drilling,drill four diameter 8mm mounting holes at the four marked positions.
- Installing screws,first Respectively Install the yellow plastic expansion screw tube into the 4 holes which step 3 drilling,then screw 2/3 of the 1 & 2 screws into the yellow plastic expansion tube.
- Hang Hub 2000, please hang the Hub 2000 on exposed part of the screw 1 & 2 .
- One person fixes the Hub 2000 with both hands, and the other one screws the rest of 1 & 2 screw into the wall completely.
- Install another two screws, screw 3 and 4 into the yellow plastic expansion tube and completely into the wall.In this way, you have completed the installation of Hub 2000.
Install Microinverter
The method of assembly is subject to the instructions of the Microinverter.Tips:
- In order to less connections, it is recommended that Microinverter is installed between Hub 2000 and home socket, close to the PV Hub.
- Ensure a distance of at least 50mm between the Hub 2000 and the Microinverter to dissipate heat.

- Mark Location, Find a position next to Hub 2000, one person fixes the Microinverter on the wall with his hands, and the other person marks the positions of the two screw holes of the Microinverter with a marker.
- Drilling,drill two diameter 8mm mounting holes at the two marked positions.
- Installing yellow plastic expansion tube of screws, Respectively Install the yellow plastic expansion screw tube into the two holes which step 2 drilling.
- Installing Microinverter, One person fixes the Microinverter with both hands on the wall and align the hole drilling in step 2, then put the flat Washers on the screws,at last screw 1 & 2 screws with flat Washer into the yellow plastic expansion tube .
- Tighten the screws,screws the rest of 1 & 2 screw into the wall completely.Then you also have completed the installation of Microinverter.
Stack AB1000 or AB2000
Before stacking AB1000 or AB2000, please pay attention to the note on the top of AB1000 or AB2000.

- Remove the plastic protective covers on the connection port ,then please align the left side first.
- Slowly insert the battery connection port.
Tips:The Hub 2000 can only be connected to a SuperBase V without a Satellite Battery, Multiple batteries are not supported.
Connect with Cables
Tips:Before connecting cable, please make sure that the product is turned off. Press and hold IOT Button for 6s to shut off SolarFlow.
If battery is SuperBase V and still working , then also hold its Power Button for 3s to switch it off .
Cable Connection For 1-in-1 Microinverter

- Connect AB1000 or AB2000 or SuperBase V to Hub 2000 with the battery cable,The terminals of battery cable can be self-locking, when you hear a click, you have inserted the battery cable well.(Be sure to tighten the connector screws for a secure connection to your SuperBase V.)
- Connect Hub 2000 to Microinverter with Microinverter cable.
- Connect the Microinverter to the home socket with your original cable.
- Connect the solar panel to Hub 2000.
Tips: You must connect AB1000 or AB2000 or SuperBase V first and then connect the solar panels.
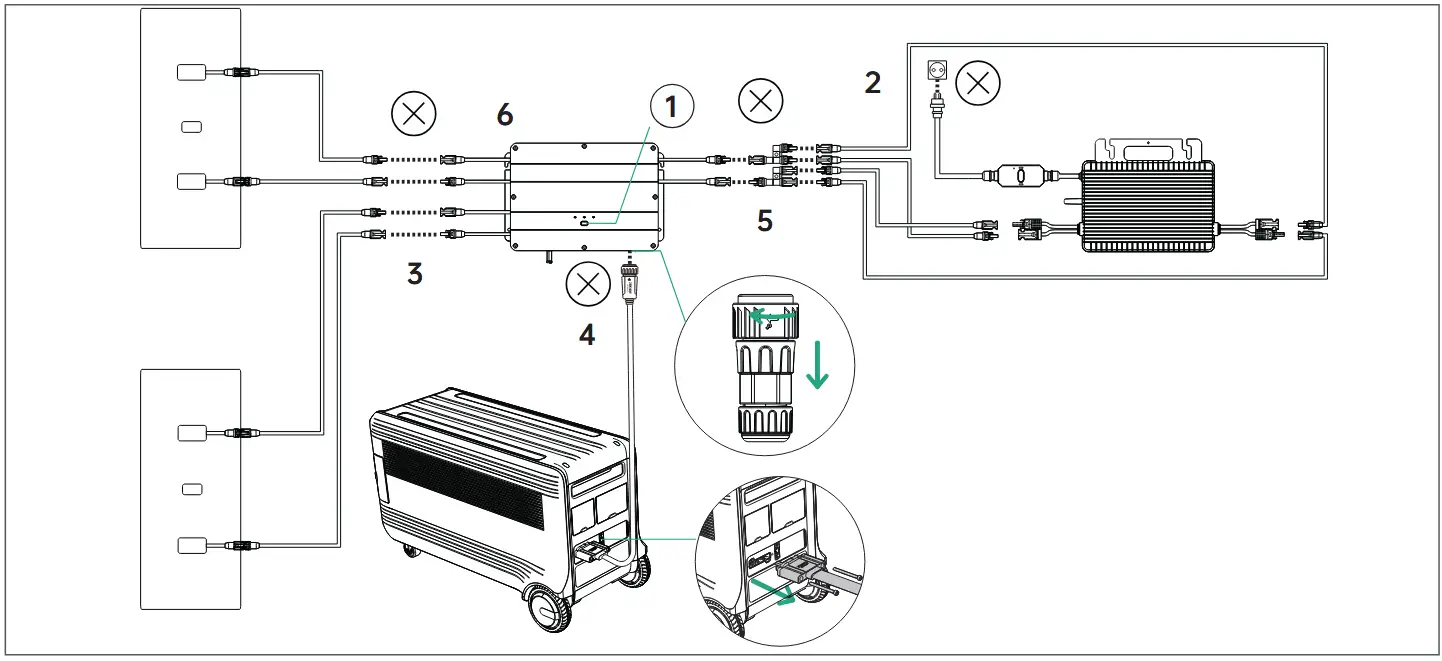
Cable Connection For 2-in-1 Microinverter

Cable Connection For SuperBase V

Cable Connection For Four Solar Panels


- Connect the Hub 2000 to up to four solar panels using two Solar Parallel Y Cables*.
- Please ensure that when connecting two solar panels in parallel, they are connected to the same PV input port. Do not connect the positive and negative terminals of the parallel-connected solar panels to the PV1 and PV2 ports separately, as this may cause the equipment to malfunction or become damaged.
- please ensure that the total operating current to each PV input port from the parallel solar panels does not exceed 26A to avoid potential overcurrent that may cause malfunction.
* The 2-to-4 Solar Parallel Y Cable needs to be purchased from Zendure official website
* We are not liable for any damages resulting from improper connections.
Tips:
- You must connect AB1000 or AB2000 or SuperBase V first and then connect the solar panels.
- After completing the connection, please turn on SolarFlow
1) If battery is AB1000 or AB2000 , then press the IOT button for 2 seconds to turn on .
2) If battery is SuperBase V , then press the power button for 1 seconds to turn on the Battery , open the App , press and hold the IOT button of battery for 3 seconds to finish pairing , finally , turn on the Parallel Switch to provide power to the Hub 2000
Download the Zendure app
The Zendure App gives users the ability to allocate the power to AB1000 or AB2000 or SuperBase V and home grid and monitor power generation,the power to Microinverter can be set in a range of 100-1200W.
Read the Zendure App user guide and access the download link here: https:// zendure.com/pages/download-center.
Privacy Policy
By using Zendure Products, Applications and Services, you consent to the Zendure Terms of Use and Privacy Policy, which you can access via the “About” section of the “User” page in the Zendure App

https://app.zendure.com/download/
* Add device and Update to the latest firmware version
Using the device for the first time, you need to update the firmware via the Zendure App.More information ,please check the Zendure App user guide.
* Set the power to the Microinverter
The maximum solar input power of SolarFlow system is 800W, you can set the power to Microinverter, and the excess power will be automatic stored in the battery.For example:
If the total solar input is 800W ,you set 200W to Microinverter, and then there will be 600W input AB1000 or AB2000 or SuperBase V.

Tips:
- It takes a period of time for the system to grid connection, and it takes about 20 minutes to synchronize data to Zendure App, so after the installation, please wait 20 minutes before going to the APP settings.
- It is recommended that you as much as possible store in the battery during the day except for basic power consumption.The way to know the basic power consumption as follow:
- Calculated the device consumption you always run during the day or 24 hours a day, such as refrigerators, routers and standby devices.
- Go to the meter box right before you go to bed, write down your current meter reading and the time. As soon as you get up, you write down the meter reading and the time. You can calculate your base load from consumption and elapsed time.
- You can use a measuring socket that you plug between the socket and the power consumer. To calculate the base load, you collect the wattage consumed from all the devices that are constantly running (including standby) and add up the values.
Disconnection of SolarFlow
Tips:
Before disconnecting, please turn off SolarFlow
Press and hold IOT Button for 6s to shut off SolarFlow.
If battery is SuperBase V and still working , then also hold its Power Button for 3s to switch it off .

- First turn off SolarFlow . Press and hold IOT Button for 6s to shut off SolarFlow.
If battery is SuperBase V , then also hold its Power Button for 6s to switch it off . - Disconnection of home grid,un plug the cables of Microinverter and home shuko.
- Disconnection of solar panels,unplug the cables of the two solar panels and Hub 2000.
- Disconnection of AB1000 or AB2000 or SuperBase V ,Unplug the cables of Hub 2000 and AB1000 or AB2000 or SuperBase V.
- Disconnection of m Microinverter,unplug the cables of Microinverter and Hub 2000.
- Unscrew the mounting screws of Hub 2000 and Microinverter, remove Hub 2000 and Microinverter from the wall.
Tips: During the disassembly, please pay attention to storing and keeping all the parts for re-installation.
Scan the QR code to access the complete user manual.

https://zendure.com/pages/zendure-download-center
Please scan the QR code to visit the Zendure Help Center or claim the product warranty.

https://zendure.com/pages/zendure-global-warranty
Zendure USA Inc.
ZENDURE TECHNOLOGY CO., LIMITED
Hours: Mon – Fri 9:00 – 17:00
Phone: 001-800-991-6148 (US)
0049-800-627-3067 (DE)
Support / Contact:
https://zendure.de/pages/contact
https://eu.zendure.com/pages/contact-us
https://zendure.com/pages/contact
Website:
https://zendure.de
https://eu.zendure.com
https://zendure.com
![]()
Manufacturer: Zendure Technology Co.,Limited
Address: Office 92, 15th Floor, Lee Garden Two, 28 Yun Ping Road, Causeway Bay, Hong Kong
© 2025 Zendure USA Inc.All Rights Reserved.Printed on recycled materials. Made in China
![]() EU Importer: Zendure DE GmbH
EU Importer: Zendure DE GmbH
Address: Rheinallee 1,40549 Düsseldorf
E-mail: support@zendure.com
Phone: 0049-800-627-3067
Documents / Resources
 |
ZENDURE Hub 2000 Solar Flow Smart PV Hub [pdf] User Manual Hub 2000 Solar Flow Smart PV Hub, Hub 2000, Solar Flow Smart PV Hub, Flow Smart PV Hub, Smart PV Hub, PV Hub |