Westcom Atlas Exp Digital Wireless Intercom
Certification
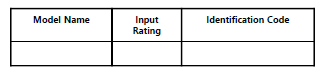
- Identification Code: Shown below Company Name:
- Manufacturer/Country:
- Date of manufacturing: Marked Separately
- Model Name: Shown Below Input Rating: Shown Below Date of Manufacture: Separately Shown
Caution
- Do not put sharp, hard materials into the connector hole when using this product.
- Do not put apart or repair “Atlas EXP” yourself.
- Do not leave Atlas EXP in a vehicle in hot or cold weather.
- Leaving “Atlas EXP” in a closed area for a long period of time may result in the deformation or malfunction of this product.
- For charging use only the provided charger & cable. Using a third-party charger may cause an explosion, fire or malfunction.
- Stop using “Atlas EXP” immediately if you smell something like smoke from this.
- Stop using “Atlas EXP” immediately when exposed to the risk of fire and call the customer center and consult if you can use “Atlas EXP“ at the environment.
- Please do not use third-party components.
- If you use a third-party component, it could cause a breakdown or malfunction.
- Be careful not to apply strong pressure on this product, which may cause breakdown or damage to the product.
- If dirt slips in, the quality could decline, so make sure to clean the product with soft cloth often.
- If “Atlas EXP” submerges underwater, don’t put it apart or repair it yourself. Please turn the power off and call our customer service center.
Introduction
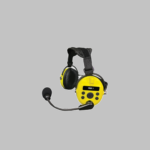
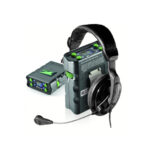
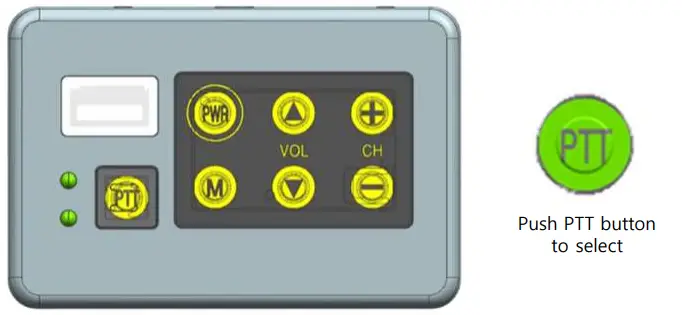
Product Image
FRONT
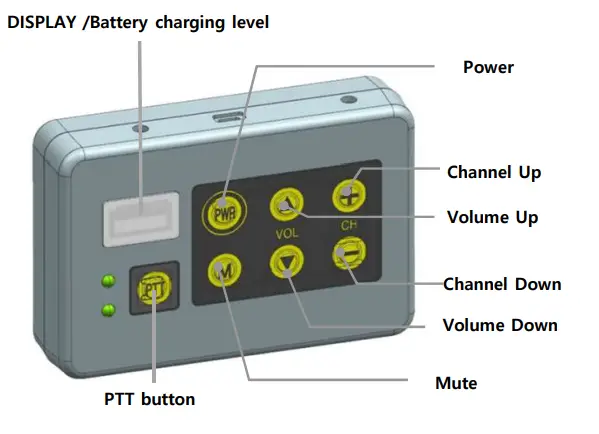
TOP
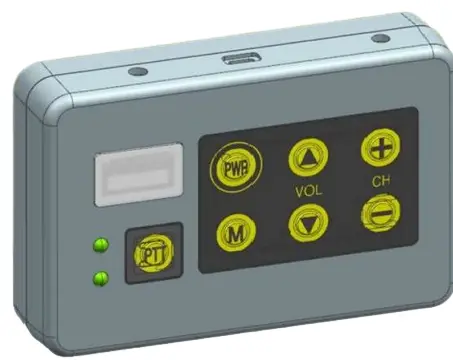
Function
- Power
Power on, and off with the PWR button
- 2. Current Setting Display
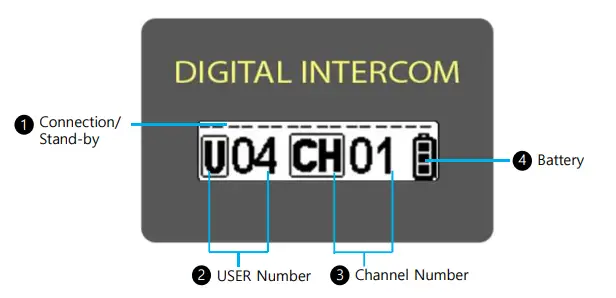
- Connection/Stand-By: Twelve bars on the upper display show connection
 or stand-by
  .
. - User Number: it shows the user number that your device is set to.
- Channel:
 means the current channel number that your device is set to. If you are a master device, is
  displayed.
 - Battery: It indicates the urrent battery level. When a battery is running low, the battery ICON is blinking.
- Connection/Stand-By: Twelve bars on the upper display show connection

Note
- If device is left in standby mode for half hour, it is automatically turned off for power-saving.
- Standby status means the device is ready for pairing (No connection)
Volume Setting
Volume level ranges from 0 to 8.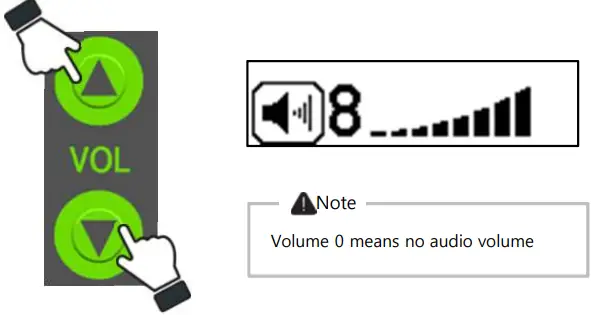
User Number Setting
User Number ranges from User 1 to User 16. Each device takes one user number, and user numbers for devices should be different from one another
STEP 1
Press&hold button to go to Menu and then choose “9. User”.

STEP 2
Choose between “User 1” and “User 12”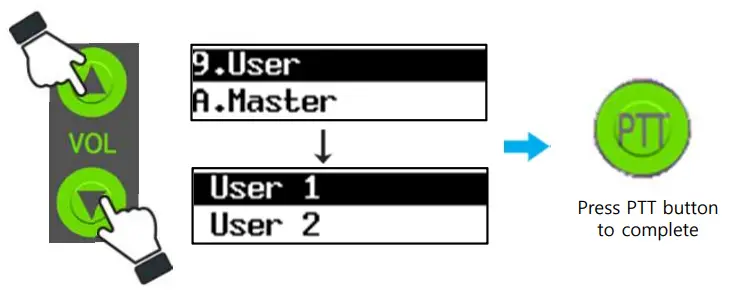
Note
- There should be one Master Device for group communication.
- Press&hold PTT button for transmission in “PA mode”.
Channel Setting
Devices should be set to same channel number for communication. If there are multiple communication groups in the same channel nearby, set channel number different from other groups to avoid potential interference
STEP 1
Choose between “Channel 1” and “Channel 6”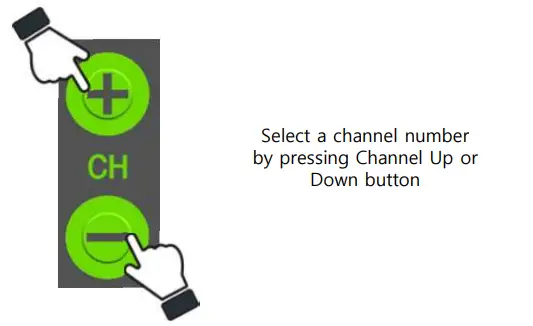
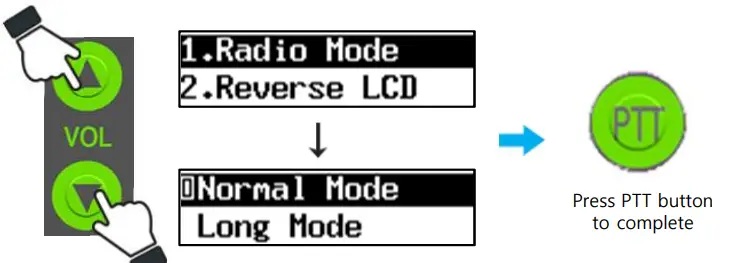
Radio Mode Setting
It can be used by selecting from Normal Mode, Long Mode and Repeat Mode.
- Normal Mode: Max. 16 User – Default mode
- Long Mode: Max. 12 User – Maximum distance mode
- Repeat Mode: Max. 16 User – Repeater mode

STEP 2
Choose Between Normal, Long, Repeat
Pairing (Grouping)
Below pairing procedure should be done to establish communication group
STEP 1
Pairing is made between a master device and the rest devices. Each device needs to be set to a different user number than the others
STEP 2
Press&hold the ‘M’ button to go to Menu and then select “6. Pairing”.

STEP 3
Once pairing is done, paired devices go to the stand-by display. If you press the ‘M’ button while pairing is being processed, the pairing is canceled and these devices go to the stand-by display
Note
Pairing is canceled if not done within 60 seconds.
Reverse LCD
Display Image
STEP 1
Press&hold button to go to the menu and then select“ 2. Reverse LCD”

STEP 2
Choose between “Normal” and “Reverse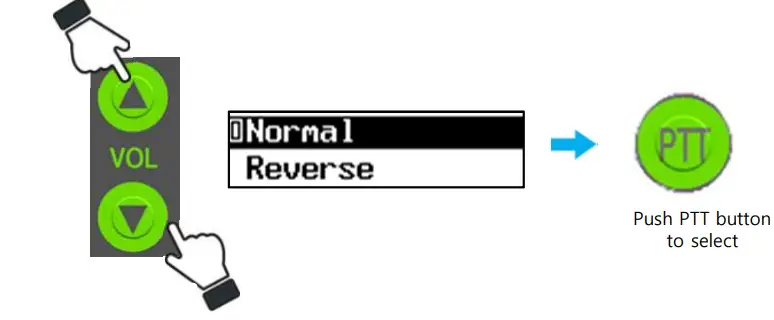
Beep Tone
You can turn on or off the warning sound and button sound depending on the user’s preference
STEP 1
Press&hold button to go to the menu and select “ 3. Beep Tone

STEP 2
Choose between “Enable” and “Disable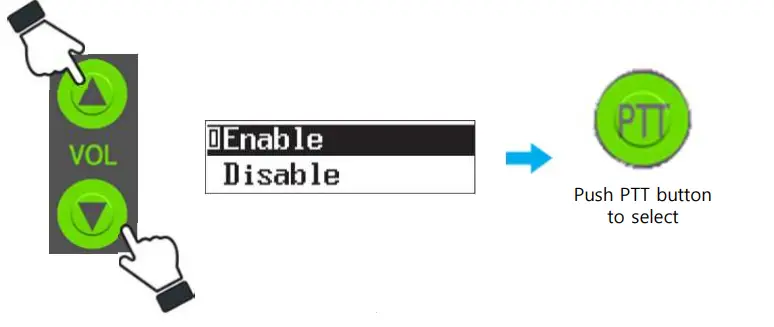
Display Brightness Setting
You can adjust the display brightness level.
STEP 1
Press&hold button to go to the menu and then select “ 4. Brightness

STEP 2
Choose between “0” and “8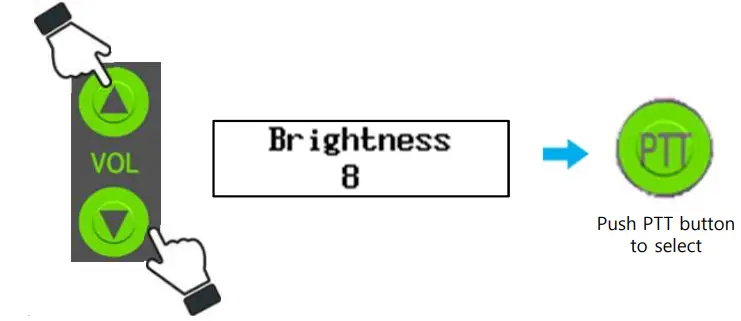
Mic Level
You can adjust the Microphone Volume level. With this function, your voice transmission is clearer if you set it right, depending on your voice level.
STEP 1
Press&hold button to go to the menu and then select “ 5. Mic Level ”

STEP 2
Choose between “0” and “8” (The higher number you choose, the higher the microphone volume it transmits) “Mic Level” 0 means the microphone is muteSTEP 1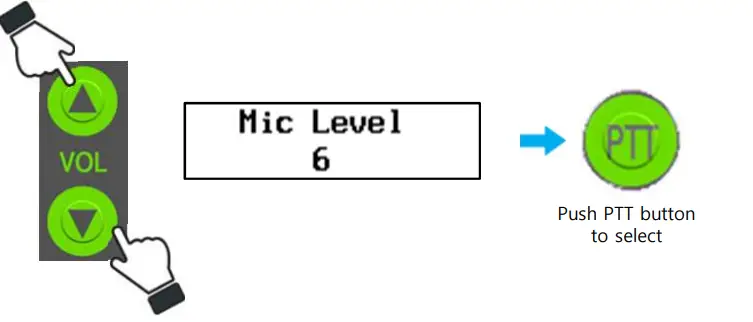 Information
You can check the device’s version
STEP 1
Press&hold button to go to menu and then select “ B.Informa

PA Mode (PTT Button)
Users 1-12 can use PA mode by using below PTT button.
Mic Mute
User 1~12 can mute the microphone by pressing the ‘M’ button shortly. Users only listen if they mute microphone

Side Tone
You can turn on or off Side Tone function. If you turn on the Side Tone, you can hear what you are saying at real-time
How to reset in case of malfunction
 Note
Note
Be careful not to press these buttons together during normal operation
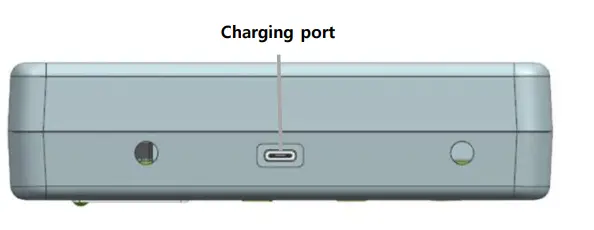
How to charge
While on a charge, green light on the lower display lights up and the green light becomes dimmer once the device is fully charged.
Note
- Please use only the provided charging adapter or use 5V / 2A adapter or higher than that.
- The battery level indication while on charge could be different from the actual battery level.
- We don’t recommend charging a device with power on. If you leave a device charged with power on for one day, it could self-discharge. (When this happens, please make sure to re-charge it) Please make sure to turn off the device before charging it to get it fully charged
Accessories

FAQ
Following is the list of frequent questions and answer
- I can’t communicate with other devices.
- Check if your device is paired with Master Device.
- In your group, check if Master Device exists.
- I cannot join a group communication.
- Check if other users are connected on the display.
- Check if there is a Master Device in the group.
- You might be too far from Master Device to get the signal from it.
- I cannot turn on the device.
- Put your device to the charger for charging and then turn it on
- I lost connections sometimes.
- Check if other users are connected on the display.
- Check if someone is using the same user number as mind
- Other users’ voice sounds broken
- Check if the distance between the users is too far.
- Other users can barely hear my voice.
- Check if you set MIC level low.
- Check if the headset’ microphone is a little far from your mouth
Specification
| Frequency | 902MHz~928MHz |
| Transmission Distance | 1Km (Line of Sight) |
| Battery Lifetime | 10Hour |
| Battery | Rechargeable Li-ion 3.7V Battery |
| Transmission Output | 250mW / 1W |
| Weight | 190g |
|
Size |
Width(w) : 92mm Height(h) : 75.5mm Thickness(t) : 35mm |
| Working Temperature | -10/+50℃ |
| Modulation System | FSK |
| Transmission Method | TDMA |
- The function may change without notice for product improvement purpose.
- Transmission distance may vary depending on the surroundings’ obstacles and humidity
Caution I
Please make sure to read through the below safety requirements before using this product. If these are not followed well, incidents like fire or explosion may happen.
- DO NOT separate/modify the antenna or DO NOT use the modified antenna. It degrades the performance of the device, which results in serious breakdown as the intercom generates strong radio wave through the antenna.
- Only the provided charging adapter and headset are acceptable to use with this device, so DO NOT use a third-party adapter and headset. Otherwise, the battery will be damaged and there will be a malfunction of the device.
- Use this device only for communication (NOT for other purposes).
- Do not take apart or modify this device yourself. Otherwise, this could result in a malfunction which our warranty doesn’t cover. Also, you might be subject to a penalty according to a relevant communication law.
- Do not change the frequency or use other frequency than the allowed frequency. Otherwise, you might be subject to a penalty according to a relevant communication law.
- Try not to put strong physical shocking to this device.
- Keep it out of direct sunlight and high humidity.
- DO NOT leave the device in a car in the summer.
Warning
Our Westcom Wireless, Inc . radio generators RF electromagnetic energy during transmit mode. This radio is designed for and classified as “Occupational Use Only”, meaning it must be used only during the course of employment by individuals aware of the hazards, and the ways To Minimize Such hazards. This radio is NOT intended for use by the “General Population” in an uncontrolled environment. This radio has been tested and complies with the FCC RF exposure limits for “Occupational Use Only”. In addition, our Westcom Wireless, Inc . radio complies with the following Standards and Guidelines with regard to RF energy and electromagnetic energy levels and evaluation of such levels for exposure to humans:
- IEEE Std. 1528:2013 and KDB447498, Evaluating Compliance with FCC Guidelines for Human Exposure to Radio Frequency Electromagnetic Fields.
- American National Standards Institute (C95.1-1992), IEEE Standard for Safety Levels with Respect to Human Exposure to Radio Frequency Electromagnetic Fields, 3 kHz to 300 GHz.
- American National Standards Institute (C95.3-1992), IEEE Recommended Practice for the Measurement of Potentially Hazardous Electromagnetic Fields-RF and Microwave.
Warning
The information listed above provides the user with the information needed to make him or her aware of RF exposure, and what to do to assure that this radio operates with the FCC RF exposure limits of this radio. Electromagnetic Interference/Compatibility During transmissions, Westcom Wireless, Inc. radio generates RF energy that can possibly cause interference with other devices or systems. To avoid such interference, turn off the radio in areas where signs are posted to do so. DO NOT operate the transmitter in areas that are sensitive to electromagnetic radiation such as hospitals, aircraft, and blasting sites.
Occupational/Controlled Use
The radio transmitter is used in situations in which persons are exposed as consequence of their employment provided those persons are fully aware of the potential for exposure and can exercise control over their exposure.
This product is compliance to FCC RF Exposure requirements and refers to the FCC website https://apps.fcc.gov/oetcf/eas/reports/GenericSearch.cfm search for
FCC ID: 2AO37-ATASEXP to gain further information including SAR Values
FCC STATEMENT
FCC Compliance Information
This device complies with Part 15 of the FCC Rules. Operation is subject to the following two conditions: (1) This device may not cause harmful interference, and (2) this device must accept any interference received, including interference that may cause undesired\ operation. This device was tested in compliance with the FCC RF Exposure limit. (0 mm distance from human head/body (limit 8.0 W/kg @ 1g SAR) and extremity (limit 20 W/kg @ 10g SAR))
Caution
- Atlas EXP operates in the license-free 900MHz ISM band.
- Atlas EXP is subject to the Rules and Regulations of the FCC.
This device complies with part 15 of the FCC rules. Operation is subject to the following two conditions:
- This device may not cause harmful interference, and
- this device must accept any interference received, including interference that may cause undesired operation.
NOTE: THE GRANTEE IS NOT RESPONSIBLE FOR ANY CHANGES OR MODIFICATIONS NOT EXPRESSLY APPROVED BY THE PARTY RESPONSIBLE FOR COMPLIANCE. SUCH MODIFICA TIONS COULD VOID THE USER’S AUTHORITY TO OPERATE THE EQUIPMENT.
NOTE: This equipment has been tested and found to comply with the limits for a Class B digital device,
pursuant to part 15 of the FCC Rules. These limits are designed to provide reasonable protection against
harmful interference in a residential installation. This equipment generates uses and can radiate radio frequency energy and, if not installed and used in accordance with the instructions, may cause harmful interference to radio communications. However, there is no guarantee that interference will not occur in a particular installation. If this equipment does cause harmful interference to radio or television reception, which can be determined by turning the equipment off and on, the user is encouraged to try to correct the interference by one or more of the following measures:
- Reorient or relocate the receiving antenna.
- Increase the separation between the equipment and the receiver.
- Connect the equipment into an outlet on a circuit different from that to which the receiver is connected.
- Consult the dealer or an experienced radio/TV technician for help.
Documents / Resources
 |
Westcom Atlas Exp Digital Wireless Intercom [pdf] Instruction Manual 2AO37-ATLASEXP, 2AO37ATLASEXP, Atlas Exp Digital Wireless Intercom, Atlas Exp, Digital Wireless Intercom, Wireless Intercom, Intercom |