1. Thông tin an toàn quan trọng
Please read this manual carefully before using the Midea M9 Robot Vacuum Cleaner and retain it for future reference. Adhere to all safety warnings and instructions to prevent injury or damage.
- Trẻ em từ 8 tuổi trở lên và những người có khả năng thể chất, giác quan hoặc tinh thần hạn chế hoặc thiếu kinh nghiệm và kiến thức đều có thể sử dụng thiết bị này nếu họ được giám sát hoặc hướng dẫn sử dụng thiết bị một cách an toàn và hiểu được những mối nguy hiểm liên quan.
- Trẻ em cần được giám sát để đảm bảo chúng không nghịch thiết bị.
- Trẻ em không được phép tự ý vệ sinh và bảo trì nếu không có sự giám sát.
- Chỉ sử dụng bộ chuyển đổi nguồn chính hãng do nhà sản xuất cung cấp.
- Không sử dụng robot hút bụi ở môi trường ẩm ướt hoặc gần nước.
- Ensure the charging base is placed on a level surface against a wall, with clear space around it.
- Trước khi tiến hành vệ sinh, hãy loại bỏ mọi dây cáp lỏng lẻo, vật nhỏ hoặc đồ dễ vỡ khỏi khu vực cần vệ sinh.
2. Nội dung gói hàng
Verify that all items are present in the package. If any components are missing or damaged, contact customer support.
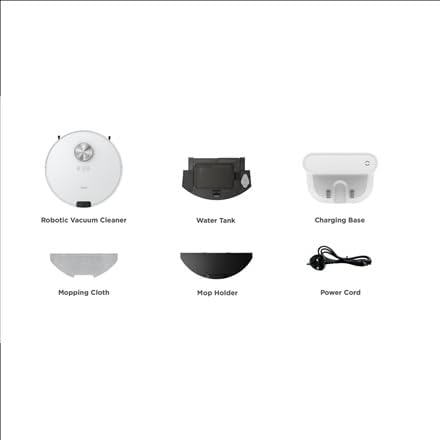
Hình ảnh: Quaview of the Midea M9 Robot Vacuum Cleaner's package contents. This image displays the main robotic vacuum cleaner unit, a water tank, a charging base, a mopping cloth, a mop holder, and a power cord.
- Robot hút bụi
- Bồn nước
- Đế sạc
- Vải lau
- Cây lau nhà
- Dây nguồn
3. Sản phẩm hếtview
3.1 Đầu View
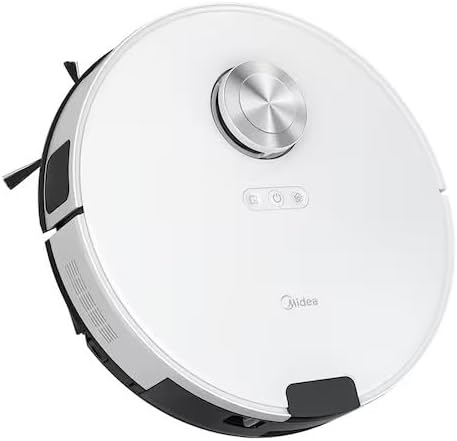
Hình ảnh: Đứng đầu view of the Midea M9 Robot Vacuum Cleaner. This image shows the circular design of the robot, with a central LiDAR navigation sensor tower, power button, and other control indicators on its surface.
The top of the Midea M9 features the LiDAR navigation sensor, which allows the robot to map your home and navigate efficiently. It also includes control buttons for starting/pausing cleaning and returning to the charging base.
3.2 Đáy View

Hình ảnh: Đáy view of the Midea M9 Robot Vacuum Cleaner. This image displays the two side brushes, the main rolling brush, the driving wheels, and the mopping pad attachment area.
The underside of the robot houses the main rolling brush, two side brushes for edge cleaning, driving wheels, and cliff sensors to prevent falls. The mopping pad attachment area is also visible.
4. Thiết lập
4.1 Vị trí đặt đế sạc
- Place the charging base against a wall on a hard, level surface.
- Ensure there is at least 0.5 meters (1.6 feet) of clear space on both sides of the charging base and 1.5 meters (4.9 feet) in front of it.
- Connect the power cord to the charging base and plug it into a power outlet.
4.2 Sạc ban đầu
- Place the robot vacuum onto the charging base, ensuring the charging contacts align.
- Allow the robot to charge completely before its first use. This typically takes 4-6 hours. The indicator light on the robot will change to indicate a full charge.
4.3 Kết nối ứng dụng (Tùy chọn)
- Download the Midea Smart app from your mobile device's app store.
- Follow the in-app instructions to connect your Midea M9 Robot Vacuum Cleaner to your home Wi-Fi network. This enables advanced features like remote control, scheduling, and cleaning mode selection.
5. Hướng dẫn vận hành
5.1 Bắt đầu/Dừng quá trình vệ sinh
- Để bắt đầu: Press the power button on the robot or use the Midea Smart app. The robot will begin cleaning in Auto mode.
- Để tạm dừng: Press the power button again during cleaning.
- To Stop/Return to Base: Press and hold the power button for a few seconds, or use the 'Return to Base' function in the app.
5.2 Chế độ làm sạch
The Midea M9 offers various cleaning modes:
- Chế độ tự động: Robot có khả năng di chuyển và dọn dẹp toàn bộ ngôi nhà của bạn một cách thông minh.
- Chế độ điểm: Cleans a specific area more intensely. Place the robot in the center of the dirty area and activate Spot mode via the app.
- Chế độ cạnh: The robot cleans along walls and furniture edges. Activate via the app.
5.3 Chức năng lau nhà
- Fill the water tank with clean water. Do not use detergents or cleaning solutions not approved by Midea.
- Attach the mopping cloth to the mop holder, then slide the mop holder with the cloth onto the water tank.
- Insert the assembled water tank and mop holder into the robot.
- The robot will automatically switch to mopping mode or combined vacuuming and mopping.
6. Bảo trì
Bảo trì thường xuyên đảm bảo hiệu suất tối ưu và kéo dài tuổi thọ cho robot hút bụi của bạn.
6.1 Vệ sinh thùng rác và bình chứa nước
- Đổ sạch thùng rác sau mỗi lần sử dụng.
- Rinse the dustbin and filter with water as needed, ensuring they are completely dry before reinstallation.
- Empty and clean the water tank after each mopping session to prevent mold and odors.
6.2 Vệ sinh bàn chải
- Cọ chính: Remove the main brush cover and lift out the brush. Use the cleaning tool to remove hair and debris. Clean weekly.
- Chổi bên: Check for tangled hair or debris. Remove and clean as needed. Replace if worn or damaged. Clean monthly.
6.3 Vệ sinh cảm biến
- Wipe the cliff sensors, wall sensors, and charging contacts with a clean, dry cloth monthly to ensure proper function.
KHAI THÁC. Xử lý sự cố
Nếu bạn gặp sự cố, hãy tham khảo các sự cố và giải pháp phổ biến sau:
| Vấn đề | Nguyên nhân có thể | Giải pháp |
|---|---|---|
| Robot không sạc | Charging contacts are dirty; Power adapter not connected; Robot not properly aligned with base. | Clean charging contacts; Ensure power adapter is plugged in; Realign robot on charging base. |
| Robot thường xuyên bị kẹt | Loose cables or small objects on the floor; Robot stuck on high thresholds. | Clear obstacles from cleaning path; Use virtual walls or no-go zones in the app. |
| Hiệu suất làm sạch kém | Thùng rác đầy; Chổi bị rối; Bộ lọc bị tắc. | Đổ hết bụi trong thùng chứa; Vệ sinh chổi chính và chổi phụ; Vệ sinh hoặc thay thế bộ lọc. |
| Robot không thể kết nối với Wi-Fi | Incorrect Wi-Fi password; Router too far; Only supports 2.4GHz Wi-Fi. | Verify password; Move robot closer to router; Ensure router is set to 2.4GHz. |
8. Thông số kỹ thuật
| Tính năng | Chi tiết |
|---|---|
| Thương hiệu | Midea |
| Tên mẫu | Midea M9 |
| Kích thước (D x R x C) | 32 x 32 x 10cm |
| Cân nặng | 4 Kilôgam |
| Tính năng đặc biệt | Smart mapping, Portable |
| Đề xuất bề mặt | Thảm |
9. Bảo hành và Hỗ trợ
For warranty information and technical support, please refer to the warranty card included with your product or visit the official Midea webtrang web. Giữ lại biên lai mua hàng làm bằng chứng mua hàng.


