VHS Multifunctional UHD Video Recorder User Manual

Customer Service:
Email: support@digitnow.us
Tel.1: +1 6264203418 (U.S.)
Mon.- Fri. 9:00-17:00(PST)
Tel.2: +1 6264203417 (U.S.)
Mon.- Fri. 17:00-24:00(PST)
148 s 8th ave city of industry CA91746
MADE IN CHINA
Quick start guide
- Insert micro SD card or USB flash drive (formats of NTFS/EX FAT/FAT 32, maximum capacity of 512G) into the device, connect HDMI signal source to HDMI IN port or AV to AV IN port, and long press“
 ” power button 2 seconds for power on. After the device is powered on, it enters into record mode. (For more details, see the page 6-7 of the user manual.)
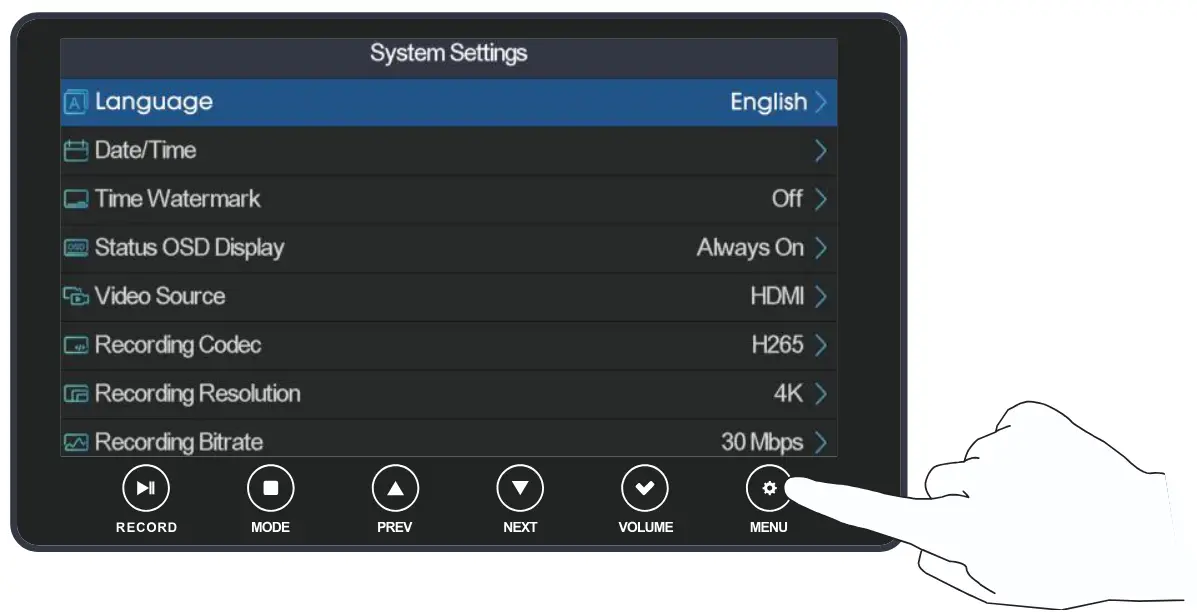
 - In record mode, set the properties for input source. Click the “
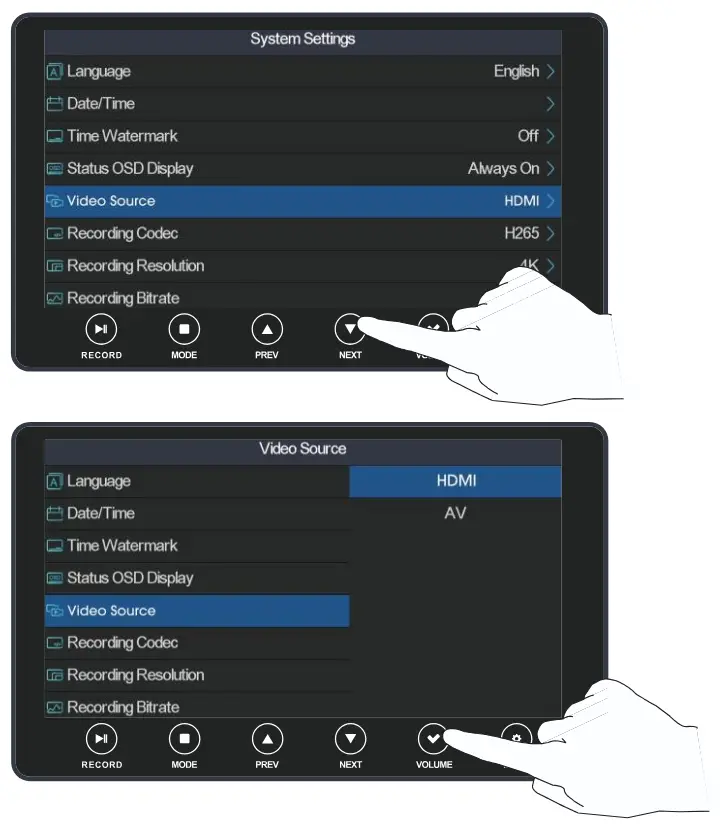
 ”MENU button to enter setting menu. Then, select the “video source” option by clicking the “
 ”NEXT button, and enter the option by clicking the “
 ” VOLUME button. Next, select HDMI input or AV input by clicking the “” NEXT button, and confirm the selection by clicking the “”VOLUME button. After that,exit the setting menu by clicking the “”MENU button. After video source selection, you will see the input source picture and hear the sound. (For more details, see the page 8 of the user manual.)
 - When nothing is wrong with the input video on the display, record video by clicking the“
 ”RECORD button, and in the top-left corner of the display status bar will show red recording time. Clicking the“ ”RECORD button again will stop recording and save the recorded video automatically at the same time.(For more details, see the page 10 of the user manual.)
 - To play back video recordings, click the“
 ”MODE button to switch into playback mode, and the screen will display recorded videos.Click the“” RECORD button to play video back and click again for a pause.Click the “”NEXT button to switch to next video, click the“
 ”PREV button to previous video, and click the “”MODE button to stop video playback. Clicking the“”MODE button again will exit from playback mode to record mode. (For more details, see the page 11-12 of the user manual.)
 - To adjust volume, click the“”VOLUME button. Then, clicking the “” PREV button will increase the volume and the“”NEXT button will decrease the volume. (For more details, see the page 13 of the user manual.)
- To output to a large-screen monitor, connect a HDMI cable to the HDMI OUT port of the device and the input port of the monitor, or connect a AV cable to the AV OUT port of the device and the input port of the monitor. (For more details, see the page 14 of the user manual.)
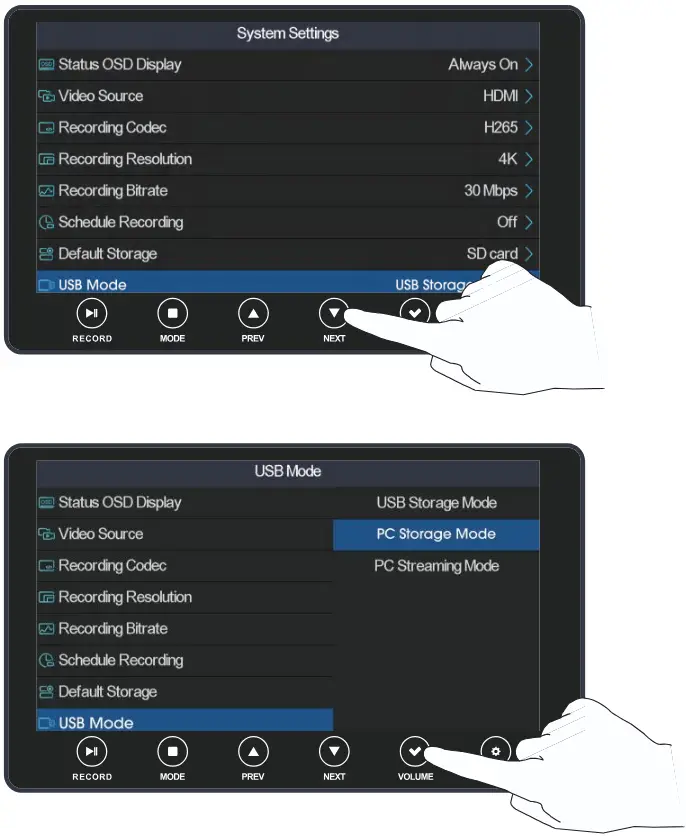
- To watch video recordings on a computer, connect the device to the computer using a USB cable. In record mode, click the“”MENU button to enter the setting menu. Then, select the “USB Mode” option by clicking the “”NEXT button and enter the option by clicking the“”VOLUME button. Next, select the “PC Storage Mode” option by clicking the“”NEXT button, and confirm the option by clicking the“”VOLUME button to enter PC storage mode.After that, a removable disk will be displayed for viewing on the computer. At last, exit the PC storage mode by clicking any button. (For more details, see the page 14-15 of the user manual.)
Thanks for purchasing Multifunctional UHD Video Recorder. With a large 5-inch OLED screen, user-friendly operation interface and rich video interfaces, the Multifunctional UHD Video Recorder can record and play 4K HD videos directly from AV ports or HDMI ports (such as set-top boxes,computers, game consoles, etc.) without computer operation.
The following guides you how to set up. Hope this device will bring you nice digital experience.
Safety Information
- Carefully read and follow the manufacturer’s instructions in this manual and save the manual for future reference.
- Clean with a dry cloth only.
- Do not use the product close to any heat source.
- Unplug the product from the wall socket during lightning storms or when it is not being used.
- Do not expose the product to moisture, as this poses a risk of fire or electrical shock.
- If the product is damaged, please refer all repairs to qualified personnel.
- For the greatest use experience, the device is recommended to be fully charged before use, due to low battery in first use.
- It takes about 3 hours for the battery to be fully charged.
- The device supports up to 512 GB USB flash drive/micro SD card, and supports formats of NTFS/EX FAT/FAT 32.
Features
- 5’’ large screen
- Touch button design
- Built-in speakers
- Built-in large-capacity battery
- Support up to 4K30HZ HD video signal input and output
- Support AV and HDMI HD video signal input and output
- Support up to 4K30HZ HD video signal record
- Support USB flash drive/Micro SD Card
- Support 3.5mm earphones and microphone
- Support 1080P60HZ PC streaming
- Support TYPE-C Recharging
Interface function:
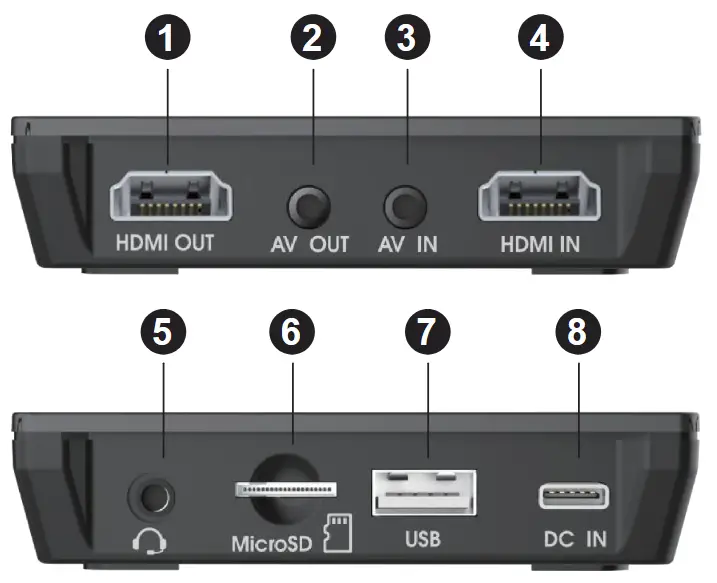
- HDMI video output port
- 3.5mm AV video output port
- 3.5mm AV video input port
- HDMI video input port
- 3.5mm earphone output/microphone input port
- Micro SD Card port
- USB flash drive port
- TYPE-C power port
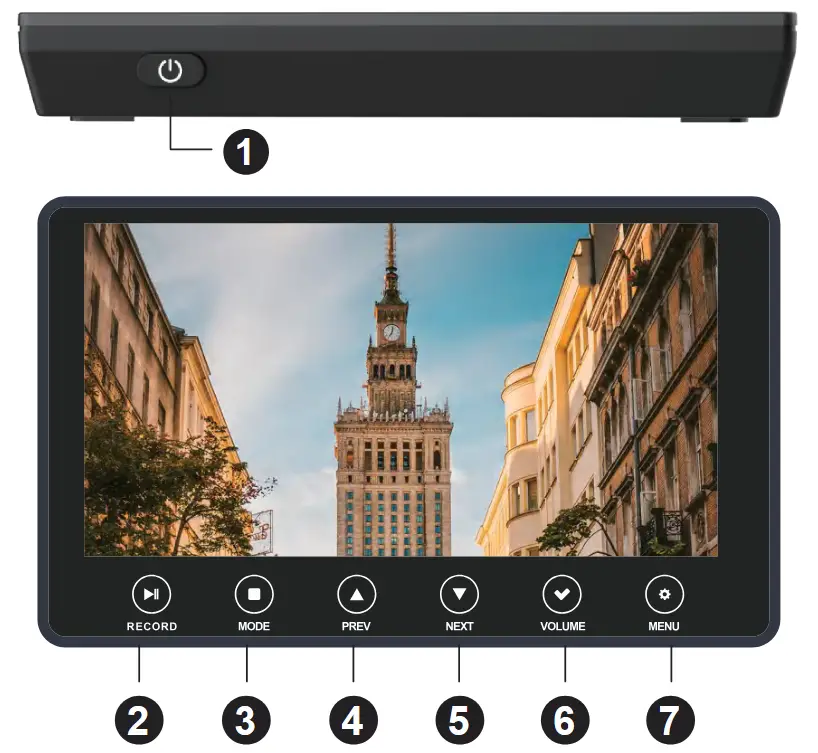
- Power button: long press 2 seconds for power on/off. When the power on, short pressing the button can turn on/off the screen, and long pressing the button 6 seconds can mandatorily shut down the device.
- RECORD button: In record mode, click to record a video and click again to stop recording. In playback mode, click to play a video back and click again for a pause.
- MODE button: Click to switch between record mode and playback mode. In playback mode, clicking the button will cause a playing video to stop playing.
- PREV button: Click the button to turn up volume when volume bar pops up on the screen, and keep pressing the button to fast backward a playing video. In other cases, clicking the button means selecting the previous one.
- NEXT button: Click the button to turn down volume when volume bar pops up on the screen, and keep pressing the button to fast forward a playing video. In other cases, clicking the button means selecting the next one.
- VOLUME button: When a menu pops up, clicking the button means confirming a selection. In other cases, clicking the button will pop up volume bar.
- MENU button: In record mode, click to pop up setting menu, and click again to exit the setting menu. In playback mode, a video that has stopped playing will be deleted, if this button is clicked.
Charge the product
Before the first use, the product should be fully charged. The internal battery of the product can be charged by two ways:
- Through the power adapter.

- Through the computer’s USB port.

When the battery is completely depleted, it will need approximately 3 hours for a full charge.
Install the storage device
The storage device can use USB flash disk or Micro SD card (supports formats of NTFS/EX FAT/FAT 32, maximum capacity of 512G).For best results, it is recommended to use an Micro SD with a speed level of 10 or above.

In order to remove the Micro SD memory card, gently press inward and then carefully remove the card.
Connecting a Video Source:
Connect your Multifunctional UHD Video Recorder to the video source in one of the following ways:

Start the Multifunctional UHD Video Recorder
- Make sure it is connected to the power supply or the battery is fully charged and the memory card is in place. Long press the ” ” power button for 2 seconds to turn on the power supply, and long press the “” Power button for 2 seconds can turn off the power supply.

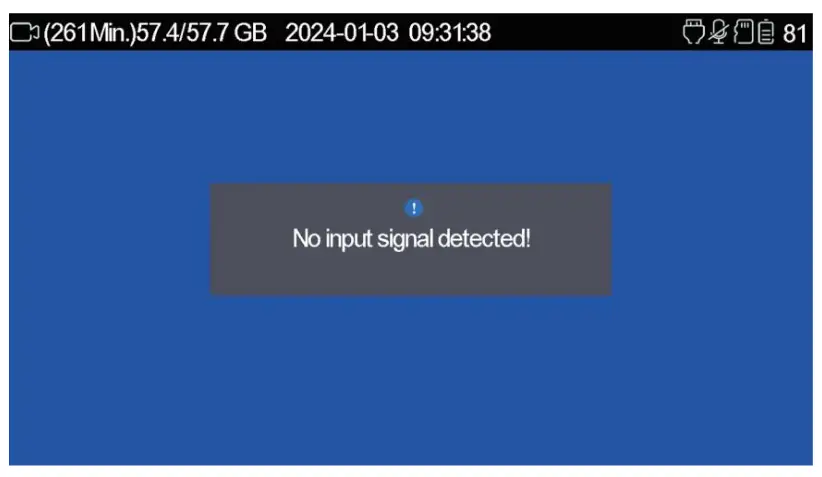
- Turn on the power and enter the recording mode, and the following information will be displayed on the screen:
Input Source Settings in Record Mode
- Click the “ ”MENU button to go into the setting menu.
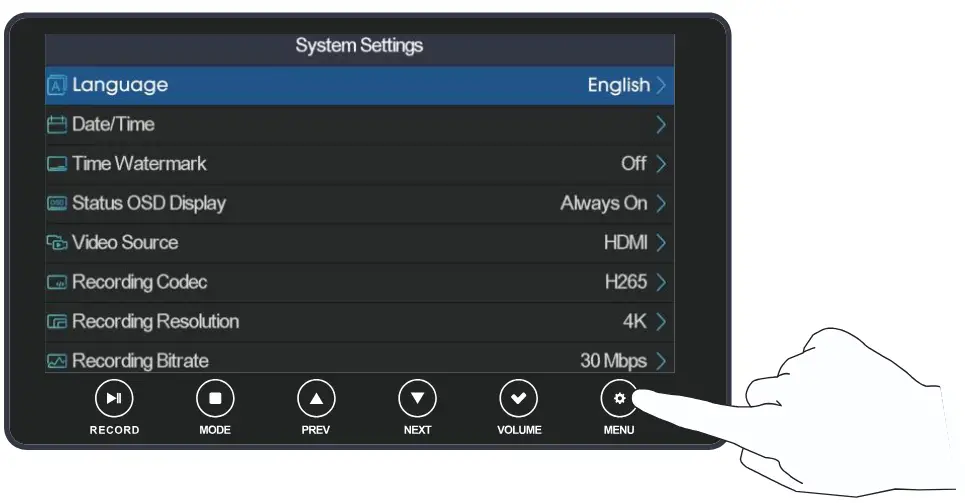
- Select the “video source” option by clicking the “” NEXT button, and enter the option by clicking the “”VOLUME button. Click the “”NEXT button to select HDMI input or AV input.Click the “” VOLUME button to confirm the selection. Exit the setting menu by clicking the “”MENU button. After video source selection, you will see the input source picture and hear the sound.
Set Date and Time
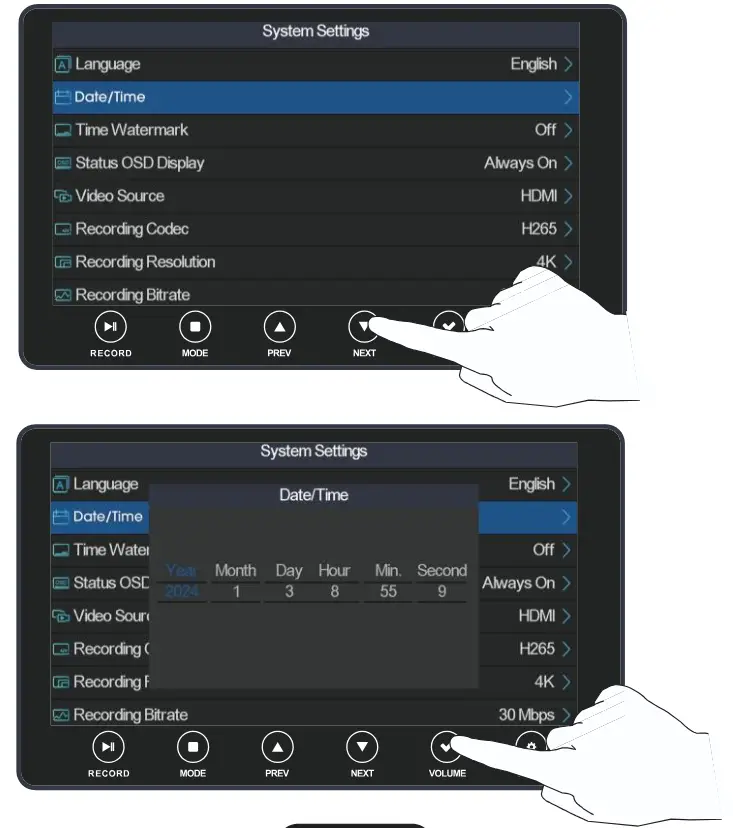
- Click the “”MENU button to enter the setting menu.
- Select the “Date and Time” option by clicking the “”NEXT button and confirm the selection by clicking the “”VOLUME button to enter the interface for date and time settings. Click the “”PREV button to increase the value, click the “”NEXT button to decrease the value, and click the “”VOLUME button to switch to next option. After setting up, exit the setting menu by clicking the “ ”MENU button.
Other settings
Settings for the other options in the setting menu are the same as the setting for the “Date and Time” option. These options are as follows:
Language: support 12 languages.
Date and Time: Date and time input (See the section “ Set Date and Time”).
Time Watermark: The watermark of date and time after opening can be displayed on recorded videos.
Status OSD Display: Status bar can be set as shown or hidden.
Video Source: Select HDMI input or AV input.
Code Type: Select H265 or H264 coding.
Recording Resolution: Select 4K, 1080P or 720P resolutions.
Recording Bit Rate: Select 30/25/20/15/10/5Mbps.
Timing Recording: Set automatic stop for recording.
Default Storage Device: Select USB flash drive or Micro SD Card.
USB Mode: USB storage mode, PC storage mode and PC streaming mode are selectable.
AV Output Formula: You can select NTSC or PAL standard TV formats.
Microphone Volume: Microphone input volume can be set.
Screen Hibernation: Set screen hibernation time.
Formatting: You can format storage devices.
Restore factory settings: You can restore the default factory settings.
Firmware Version: display firmware version.
Recording Operation
After a storage device has been inserted and a video source been connected, turn on the power, and the device enters into record mode. When nothing is wrong with the input source’s picture and sound, record video by clicking the “![]() ”RECORD button; on the top left corner of the display status bar will show a red recording time. Clicking the “
”RECORD button; on the top left corner of the display status bar will show a red recording time. Clicking the “ ![]() ”RECORD button again will stop recording and save the recorded video automatically at the same time.
”RECORD button again will stop recording and save the recorded video automatically at the same time.

Playback Operation
- Click the “”MODE button to switch into playback mode, and the screen will display recorded videos.

- Click the “ ”RECORD button to play videos, and click again to pause.

- Click the “”NEXT button to switch to the next video. When it is playing, keep pressing the “”NEXT button to fast backward. Click the “”PREV button to switch to the previous video, and when it is playing, keep pressing the “”PREV button to fast forward.

- Click the “” MODE button to stop video playing, and then click the “” MENU button to pop up video deleting menu. Options will be selected by clicking the “”PREV and “”NEXT buttons, and be confirmed by clicking the “” VOLUME button.Click the “”MODE button again to exit from playback mode to record mode.

Volume Control
To adjust volume, click the “![]() ”VOLUME button to turn on the volume bar. Turn the volume up/down by clicking the “
”VOLUME button to turn on the volume bar. Turn the volume up/down by clicking the “![]() ”PREV button/the “
”PREV button/the “![]() ”NEXT button.
”NEXT button.

Showing Recordings on TV
You can connect your Multifunctional UHD Video Recorder to a TV receiver via the AV cable or by using an HDMI cable.

If you want to connect to the HDMI on your TV,use the accompanying HDMI cable. Multifunctional UHD Video Recorder now turns black and you will see the film on the TV screen instead.
Connect to the computer
After the device has been connected to a computer using a USB cable, turn the power on.In record mode, click the“![]() ”MENU button to enter the setting menu.Then, select the “USB Mode” option by clicking the“
”MENU button to enter the setting menu.Then, select the “USB Mode” option by clicking the“ ![]() ”NEXT button and enter the option by clicking the“
”NEXT button and enter the option by clicking the“![]() ”VOLUME button. Next, select the “PC Storage Mode” option by clicking the“
”VOLUME button. Next, select the “PC Storage Mode” option by clicking the“![]() ”NEXT button, and confirm the option by clicking the“
”NEXT button, and confirm the option by clicking the“![]() ”VOLUME button to enter PC storage mode. After that, a removable disk will be displayed for viewing on the computer. At last, exit the PC storage mode by clicking any button.
”VOLUME button to enter PC storage mode. After that, a removable disk will be displayed for viewing on the computer. At last, exit the PC storage mode by clicking any button.

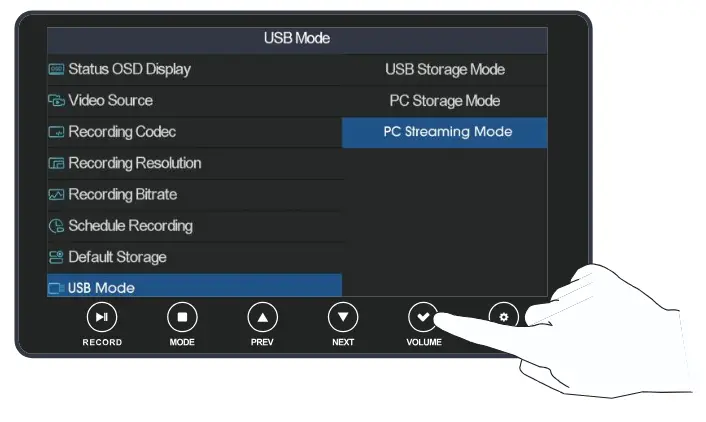
PC Streaming Mode
- After the device has been connected to a computer using a USB cable, turn the power on to enter record mode. In this mode, when the input source’s picture and sound are normally displayed, click the“ ”MENU button to enter the setting menu. Then, select the “USB Mode” option by clicking the“”NEXT button and enter the option by clicking the“”VOLUME button. Next, select the “PC Streaming Mode” option by clicking the“”NEXT button and confirm the option by clicking the“ ”VOLUME button to enter PC streaming mode.

- Open streaming software OBS that has been installed on PC. Click “+”, and then select the “Video Capture Device” option to set properties for input source. Set “Device” as “V110 UVC Camera”, “Resolution/FPS Type” as “Custom”, “Resolution” as “1920×1080”, and “FPS” as “60”. Set “Audio Output Mode” as “Output desktop audio (DirectSound)”, tick “Use custom audio device”, and set “Audio Device” as “V110 UVC Audio”.


After setting, click “Start Recording” to start recording video.

- Make audio and video synchronized by setting video delay: click “Filters”, and then click “+” at the bottom left corner of the “Audio/Video Filters” windows; click and select the “Video Delay (Async)” option, and input 470 ms(You can adjust the value until audio and video are synchronized.). After that, you can start to record or stream video.
Note: PC streaming is for Windows 10, Windows 11 only.
OBS software download link: https://obsproject.com/
Trouble Shooting
- No input signal detected: make sure all cables have securely been connected to input source and the device, the input source (for example, set-top box, computer, game consoles) is open and able to provide the device with video and audio signals , and that the input source setting on the device is appropriate.
- If you press and hold power button for a long time and the device still shows a black screen, the battery runs out probably. In this case, you should recharge the battery and try again later.
- If the product is crashing with black screen, press and hold power button for 6 seconds for mandatory shutdown, or reset the product by inserting a needle into the hole at the product back.
Screen Icon
![]()
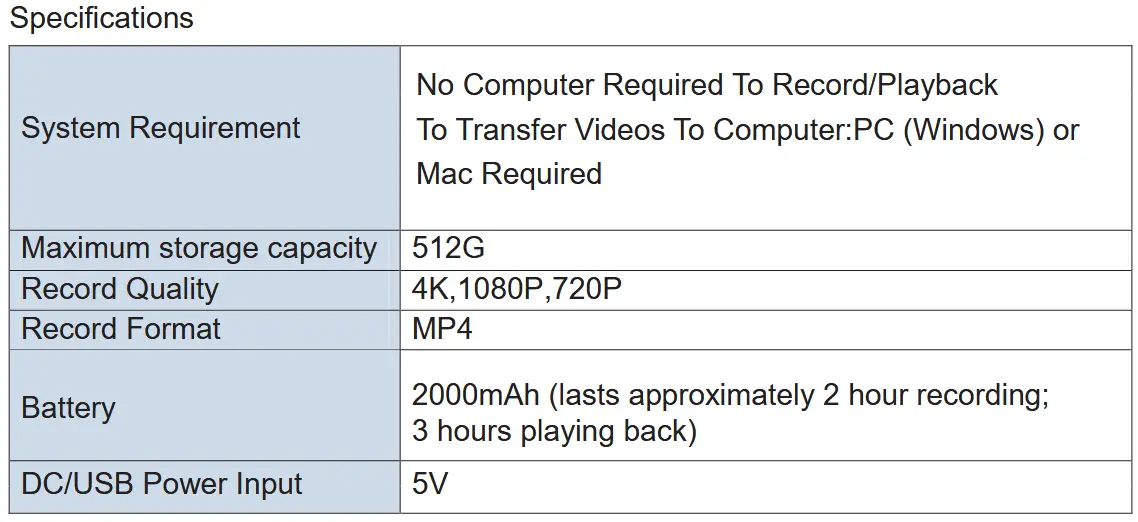
Technical Specifications

![]() At the end of its life, the device has to be separated from the other waste. Consign the device and all its components together to a center of electronical and electrotechnical waste recycling center, designated by your local authorities.
At the end of its life, the device has to be separated from the other waste. Consign the device and all its components together to a center of electronical and electrotechnical waste recycling center, designated by your local authorities.
Documents / Resources
 |
VHS Multifunctional UHD Video Recorder [pdf] User Manual Multifunctional UHD Video Recorder, UHD Video Recorder, Video Recorder |