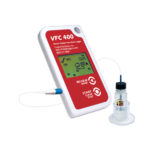
VFC400 Vaccine Temperature Data Logger User Guide

Installation

Your kit includes:
- VFC400 Data Logger
- Stainless Steel Probe encased in glycol
- Acrylic stand for probe and mounting equipment for logger
- Adhesive backed zip tie mounts and zip ties for securing cable
- Spare battery
- 2 year NIST traceable Certificate of Calibration compliant to ISO 17025:2017
- Place acrylic stand and probe vial nearthe middle of the fridge/freeze
- Route the cable under the wire rack and secure with zip tie
- Route the cable toward the wall of the hinge side and secure with zip tie

- Route the cable toward the front of the fridge/freezer on the hinge sideand secure
- Place the glycol bottle in thefridge/freezer for at least 1.5 hours prior to starting your logger to allow thesolution to reach the appropriate temperature.

- Adhere the mounting bracket to the side or front of your fridge/freezer
- Place the logger into the mounting bracket and plug the sensor wire into the logger (left side)
- Approx. 6 inches underneath the logger,adhere cable tie bracket and secure the cable witha Zip tie. Leave enoughslack in the cable so youcan plug and unplug the VFC400 easily

Control Solutions, Inc. | 503-410-5996 | support@vfcdataloggers.com
Documents / Resources
 |
VFC VFC400 Vaccine Temperature Data Logger [pdf] User Guide VFC400 Vaccine Temperature Data Logger, VFC400, Vaccine Temperature Data Logger, Temperature Data Logger, Data Logger |