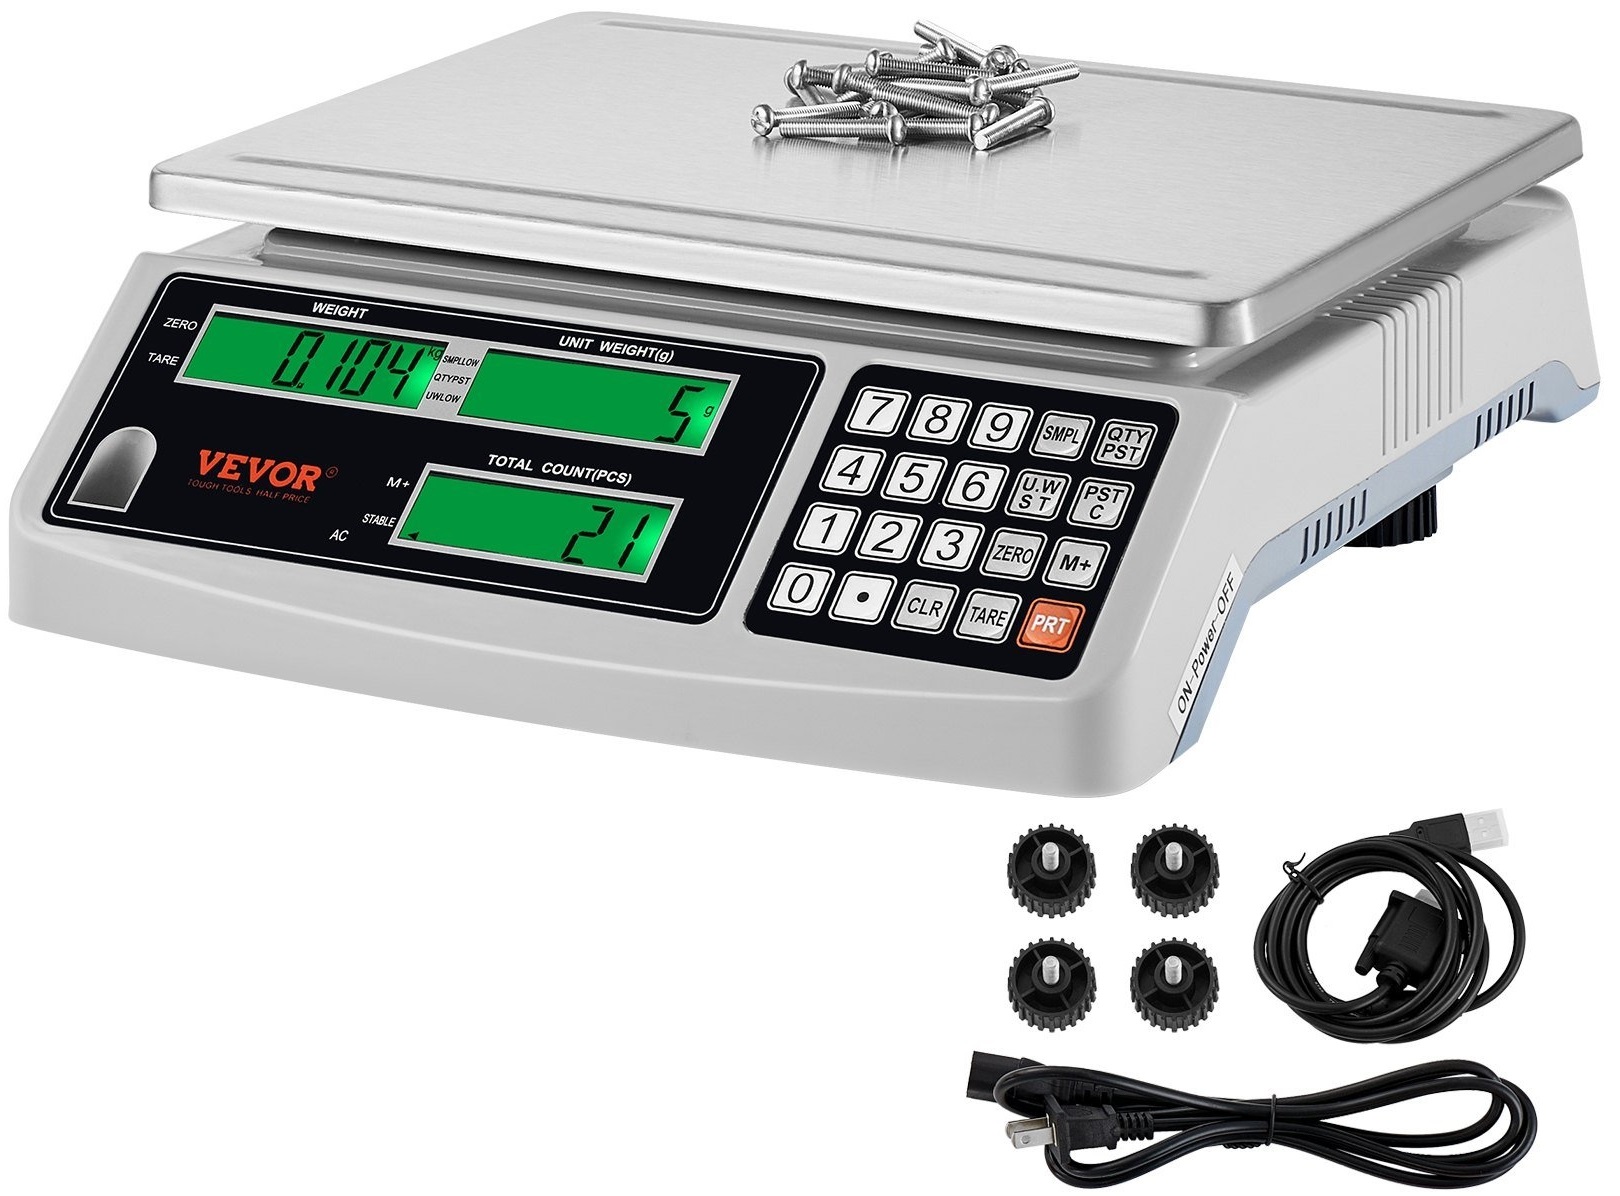
VEVOR KF-H2C,KF-H2D Counting Scale
Specifications
- Model: KF-H2C / KF-H2D
- Function: Autozero; Counting; ADD; TARE; Backlight
- Power: DC 6V/4AH rechargeable battery
- Power Consumption: DC 38 mA (DC 58 mA with backlight)
- Capacity: 1g – 30.009kg
- Unit Choose: Kg/g/lb
Product Usage Instructions
- Main Technical Function
- Function: Autozero; Counting; ADD; TARE; Backlight
- Power: DC 6V/4AH rechargeable battery
- Power Consumption: DC 38 mA (DC 58 mA with backlight)
- Low Power Alarm: When it shows “()” means need to charge. If keep still using, it’s easy to break the scale.
- Technical Data
- Capacity: 1g – 30.009kg
- Unit Choose: Press the respective buttons to choose between kg, g, or lb units.
- Counting
- Before Counting: Obtain samples to determine the unit weight or pcs.
- When Unit Weight is Unknown:
- Put samples of relevant goods on the plate with the same weight.
- Eg, for unit G, put 30 pcs of screws of the same weight on the plate.
- Input the number of samples (eg, PCS 30) to display weight, unit weight, and total count.
- Continue adding goods to the plate; total weight and count will change while unit weight remains constant.
FAQs
- Q: How do I know when to charge the scale?
- A: The low power alarm will indicate when charging is needed. If ignored, it may damage the scale.
- Q: How do I choose the unit (kg/g/lb)?
- A: Press the corresponding buttons to select between kg, g, or lb units.
“`
Technical Support and E-Warranty Certificate www.vevor.com/support
Counting Scale USER MANUAL
MODEL: KF-H2C / KF-H2D
We continue to be committed to providing you tools with competitive price. “Save Half”, “Half Price” or any other similar expressions used by us only represents an estimate of savings you might benefit from buying certain tools with us compared to the major top brands and does not necessarily mean to cover all categories of tools offered by us. You are kindly reminded to verify carefully when you are placing an order with us if you are
actually saving half in comparison with the top major brands.
MODEL: KF-H2C / KF-H2D
COUNTING SCALE
(The picture is for reference only, please refer to the actual object)
NEED HELP? CONTACT US! Have product questions? Need technical support? Please feel free to contact us:
Technical Support and E-Warranty Certificate www.vevor.com/support
This is the original instruction, please read all manual instructions carefully before operating. VEVOR reserves a clear interpretation of our user manual. The appearance of the product shall be subject to the product you received. Please forgive us that we won’t inform you again if there are any technology or software updates on our product.
-1-
Main Technical Function
A. Main Technical Function.
1.Function:
Auto zero; Counting; ADD; TARE; Backlight
2. Power
AC 220-240V (±10%) 50Hz ± 1 Hz
AC 110V (±10%) 60Hz ± 1 Hz
DC 6V / 4AH rechargeable battery
3. Power consumption
DC 38 mA DC 58 mAwith backlight
4. Watt0.4Wwith backlight 5. Low power alarm
When it shows (
)means need to charge. If keep still using, it’s easy to
broke the scale.
B. Technical Data
Capacity 1
capacity
(n)
(e) (d)
(max) (min) zero Tare(max) Overload(max+9e)
15000.0g 15000.0g 0.5g 0.5g 15000.0g 10g ±300g 0~15000.0g
15004.5g
30,000kg 30,000kg 1g 1g 30,000kg 20g ±600g 0~30,000kg
30.009kg
NotesFS= MAX WEIGHT of division
Additional remark
When the division 1g, generally the unit is KG(eg 1g, 2g, 5g), When the
division<1g, generally the unit is G(eg 0.1g, 0.2g, 0.5g)
-2-
Operation instruction
C. Operation instructions.
1. Before using
(1).Please put the scale on a flat and firm place. It can tighten or loose the four feet to make sure on the same level. there is a level ball on it. (2).Do not use it in hostile environments like strong wind and sunshine. (3).Please use the power supplier alone. (4).Don’t put anything on the plate when you turn on. (5).When weighing, please try you best put the good on the center of the plate, don’t over it. (6).Turn on the scale after 15-20 Minutes weighing is more better.
(7).Show
need to charge first.
2. Dispaly:
A: When the unit is KG, the Weight will display 0.000 as picture:

or
-3-
B:When the unit is G, the Weight will display 0.0 as picture:
or
(1).WEIGHT
6 digital for the goods weight and add weight and the left digital can display[- ]
(2).UNIT WEIGHT
5 digital for the unit weight and times of add .the point is can change.
(3).QUANTITY
6digital for the pieces of the goods
3.Symbol” ”
(1). or Net or Taremeans has been cut the weight of packing (2). or Zeromeans no weight (3).+ or M+means ADD (4). or Stable or ~: Means on stable (5).SMPLOWmeans sample is not enough. the weight of the sample on the plate is less than the weight of min sample, please add the pieces unit this symbol disappear. (6).QTYPST UWLOWWhen the pcs is low as you set, it will alarm and QTYPST UWLOW .
(7).
Means the power is low, need to charge.
Remark
High precision counting scale: Min sample weight = 20d Min unit weight =
0.2d ( d=division) counting scale Min sample weight = 40d Min unit weight= 0.8d ( d=division)
-4-
KEYBOARDFUNCTION
4. KEYBOARD
GOLD
(Without RS-232)
(with RS-232)

4.1 Composite key function description
+Number keys0–2convert units
+Numbers keys4–6adjust the brightness
+ set the upper and lower limits of alarmLong
Press to enter the alarm settingPress to closePress to set
the outside of the upper and lower limits of alarmPress to set the inside of
the upper and lower limits of alarmPress to set the upper limits of
alarmPress to confirm
4.2 Function key
: When the unit weight is unknownSet the number of items to be sampled
:When the unit weight is knownConfirm the input weight:Use this key to set the alarm value when a fixed number of alarms are required
-5-
:Disable alarm function
:Add up the quantity of goods :Cancel the total amount of the accumulated items :Remove the weight of tare :Return the scale to zero as far as possible :Clear the number :Print the current weight, single weight, quantity ,and the cumulative data (Note: with the RS232)
FUNCTION
5. FUNCTION
5.1. ON-OFF Button
Put ON/OFF to”” means turn on.
Put ON/OFF to “O” Means power off.
5.2. Auto Backlight
Press, when it displays “
“press
, I will display”
“. Put the
goods on the plateweight >10d, the light is on auto, when it is zero, the light is
auto off.
Light on all the time
Press
when it displays”
“press
it will display” “, Light on all
the time .
Light off all the time press, when it display “off all the time.
“Press
it will display ” “, the light
When you turn off the scale, it will memory what you have chosen
-6-
5.3.Kg/g/lb unit choose
Press
when is display”
” then press
, unit is “kg”.
Press
when is display”
” then press , unit is “g”.
Press
when is display”
” then press , unit is “lb”.
5.4. Counting
5.4.1 Before counting, you need to get some samples to know the pcs or unit weight (1) When the unit weight is unknown
Put the samples of relevant goods on the plate (the weight of each sample must be the same): Eg (A): when the unit is G, put 30pcs screws of each same weight on the plate, It will display:
Weight
Unit weight Total count
[ 53.1g ] [ 0 ]
[0 ]
Input the PCS “30” of the samples(Screws), it will display:
Weight
Unit weight Total count
[53.1g]
[30]
[0]
Then press , it will display:
Weight
Unit weight Total count
[53.1g]
[1.77g]
[ 30 ]
At this moment you can continue to put the more goods (eg: screws) on the plate, the Total weight & Total count will change constantly, the unit weight won’t be changed.
Eg (B): when the unit is KG, put 30pcs screws of each same weight on the plate, It will display:
Weight
Unit weight Total count
[ 0.053kg ] [ 0 ]
[0 ]
-7-
Input the PCS “30” of the samples (Screws), it will display:
Weight
Unit weight Total count
[0.053kg]
[30]
[0]
Then press , it will display:
Weight
Unit weight Total count
[0.053kg]
[1.766g]
[ 30 ]
At this moment you can continue to put the more goods (eg screws) on the plate, the Total weight & Total count will change constantly, the unit weight won’t be changed.
(2) Know the unit weight(eg screws)
When you know the weight of one screw is 1.766g,
A: if the unit is G, Input the unit weight 1.766, it will display:
[0.0g]
[1.766g] [0]
Then Press, and put the more goods(eg:30 pcs screws) on the plate,
[53.0g] [1.766g] [30] If at this moment you continue to put the more pcs, the Total weight & Total count on the window will change constantly, the unit weight won’t change. B:If the unit is KG, Input the unit weight 1.766, it will display:
[0.000kg]
[1.766g] [0]
Then Press
, and put the more goods(eg:30 pcs screws) on the plate,
[0.053kg] [1.766g ] [30 ]
Finally, when you take off all the goods on the plate, the unit window still
displays value, you can press
.
-8-
The sample is more, the precision is more high
NULL POINT
When you using the scale, sometimes the weight window is not [0.0], you can
press
to make it into [0.0], Zero range =capacity ×+ 4%
5.4.2 Counting goods have packing
(1).When the packing box /carton weight is unknown (eg the unit is KG)
has. Put the packing box of 500g on the plate, it will display
[0.500kg]
[0 ]
[0]
b. Press
, It will display
OR At this moment you can follow 5.4.1 to continue the counting. When the packing box/carton weight is unknown (eg the unit is G) a. Put the packing box of 500g on the plate, It will display
[500.0g]
[0 ]
[0]
b. Press , it will display:
[0.0g]
[0 ]
[0]
-9-
Clear the TARE history Take down the goods and package on the plate, the weight will be [- 0.500kg ] on the basis of KG or [- 500.0g ] on the basis of G, Press, The weight will be [0.0], and this to TARE will disappear.
(2) on the plate, it will display 0.000(it means tared),
and at this moment you start to follow the way of 5.4.1 for counting. (3).1-B. When The weight of packing box/carton is known (eg the unit is G)
There is nothing on the plate, it display [0.0 g] [0] [0] The packing box is 500g, Input 5000, it will display [0.0g ] [5000] [0] Press, it will display [-500.0g] [—-] [—-]
Attention: when weight window display “0.0”(it means the unit is G), input the weight of packing box must be 10 times of the actual weight. (eg:500g package box, you need to input 5000)
At this moment you can firstly put that packing box, it will display “0.0” on the basis of G or “0.000” on the basis of KG, it means both are tared. Then start to follow the step of 5.4.1 to continue the counting. There is some goods including the packing box/carton on the plate.
– 10 –
Eg Packing box is 500g, on the basis of KG, packing box(500g)+goods(30PCS screws)= 0.553kg, it will display
[0.553kg] [0] [0]
Input the weight 1.766 of one screw, press, it will display
[0.553kg] [1.766g] [313]
Input 500(packing box is 500g
)
[553.0g] [1.766g] [313]
Input 5000(actual packing box is 500g), Press the key, it will display
[53.0g] [1.766g] [30] Attention: When weight window display “0.0” (it means the unit is G), input the weight of packing box must be 10 times of the actual weight.(eg:500g package box, you need to input 5000) Clear the TARE history
Take down the goods and package on the plate, the weight will be [-
0.500kg], press, The weight will be [0.0].
5.5. ADD
99Times ADD, 6 Digital
5.5.1 Quantity ADD of repeatedly counting
5.1.1.1 PCS ADD
Put the goods on the plate, follow as 5.4.1 counting, then press
, Repeat
5.1.1.1, then press
,on the unit weight window will show [2], it means, 2
– 11 –
times ADD. THE Total COUNT(PCS) will show the two times pcs.(eg put 10pcs
screws on the plate, input 10, press SMPL, press
one time, then take off
10pcs screws, put again another 10pcs screws, press
again. The total count
will display that 20 pcs that they are 1st time’s and count of 2nd time’s, of course,
the total weight is 1st time +2nd time)
When you finish the counting of all goods, there is no goods on the plate, Press
to check the total weight and times and quantities. Press
and
to
clear the ADD history.
5.5.2 Weight ADD
Eg the unit is G
Put the goods on the plate like 500g, press
It will display [500.0] [1] [0] for 5 seconds, then to [500.0] [0] [0]
Then take off the goods, put another good s on the plate like 100g, press
It will display [600.0g] [2] [0] for 5 seconds, then to [100.0g] [0] [0].
But when you take off those goods, press
again, you can just check the
total value still is: [600.0g] [2] [0], of course, you can continue to put the
new goods on it, press for counting.
Finally when you finish ADD, there is no goods on the plate, Press
to
Check the total weight. Press
to clear the ADD history.
Eg the basis is KG
Put the goods on the plate Like 500g, press
It will display [0.500kg] [1] [0] for 5 seconds, then to [0.500] [0] [0]
Then take off the goods, put another good s on the plate like 100g, press
It will display [0.600kg] [2] [0] for 5 seconds, then to [0.100g] [0] [0].
– 12 –
But when you take off those goods, press
again, you can just check the
total value still is: [0.600kg] [2] [0], of course, you can continue to put the new
goods on it, press
for counting.
Finally when you finish ADD, there is no goods on the plate, Press
to
check the total weight. Press
to clear the ADD history.
5.6. Quantity alarm
Eg If over the goods of 30pcs on the plate, you want alarm.
Firstly Input 30 pcs, press
,It will display
[0.000] [0] [30] for 3 seconds,
then display [0.000] [0] [0]
Put the goods on the plate, when counting (follow the way of 5.4.1 eg: put 10pcs
goods on the plate, input 10, press
, then continue to put more goods on
it),when the pcs over 30pcs it will alarm.
Press
and
to cancel quantity alarm.
5.7. Calibration
1.Turn on the scale, when the window displays “0”, input 52411 and press
key to enter into calibration mode.
2. Press
to choose max capacity, press to confirm, for example:
30kg, input “30000”, press to confirm
3.Press
to choose division, press to confirm, for example, when you
press
continuously, it will display “1,2,5,10,” then you choose the division
you need. Then press .
– 13 –
4.Press
to choose position of point, after pressing constantly, it displays
“0””1″”2″”3″”4″”0″ you can choose the position you need, then press
to confirm.”0″means “0”, “1”means “0.0” “2”means “0.00”, “3”means “0.000” ,
“4”means “0.0000” If you don’t need change capacity, division and point, you can
could directly press
to enter next step
5.Weight window will show the data which poise will load on scale(If you what change load poise, you could input the data you will load on scale). press
,the unit price window will display “LOAD”, then put load/weight, finally press
to confirm.
5.8. Upper and Lower Limit Alarms
5.8.1 Selecting Alarm Types
Long-press the
key to enter the settings. The single weight window displays:
Dry cleaning
shows OFF to disable, pressing
shows OUT for out-of-range
alarm, pressing
shows IN for in-range alarm, and pressing
shows UP
for upper limit alarm only. Press
to save and exit.
Short-press the
key to set the quantity upper limit.
5.8.2Inputting Alarm Values (Note: Long-press the
key to activate the alarm,
same as the first step above)
Short-press the
key to enter settings, displaying (A-FF-O-dn).The weight
window displays alarm types: A-OUT indicates out-of-range alarm, A-IN indicates in-range alarm, A-UP indicates upper limit alarm only.
– 14 –
A. When the quantity window displays DN, input the lower limit value, press
to confirm and proceed to the next step. B. When the single weight window displays UP, input the upper limit value, press
to confirm and exit.
5.8.3Press
To deactivate the alarm and reset the upper and lower limit
values.
5.9.UART Settings 5.9.1After powering on and zeroing, press. key followed by the numeric key 8. The weight window will display “print” indicating the external printer mode. 5.9.2After powering on and zeroing, press .key followed by the numeric key9. The weight window will display “PC” indicating the computer
data upload mode, which can be uploaded to the computer using Excel
spreadsheets.
5.10.Printing Function (Note: with the RS232)
When UART switches to “print” mode:
5.10.1Single Print
When the weight is not zero, press the Print key to print the current weight, unit weight, and quantity. The format is as follows:
– 15 –
5.10.2Accumulated Print
When multiple weights are accumulated, first adjust the weight, unit weight, and quantity of the items, press the Add key repeatedly to accumulate, then press the Print key to print the weight, unit weight, and quantity of the items multiple times. In “Print” mode, pressing the “PRT” key after printing will automatically clear the accumulation, or press the combination key “M+”+”CLR” to clear the accumulation. The printing format is as follows:
6.Computer Data Upload Function(Note: with the RS232)
When UART switches to “PC” mode, use an RS232 to HID protocol data cable to connect the computer to the scale (Note: Counting scales with RS232 ports come with this data cable). Open an Excel spreadsheet on the computer after the electronic scale powers on and zeros, place the weighing items on the scale. When the weight stabilizes, there will be a “beep” sound, and the computer Excel spreadsheet will automatically write the weight data displayed in the electronic scale weight window. Remove the items from the scale, and after it returns to zero, weigh again. The Excel spreadsheet will write the second weight data (no need to press the Print key). The format is as follows:
– 16 –
7. Attention:
1. Keep away from the rain and wash by water if happens, please dry it, and find it cannot work, return to the seller to repair).
2. Please do not store in the high temperature and wet place. 3. Do not let insects into the body. 4. Do not heavy shock and overload. 5. No need using for a long time. please clear it, and take it into the bag, and
charge it each 3 months. Reload it before using . 6. If you have good advise please feel free to tell us.
– 17 –
Common trouble shootingWW
8. Common trouble shooting:
No TROUBLE
Turn 1 on, show “LB
” and alarm
MEANS
LOW BATTERY (POWER)
Turn 2 on, show “ED WEIGHING ERROR
“
REASON Battery no power
Battery broken
LOAD CELL LINE SEALING -OFF
LOAD CELL TOUCH WITH SOMETHING
LOAD CELL BROKEN
PCB BROKEN
too wet
TOO DURTY
3
Turn on, hop counting
The weight window number on changing
cannot weigh
LOAD CELL TOUCH WITH SOMETHING LOAD CELL LINE
SEALING -OFF
LOAD CELL BROKEN
When
The weight window
4 charging, co number on changing
unting
cannot charge
PCB BROKEN Adapter
Digital 8 not
5
full show
Digital 8 not full show, or less
electronic circuit short LCD Broken
Drive broken
the key is stuck
the key cannot spring
back
6
key cannot work
Press the key can’t work
key electronic circuit short
PCB BROKEN
KEY BOARD
CORRODES
the load cell line and PCB
7 NO WEIGHT
no any weight
broken link
LOAD CELL LINE
ADVISE RECHARGING
change the battery
RE-SEALING
CHECKING
CHANGE THE LOAD CELL
CHANGE THE PCB DRY the PCB and load
cell take down the PCB, using Alcohol cleaning
first, then dry it
CHECKING
RE-SEALING
CHANGE THE LOAD CELL
CHANGE THE PCB
change the adapter
using rubber-insulated wire link together change the LED
change the display board checking
changing the key
using rubber-insulated wire link together
CHANGE THE PCB CHANGE THE KEY
BOARD
checking
RE-SEALING
– 18 –
can’t turn
press the on/off
8
we
button, can’t turn on
when turn on
DID DID DID
when turn on DI DI DI
9 sound all the
sound all the time
time
turn on the sound
10 normal, but no words
turn on 11 show”8″all
the time
turn on the sound normal, but no words
when turn on the scale, all the window
show 8, can not weighing, and the sound it is normal When charging AC light is working, but can not charge
can not
12
recharge
When charging AC light is not working,
no backlight 13 for the LCD
Turn on, there is no light for the LCD
SEALING -OFF LOAD CELL BROKEN
PCB BROKEN the ON/OFF BUTTON
BROKEN CHECK THE BATTERY POWER IS ENOUGH
PCB BROKEN CHECK THE BATTERY POWER IS ENOUGH
PCB BROKEN check the displaybord to
PCB link is ok display board broken check the displaybord to
PCB link is ok
display board broken
Adapter Battery broken
adapter adapter charging connect broken the charging connect to the PCB link off PCB BROKEN Battery broken power save function check the LCD part if have sealing-off LCD Broken
CHANGE THE LOAD CELL
CHANGE THE PCB CHANGE THE ON/OFF
BUTTON LOW
VOLT ,RECHARGE
BATTERY BROKEN CHANGE IT ,V<5.25V
CHANGE THE PCB LOW
VOLT ,RECHARGE BATTERY BROKEN CHANGE IT ,V<5.25V CHANGE THE PCB
turn off , relink the display board link
change the display board
turn off , relink the display board link
change the display board
change the adapter
change the battery
change the adapter take down recharging change the connect part
re sealing
CHANGE THE PCB change the battery reset the backlight on
function
RE-SEALING
CHANGE THE LCD
– 19 –
Items
Description
1 Sales territory North America
2 Name
Counting Scale
3 Model
KF-H2D
4 Parameter
Rating(s): AC110V/60HzCapacity: 30kgDivision: 1gRS232
Items
Description
1 Sales territory North America
2 Name
Counting Scale
3 Model
KF-H2C
4 Parameter
Rating(s): AC110V/60HzCapacity: 30kgDivision: 1gRS232
Items
Description
1 Sales territory Europe
2 Name
Counting Scale
3 Model
KF-H2C
4 Parameter
Rating(s): AC220-240V/50HzCapacity: 30kgDivision: 1g RS232
Items
Description
1 Sales territory Australia
2 Name
Counting Scale
3 Model
KF-H2C
4 Parameter
Rating(s): AC220-240V/50HzCapacity: 30kgDivision: 1g RS232
– 20 –
Items
Description
1 Sales territory North America
2 Name
Counting Scale
3 Model
KF-H2C
4 Parameter
Rating(s): AC110V/60HzCapacity: 30kgDivision: 1g
Items
Description
1 Sales territory Europe
2 Name
Counting Scale
3 Model
KF-H2C
4 Parameter
Rating(s): AC220-240V/50HzCapacity: 30kgDivision: 1g
Items
Description
1 Sales territory North America
2 Name
Counting Scale
3 Model
KF-H2C
4 Parameter
Rating(s): AC110V/60HzCapacity: 15kgDivision: 0.5g RS232
– 21 –
Manufacturer: Shanghaimuxinmuyeyouxiangongsi Address: Shuangchenglu 803nong11hao1602A-1609shi, baoshanqu, shanghai 200000 CN. Imported to AUS: SIHAO PTY LTD. 1 ROKEVA STREETEASTWOOD NSW 2122 Australia Imported to USA: Sanven Technology Ltd. Suite 250, 9166 Anaheim Place, Rancho Cucamonga, CA 91730
EC REP E-CrossStu GmbH Mainzer Landstr.69, 60329 Frankfurt am Main. YH CONSULTING LIMITED.
UK REP C/O YH Consulting Limited Office 147, Centurion House, London Road, Staines-upon-Thames, Surrey, TW18 4AX
– 22 –
Technical Support and E-Warranty Certificate www.vevor.com/support
-1-
Technical support and electronic warranty certificate www.vevor.com/support
Counting balance USER MANUAL
MODEL: KF-H2C / KF-H2D
We continue to be committed to providing you tools with competitive price. “Save Half”, “Half Price” or any other similar expressions used by us only represents an estimate of savings you might benefit from buying certain tools with us compared to the major top brands and does not necessarily mean to cover all categories of tools offered by us. You are kindly reminded to verify carefully when you are placing an order with us if you are
actually saving half in comparison with the top major brands.
-2-
MODEL: KF-H2C / KF-H2D
COUNTING SCALE
(The picture is for reference only, please refer to the actual object)
NEED HELP? CONTACT US! Have product questions? Need technical support? Please feel free to contact us:
Technical Support and E-Warranty Certificate www.vevor.com/support
This is the original instruction, please read all manual instructions carefully before operating. VEVOR reserves a clear interpretation of our user manual. The appearance of the product shall be subject to the product you received. Please forgive us that we won’t inform you again if there are any technology or software updates on our product.
-1-
ONE. Main technical function.
1. Function:
Auto Zero; Count; ADD; TARE; Backlight
2. Power:
AC 220-240V (±10%) 50Hz ± 1Hz AC
110V (± 10%) 60Hz ± 1Hz
Rechargeable Battery DC 6V / 4AH
3. Power Consumption
38mA DC DC 58mA with backlight
4. Watt 0.4W with backlight 5. Low power alarm
When the indicator (
) is displayed, this means that it needs to be loaded. If you
keep using it, it is easy to break the scale.
B. Technical data
Capacity 1:
ability
(n)
(f) (d)
(max)
(min) zero Tare (max) Overload (max+9e)
15000 .0 15000 .0 0.5 0.5
0~1500 0.0
15000.0g 10g ±300g
g
g
gg
g
30,000 kg
30,000
0 to 30,000
1 g 1 g 30,000 kg 20g ±600g
kg
kg
1500 4.5 g 30,009 kg
Notes: FS = MAXIMUM WEIGHT; d = division
Additional note
When division 1 g, the unit is usually KG (e.g. 1 g, 2 g, 5 g), when division < 1 g, the unit is usually G (e.g. 0.1 g, 0.2 g, 0.5 g)
-2-
C. Instructions for use.
1. Before using
(1). Please place the scale on a flat and firm place. You can tighten or loosen the four feet to make sure they are on the same level. there is a level ball on it. (2). Do not use it in harsh environments such as strong wind and sun. (3). Please use only the electricity supplier. (4). Do not put anything on the plate when you turn it on. (5). When weighing, try to place the food in the center of the plate as best as possible, without overloading it. (6). Turn on the scale after 15 to 20 minutes, the weighing is better.
(7) . Show
must first be loaded.
2. Display:
A: When the unit is KG, the weight will display 0.000 as shown in the picture:
or
-3-
B: When the unit is G, the weight will display 0.0 as shown in the picture:
or (1). WEIGHT
6 digital for goods weight and add weight and the left digital can display [- ]
(2). UNIT WEIGHT
5 digital for unit weight and adding times. The point is they can change.
(3). QUANTITY
6digital for goods pieces
3. Symbol “ ”
(1). or Net or Tare: means the package weight has been reduced (2). or Zero means no weight (3).+ or M+ means ADD (4). or Stable or ~: Means on stable (5). SMPLOW: means the sample is not enough. the sample weight on the plate is less than the minimum sample weight, please add the pieces, this symbol will disappear. (6). QTYPST UWLOW When the pieces number is low as you set, it will alarm and QTYPST UWLOW .
(7).
Means power is low, need to charge.
Noticed
-4-
High precision counting scale: Minimum sample weight = 20d Minimum unit weight = 0.2d (d= division )
counting scale: Minimum sample weight = 40d Minimum unit weight = 0.8d (d= division )
4. KEYBOARD
OR
(Without RS-232) (with RS-232)
4.1 Composite key function description
+ Numeric keys (0 to 2) convert units. + Numeric keys (4 to 6) adjust brightness. + set the upper and lower limits of the alarm. Long press to enter the alarm setting. Press to close. Press to set the outside of the upper and lower limits of the alarm. Press to set the inside of the upper and lower limits of the alarm. Press to set the upper limits of the alarm. Press to confirm.
4.2 Function key
-5-
: When the unit weight is unknown, set the number of items to be sampled.
: When the unit weight is known, confirm the entered weight; : Use this key to set the alarm value when a fixed number of alarms is required;
: Turn off the alarm function;
: Add up the quantity of goods; : Cancel the total amount of accumulated items; : Remove the tare weight; : Reset the scale to zero as much as possible; : Clear the number; : Print the current weight, single weight, quantity, and cumulative data. (Note: with RS232)
5. FUNCTION
5.1. ON-OFF button n
Switching ON/OFF to “ ” means turning on.
“Turn ON/OFF” also means power off.
5.2. Auto Backlight
Press , when it displays “
» press
, I will display ” “
. Place the goods on the plate, weight > 10d, light is
automatically on, when it is at zero, the light is automatically off.
Light on all the time
-6-
Press when it displays “
“, press it will display
” “, the light will be on permanently.
Lights off all the time
Press , when it displays “
» Press , it will display “
“, the light will go out all the time.
When you turn off the scale, it remembers what you chose
5.3. Unit Kg/g/lb to choose
Press , when is displayed “
» then press , the unit is
“kg”.
Press , when is displayed “
» then press , the unit is
“g”.
Press , when is displayed “
» then press , the unit is
“lb”.
5.4. Counting 5.4.1 Before counting, you must obtain samples to know the number of pieces or unit weight. (1) When the unit weight is unknown
Place the samples of the relevant goods on the plate (the weight of each sample must be the same): For example (A): when the unit is G, place 30 screws of the same weight on the plate. It will display:
Weight Unit weight Total number
[ 53.1 g ] [ 0 ] [ 0 ]
Enter the PCS “30” of the sample s(Vis), it will display:
Weight Unit weight Total number
[ 53.1 g] [ 3 0] [0]
-7-
then on , it will display:
Weight Unit weight Total number
[ 53.1 g ] [ 1.77 g ]
[ 30 ]
At this time, you can continue to put more goods (eg: screws) on the plate, the total weight and total number will constantly change, the unit weight will not be changed. For example (B): when the unit is KG, put 30 screws of the same weight on the plate. The following message will be displayed:
Weight Unit weight Total number
[ 0.053 kg ] [ 0 ] [ 0 ]
Enter the PCS “30” of the sample s (screw), it will display:
Weight Unit weight Total number
[ 0.053 kg] [ 3 0] [0]
then on , it will display:
Weight Unit weight Total number
[ 0.053 kg ] [ 1.766 g ]
[ 30 ]
At this time, you can continue to put more goods (eg screws) on the plate, the total weight and total number will constantly change, the unit weight will not be changed.
(3) Now know the unit weight (e.g. screws)
When we know that the weight of a screw is 1.766 g,
A: If the unit is G, I enter the unit weight 1.766, it will display:
[0.0 g] [1.766 g] [0]
Then press , and place as many products (eg: 30 screws) on the plate,
[ 53.0 g ] [ 1.766 g ] [ 3 0 ]
-8-
If at this time you continue to put more pieces, the total weight and total number on the window will constantly change, the unit weight will not change.
B: If the unit is KG , I input the unit weight 1.766, it will display: [0.0 00 kg] [ 1.766 g ] [0] Then press , and put the most goods (for example: 30 screws) on the plate, [ 0.053 kg ] [ 1.766 g ] [ 3 0 ] Finally, when you remove all the goods from the plate, the unit window still displays the value, you can press .
The sample is larger, the accuracy is higher
ZERO POINT When using the scale, sometimes the weight window is not [0.0], you can press to change it to [0.0], Zero range = capacity × + 4%
5.4.2 Counting packed goods
(1). When the weight of the packing box/carton is unknown (for example, the unit is KG) a. Put the 500g packing box on the plate, it will display [0.500kg] [0] [0] b. Press , I will display it
-9-
OR At this time, you can follow 5.4.1 to continue counting. When the weight of the packing box/carton is unknown (for example, the unit is G) a. Put the 500g packing box on the plate, It will display [500.0g] [0] [0] b. Press , it will display: [0.0g] [0] [0] Clear TARE History
Take out the goods and pack them on the plate, the weight will be [-0.500kg] based on KG or [-500.0g] based on G, press , the weight will be [0.0] and this TARE will disappear. (2). 1-A. When the weight of the packaging box/carton is known (for example, the unit is KG) There is nothing in the plate, it is displayed [0.00 0 ] [0] [0]
– 10 –
The packaging box is 500g, enter 500, it will be displayed
[0.00 0 ] [ 50 0] [0]
Pres [TARE], it will display
[- 0.500 ] [—-] [—-] Then place this packing box on the plate, it will display 0.000 (this means tared), and at this time you start to follow the method of 5.4.1 to count. (3).1-B. When the weight of the packing box/carton is known (by
example, the unit is G)
There is nothing on the plate, it is displayed
[0.0 g] [0] [0]
The packaging box weighs 500g, enter 5000, it will be displayed
[0.0 g] [50 0 0] [0]
Press
, it will display
[- 500.0 g ] [—-] [—-]
Attention: When the weighing window displays “0.0” (it means the unit is G), the weight of the packing box should be 10 times the actual weight. (For example: for a 500 g packing box, you should input 5000) At this time, you can first place the packing box, it will display “0.0” based on G or “0.000” based on KG, which means both are tared. Then start to follow step 5.4.1 to continue counting.
There are some goods including the packing box/carton on the plate. For example, the packing box weighs 500g, based on KG, packing box (500g) + goods (30 screws) = 0.553kg, it will display [0.553kg] [0] [0]
Enter the weight 1.766 of a screw, press , it will display
[0.553 kg] [1.766 g] [313]
– 11 –
Input 500 (the packing box weighs 500g), press , it will display
[ 0.053kg ] [ 1.766g ] [ 30 ] For example, the packing box weighs 500g, based on G, packing box (500g) + goods (30 screws) = 553.1g , it will display [ 553.0g ] [ 0 ] [ 0 ]
Input the weight 1.766 of a screw , press , it will display
[ 553.0g ] [ 1.766g ] [ 313 ] Input 5000 (the actual weight of the packing box is 500g ), press
the key, it will display
[ 53.0g ] [ 1.766g ] [ 30 ] Attention: when the weight window displays “0.0” (this means the unit is G), the weight of the packing box should be 10 times the actual weight (for example: for a 500g packing box, you should enter 5000). Clear TARE history
Remove the goods and pack them on the plate, the weight will be [- 0.500
kg], press ,The weight will be [0.0].
5.5. ADD
99 times ADD, 6 digital
5.5.1 Repeat Count ADD Quantity
5.1.1.1 ADDING PCS
Place the goods on the plate, follow the counting as shown in
point 5.4.1, then press
, Repeat 5.1.1.1, then press
,on
the unit weight window, [2] will be displayed, that means, 2 times ADD. The number
total (PCS) will display both parts. (e.g., place 10 screws on the
plate, enter 10, press SMPL, press once, then remove 10 screws,
– 12 –
put back 10 more screws, press again. The total number will show 20 pieces is the 1st time and the number of 2nd time , of course, the total weight is the 1st time + the 2nd time) When you finish counting all the goods , there is nothing in the plate, Press to check the total weight, times and quantities. Press
and to clear the ADD history. 5.5.2 Weight ADD For example, the unit is G
Put the goods into the plate as 500g, press It will display [ 500.0 ] [1] [0] for 5 seconds, then to [ 500.0 ] [0] [0] Then remove the goods, put another goods into the plate, for example 100g, press It will display [ 600.0g ] [2] [0] for 5 seconds, then to [ 100.0g ] [0] [0]. But when you remove these goods, press again, you can just check the total value is still: [ 600.0g ] [2] [0], of course, you can continue to put the new goods into it, press to count. Finally, when you finish ADD, there is nothing in the plate, Press to check the total weight. Press to clear the ADD history. For example, the base is KG Put the goods in the plate Like 500g, press It will display [ 0.500 kg ] [1] [0] for 5 seconds, then to [ 0.500 ] [0] [0] Then remove the goods, put another goods on the plate, for example 100g, press
– 13 –
It will display [ 0.600 kg ] [2] [0] for 5 seconds, then to [ 0.100 g ] [0] [0]. But when you take out these goods, press again, you can just check the total value is still: [ 0.600 kg ] [2] [0], of course, you can continue to put the new goods in it, press to count. Finally, when you finish ADHD, there is nothing in the plate, Press to check the total weight. Press to clear ADD history.
5.6. Quantity alarm
For example, if the quantity of goods in the plate exceeds 30 pieces,
you want to trigger an alarm.
First, enter 30 coins, press
,It will display
[0.000] [0] [30] for 3 seconds,
then display [0.000] [0] [0]
Put the goods on the plate, when counting (follow the method of
5.4.1 for example: place 10 pieces of goods on the plate, enter 10,
press , then continue to put more goods in it), when the
If the number of coins exceeds 30 coins, an alarm is triggered.
Press and to cancel the quantity alarm.
5.7. Calibration
1. Turn on the scale, when the window displays “0”, enter 52411 and press the key to enter calibration mode.
– 14 –
2. Press to choose the maximum capacity, press to confirm, for example: 30 kg, enter “30000”, press to confirm 3. Press to choose the division, press to confirm, for example, when you press continuously, “1, 2, 5, 10” is displayed, then choose the division you want. Then press . 4. Press to choose the point position, after pressing continuously, it displays “0”, “1”, “2”, “3”, “4”, “0”, you can choose the position you need, then press to confirm. “0” means “0”, “1” means “0.0”, “2” means “0.00”, “3” means “0.000”, “4” means “0.0000” (If you don’t need to change the capacity, division and point, you can directly press to go to the next step 5. The weight window will display the data that the weight will be loaded on the scale (if you want to change the load weight, you can input the data that you will load on the scale). Press , the unit price window will display “LOAD”, then input the load/weight, finally press to confirm.
5.8. Upper and lower limit alarms
5.8.1 Alarm types selection Long press the key to enter the settings. The
single weight window displays: Press OFF to turn off, press
OUT to display the out of range alarm, press IN to display
– 15 –
the alarm in the range and press UP to display the
upper limit alarm only. Press to save and exit.
Short press the key to set the upper limit of the quantity. 5.8.2 Entering alarm values (Note: Long press the
key to activate the alarm, as in the first step above)
Short press the key to enter the settings and display (A-FF-O-dn). The weight window displays the alarm types: A-OUT indicates an out-of-range alarm, A-IN indicates an in-range alarm, A-UP indicates only an upper limit alarm. A. When the quantity window displays DN, enter the lower limit value, press to confirm and go to the next step. B. When the single weight window displays UP, enter the upper limit value, press to confirm and exit.
5.8.3 Press to deactivate the alarm and reset the upper and lower limit values.
5.9. UART Settings 5.9.1 After powering up and zeroing, press the . key followed by the number 8 key. The weight window will display “print” indicating external printer mode. 5.9.2 After powering up and zeroing, press the . key followed by the number 9 key. The weighing window will display “PC” indicating computer data download mode, which
– 16 –
can be downloaded to the computer using Excel spreadsheets
.
5. 10 .Print function (Note: with RS232 ) When the UART enters “print” mode:
5. 10 .1 Single print
When the weight is not zero, press the Print key to print the current weight, unit weight and quantity. The format is as follows:
5.10.2
Impression
cumulative
When multiple weights are accumulated, first adjust the weight, unit weight and quantity of the items, press the A dd key repeatedly to accumulate, and then press the Print key to print the weight, unit weight and quantity of the items repeatedly. In “Print” mode, press the “PRT” key after printing to automatically clear the accumulation, or press the “M+”+”CLR” combination key to clear the accumulation. The print format is as follows:
– 17 –
6. Computer data download function (Note: with RS232 )
When the UART switches to “PC” mode, use an RS232 to HID protocol data cable to connect the computer to the scale (Note: Counting scales with RS232 ports are supplied with this data cable). Open an Excel spreadsheet on the computer After the electronic scale is powered on and zeroed, place the items to be weighed on the scale. When the weight stabilizes, a “beep” will sound, and the computer’s Excel spreadsheet will automatically write the displayed weight data to the weighing window of the electronic scale. Remove the items from the scale, and after it returns to zero, weigh again. The Excel spreadsheet will write the second weight data (no need to press the Print key). The format is:
7 . Caution:
7. Keep away from rain and water washing ( if this happens , Please dry it easily , and find it can not work , return to seller for repair ) .
8. Please do not store in high temperature and humid place . 9. Do not let insects enter the body .
– 18 –
10. Do not subject to strong shock or overload. 11. No need to use it for a long time. Please erase it,
and put it in the bag, and charge it every 3 months. Recharge it before using it. 12. If you have any good advice, please let us know.
– 19 –
8. Routine troubleshooting:
No
WORRY
To light up,
display
1
“LB” and
alarm
LOW BATTERY MEANS
(POWER)
Turn on,
2
display “
WEIGHING ERROR
ED »
3
Turn on, count the
jumps
Weight window number changes, cannot
weigh
4
When charging, counting
Weight window number changes, cannot
load
Digital 8 5 is not
complete
Digital 8 is not complete, or less
the key does not
press the key
6
works
can’t
REASON Battery without power
Broken battery
LOAD CELL LINE SEALING
– OFF LOAD CELL
IN CONTACT WITH SOMETHING BROKEN LOAD
CELL BROKEN PCB TOO WET
TOO STRONG LOAD
CELL IN CONTACT WITH SOMETHING
LOAD CELL LINE SEALING – OFF BROKEN
LOAD CELL
BROKEN PCB
Adaptor
electronic short circuit
Broken LCD display Broken disk
Key is stuck Key can’t return
ADVISOR CHARGING
change battery
RE-CLOSING
CHECK
CHANGE LOAD CELL
CHANGE PCB DRY PCB and
load cell disassemble PCB using alcohol cleaner first, then
dry it CHECK RE-CLOSING
CHANGE LOAD CELL CHANGE PCB change adapter using rubber insulated wire connecting together change LED change display board check change key
– 20 –
not
function
back
short circuit of the key electronic circuit
using a rubber insulated wire connecting together
BROKEN PCB
CHANGE THE PCB
KEYBOARD CORROSION
CHANGE THE KEYBOARD
the cell line of
load and PCB link are
verification
broken
NONE
7
WEIGHT
no weight
LOAD CELL LINE SEALING
– OFF
RE-CLOSURE
LOAD CELL CHANGE CELL
BROKEN
DUMP
BROKEN PCB
CHANGE THE PCB
the on/off button CHANGE THE BUTTON
is broken
ON/OFF
CHECK THAT THE
8
can’t turn on
press the on/off button,
cannot turn on
BATTERY POWER IS QUITE
HIGH
LOW VOLTAGE, CHARGING
BROKEN BATTERY
CHANGE IT, V<5.25V
BROKEN PCB
CHANGE THE PCB
CHECK THAT THE
when we turn on DI DI when we turn on DI DI 9 DI its all the DI its all the time
time
BATTERY POWER IS QUITE
HIGH
LOW VOLTAGE, RECHARGE
BROKEN BATTERY CHANGE IT, V<5.25V
BROKEN PCB
CHANGE THE PCB
turn on the sound normally 10, but no
words
turn on the sound normally, but
no words
check that the connection between the display panel and the PCB is ok broken
display panel
turn off, connect the billboard link
change the billboard
11
Turn on the show “8” all the
time
when the scale is turned on, all windows display 8, cannot weigh, and the noise is normal
check that the connection between the display panel and the PCB is ok broken
display panel
turn off, connect the billboard link
change the billboard
12 cannot When charging, the
Adapter
change the adapter
– 21 –
recharge
AC light works, but cannot charge
When the AC charging indicator light does not work,
13
no backlight
for the LCD screen
Turn on, there is no light on the
LCD screen
Broken battery
adapter plug adapter broken charging connection
charging connection
to PCB link is disabled BROKEN PCB
Broken battery power saving function
check if LCD part
is sealed
Broken LCD screen
change battery
change adapter disassemble charging change
connection part
re-sealing CHANGE PCB change battery reset backlight
function RE-SEAL CHANGE LCD SCREEN
Items 1 Sale Territory 2 Name 3 Model
4 Parameter
Description
North America
KF-H2D Counting Scale Rated Power: 110V AC/60Hz, Capacity: 30kg, Division: 1g, RS 232
Items Territory of 1 sale 2 Name 3 Model
Description North America KF-H2C Counting Scale
– 22 –
4 Parameter
Rated power: 110 V AC/60 Hz, capacity: 30 kg, division: 1 g, RS 232
Items 1 Sale Territory 2 Name 3 Model
4 Parameter
Description
Europe
Counting Scale KF-H2C Rated power: 220-240 V AC/50 Hz, capacity: 30 kg, division: 1 g, RS 232
Items 1 Sale Territory 2 Name 3 Model
4 Parameter
Description
Australia
Counting Scale KF-H2C Rated power: 220-240V AC/50Hz, Capacity: 30kg, Division: 1g, RS 232
Items 1 Sale Territory 2 Name 3 Model
4 Parameter
Description
North America
KF-H2C Counting Scale Rated Power: 110V AC/60Hz, Capacity: 30kg, Division: 1g
– 23 –
Items 1 Sale Territory 2 Name 3 Model
4 Parameter
Description
Europe
Counting Scale KF-H2C Rated power: 220-240 V AC/50 Hz, capacity: 30 kg, division: 1 g
Items 1 Sale Territory 2 Name 3 Model
4 Parameter
Description
North America
KF-H2C Counting Scale Rated power: 110V AC/60Hz, Capacity: 15kg, Division: 0.5g, RS 232
– 24 –
Manufacturer: Shanghaimuxinmuyeyouxiangongsi Address: Shuangchenglu 803nong11hao1602A-1609shi, baoshanqu, Shanghai 200000 CN. Imported into Australia: SIHAO PTY LTD. 1 ROKEVA STREETWOOD NSW 2122 Australia Imported into the USA: Sanven Technology Ltd. Suite 250, 9166 Anaheim Place, Rancho Cucamonga, CA 91730
EC REP E-CrossStu GmbH Mainzer Landstr.69, 60329 Frankfurt am Main. YH CONSULTING LIMITED.
UK REP C/O YH Consulting Limited Office 147, Centurion House, London Road, Staines-upon-Thames, Surrey, TW18 4AX
– 25 –
Technical Support and Electronic Warranty Certificate www.vevor.com/support
-1-
Technischer Support und E-Garantie-Certifikat www.vevor.com/support
Zählwaage BENUTZERHANDBUCH
MODEL: KF-H2C / KF-H2D
We continue to be committed to providing you tools with competitive price. “Save Half”, “Half Price” or any other similar expressions used by us only represents an estimate of savings you might benefit from buying certain tools with us compared to the major top brands and does not necessarily mean to cover all categories of tools offered by us. You are kindly reminded to verify carefully when you are placing an order with us if you are
actually saving half in comparison with the top major brands.
-2-
MODEL: KF-H2C / KF-H2D
COUNTING SCALE
(Das Bild dient nur als References, bitte beziehen Sie sich auf das tatsächliche Objekt)
NEED HELP? CONTACT US! Have product questions? Need technical support? Please feel free to contact us:
Technical Support and E-Warranty Certificate www.vevor.com/support
This is the original instruction, please read all manual instructions carefully before operating. VEVOR reserves a clear interpretation of our user manual. The appearance of the product shall be subject to the product you received. Please forgive us that we won’t inform you again if there are any technology or software updates on our product.
Documents / Resources
 |
VEVOR KF-H2C,KF-H2D Counting Scale [pdf] User Manual sku4, sku10, KF-H2C KF-H2D Counting Scale, KF-H2C KF-H2D, Counting Scale, Scale |