1. Вступ
This manual provides detailed instructions for the proper installation, operation, and maintenance of your Spider SR-W122D 12-inch Dual Voice Coil Subwoofer. To ensure optimal performance and longevity of your product, please read this manual thoroughly before use and retain it for future reference.
2. Інформація про безпеку
- Завжди від'єднуйте негативну клему акумулятора автомобіля перед початком будь-яких електромонтажних робіт.
- Переконайтеся, що вся проводка належним чином ізольована, щоб запобігти коротким замиканням.
- Використовуйте проводку відповідного калібру для підключення живлення та динаміків, щоб задовольнити потреби сабвуфера в живлення.
- Mount the subwoofer securely to prevent movement during vehicle operation, which could cause damage or injury.
- Уникайте впливу надмірної вологи або екстремальних температур на сабвуфер.
- Do not operate the subwoofer beyond its rated power specifications to prevent damage.
3. Вміст упаковки
Upon unpacking, please verify that the following item is included:
- 1x Spider SR-W122D 12-inch Dual Voice Coil Subwoofer
4. Продукт закінчивсяview
The Spider SR-W122D is a high-performance 12-inch subwoofer designed for car audio applications, featuring a dual voice coil for flexible wiring options and robust power handling.

Figure 4.1: Spider SR-W122D 12-inch Subwoofer shown with its retail packaging.

Малюнок 4.2: Верх view of the subwoofer, highlighting the cone and surround.

Малюнок 4.3: Сторона view of the subwoofer, illustrating the voice coil wiring and basket structure.
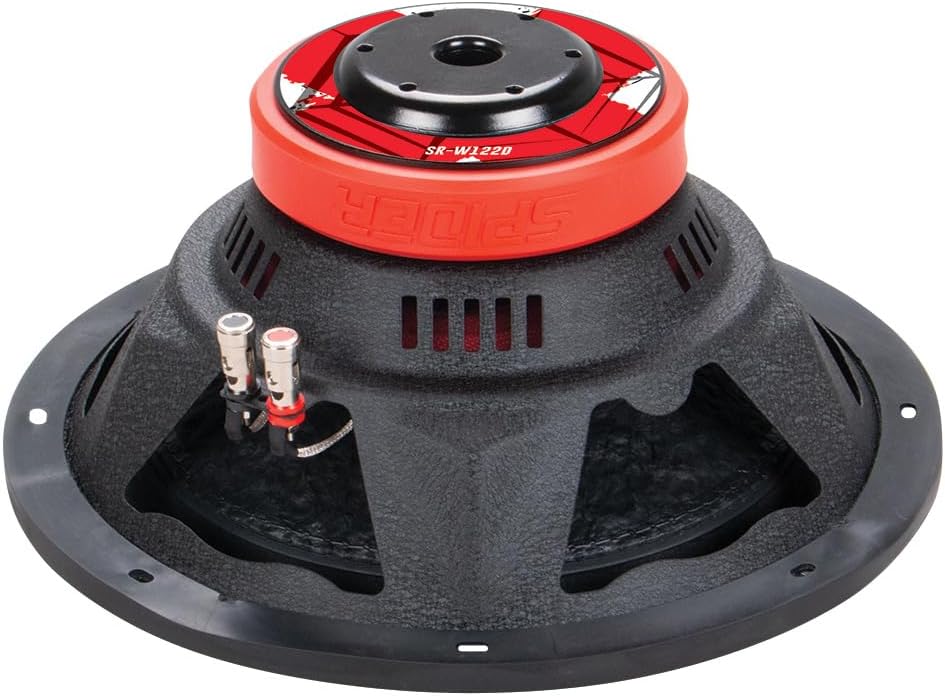
Малюнок 4.4: Нижня частина view of the subwoofer, displaying the magnet assembly and speaker terminals.
5. Налаштування та встановлення
5.1 Перевірки перед встановленням
- Забезпечте свій amplifier is compatible with a 4 Ohm load (or 2 Ohm/8 Ohm depending on wiring configuration).
- Verify that the mounting location and enclosure are suitable for a 12-inch subwoofer.
- Gather all necessary tools and wiring materials.
5.2 Конфігурації підключення (подвійні звукові котушки 4 Ом)
The SR-W122D features dual 4 Ohm voice coils, offering flexibility in wiring to achieve different impedance loads for your ampліфірник.
- Паралельне підключення (навантаження 2 Ом): З'єднайте позитивні клеми обох звукових котушок разом, а негативні клеми обох звукових котушок разом. Потім під'єднайте об'єднаний позитивний до ampпозитивний вихідний сигнал ліфіера та комбінований негативний для ampнегативний вихід затримувача. Ця конфігурація створює навантаження 2 Ом на ampліфірник.
- Послідовне підключення (навантаження 8 Ом): Підключіть позитивний вивід однієї звукової котушки до негативного виводу іншої звукової котушки. Потім підключіть решту позитивного виводу до ampпозитивний вихід нагрівача, а решта негативного виводу - до ampнегативний вихід затримувача. Ця конфігурація створює навантаження 8 Ом для ampліфірник.
Завжди забезпечуйте своє amplifier is stable at the chosen impedance load. Consult your amplifier's manual for compatibility.
5.3 Корпус та монтаж
- Install the subwoofer into a suitable enclosure (sealed or ported) designed for a 12-inch driver.
- Ensure the enclosure is robust and free from air leaks.
- Secure the subwoofer to the enclosure using appropriate screws, ensuring a tight seal.
5.4 Підключення до Ampлібератор
- Connect the subwoofer's wired output (from your chosen impedance configuration) to the amplifier's subwoofer output terminals.
- Ensure correct polarity (+ to + and - to -) to avoid phase issues.
- Ще раз перевірте всі підключення перед увімкненням системи.
6. Інструкція з експлуатації
6.1 Початкове ввімкнення та налаштування
- Почніть з amplifier's gain control set to minimum.
- Turn on your audio system and play music with a good bass range.
- Повільно збільшуйте amplifier's gain until the desired bass level is achieved without distortion.
- Налаштуйте фільтр низьких частот (LPF) на вашому amplifier to blend the subwoofer's output with your main speakers (typically between 80Hz and 120Hz).
- Adjust the phase control (if available on your amplifier) to ensure optimal bass response.
6.2 Період обкатки
Allow a break-in period of approximately 10-20 hours of moderate listening before operating the subwoofer at high volumes. This allows the suspension components to loosen up, leading to improved performance and longevity.
7. Технічне обслуговування
- Прибирання: Use a soft, dry cloth to wipe down the subwoofer cone and surround. Avoid using harsh chemicals or excessive moisture.
- Огляд: Periodically check all wiring connections for tightness and signs of corrosion. Inspect the subwoofer's cone and surround for any tears or damage.
- Зберігання: If storing the subwoofer for an extended period, ensure it is kept in a cool, dry place, away from direct sunlight and extreme temperatures.
8. Вирішення проблем
| проблема | Можлива причина | Рішення |
|---|---|---|
| Немає звуку з сабвуфера |
|
|
| Спотворений або нечіткий бас |
|
|
| Сабвуфер нагрівається |
|
|
9. Технічні характеристики
| Особливість | Деталь |
|---|---|
| Назва моделі | SR-W122D |
| Тип динаміка | Сабвуфер |
| Діаметр сабвуфера | 12 дюймів |
| Імпеданс | Dual Voice Coil 4 Ohms (can be wired to 2 or 8 Ohms) |
| Максимальна вихідна потужність | 1500 Вт |
| Потужність RMS | 750 Вт |
| Розмір звукової котушки | 2.5 дюймів |
| Voice Coil Winding | 15 мм |
| Вага магніту | 40 унцій |
| матеріал | Металік |
| Колір | Червоний |
| Розміри продукту | 35.5cm (Depth) x 35.5cm (Width) x 21.3cm (Height) |
| Вага продукту | 6 кілограма |
| Рекомендоване використання | Автомобільна аудіосистема |
| Сумісні пристрої | Ampлібератор |
| Технологія підключення | RCA (for amplifier input, not subwoofer direct) |
| Ampтип ліфікації | пасивний |
10. Інформація про гарантію
This product is covered by a standard manufacturer's warranty against defects in materials and workmanship. The duration and terms of the warranty may vary by region and retailer. Please retain your proof of purchase for any warranty claims. Damage resulting from improper installation, abuse, or unauthorized modifications is not covered under warranty.
11. Підтримка
For technical assistance, troubleshooting beyond this manual, or warranty inquiries, please contact your retailer or the manufacturer's customer support. Refer to your purchase documentation for specific contact details.


